' || description || '
' as atom_content_html from museums order by created desc limit 15 ``` You can try this query by [pasting it in here](https://www.niche-museums.com/browse) - then click the `.atom` link to see it as an Atom feed. ## Using a canned query Datasette's [canned query mechanism](https://datasette.readthedocs.io/en/stable/sql_queries.html#canned-queries) is a useful way to configure feeds. If a canned query definition has a `title` that will be used as the title of the Atom feed. Here's an example, defined using a `metadata.yaml` file: ```yaml databases: browse: queries: feed: title: Niche Museums sql: |- select 'tag:niche-museums.com,' || substr(created, 0, 11) || ':' || id as atom_id, name as atom_title, created as atom_updated, 'https://www.niche-museums.com/browse/museums/' || id as atom_link, coalesce( '' || description || '
' as atom_content_html from museums order by created desc limit 15 ``` ## Disabling HTML filtering The HTML allow-list used by Bleach for the `atom_content_html` column can be found in the `clean(html)` function at the bottom of [datasette_atom/__init__.py](https://github.com/simonw/datasette-atom/blob/main/datasette_atom/__init__.py). You can disable Bleach entirely for Atom feeds generated using a canned query. You should only do this if you are certain that no user-provided HTML could be included in that value. Here's how to do that in `metadata.json`: ```json { ""plugins"": { ""datasette-atom"": { ""allow_unsafe_html_in_canned_queries"": true } } } ``` Setting this to `true` will disable Bleach filtering for all canned queries across all databases. You can disable Bleach filtering just for a specific list of canned queries like so: ```json { ""plugins"": { ""datasette-atom"": { ""allow_unsafe_html_in_canned_queries"": { ""museums"": [""latest"", ""moderation""] } } } } ``` This will disable Bleach just for the canned queries called `latest` and `moderation` in the `museums.db` database. ",Simon Willison,,text/markdown,https://github.com/simonw/datasette-atom,,"Apache License, Version 2.0",,,https://pypi.org/project/datasette-atom/,,https://pypi.org/project/datasette-atom/,"{""CI"": ""https://github.com/simonw/datasette-atom/actions"", ""Changelog"": ""https://github.com/simonw/datasette-atom/releases"", ""Homepage"": ""https://github.com/simonw/datasette-atom"", ""Issues"": ""https://github.com/simonw/datasette-atom/issues""}",https://pypi.org/project/datasette-atom/0.8.1/,"[""datasette (>=0.49)"", ""feedgen"", ""bleach"", ""pytest ; extra == 'test'"", ""pytest-asyncio ; extra == 'test'"", ""httpx ; extra == 'test'""]",,0.8.1,0, datasette-auth-existing-cookies,Datasette plugin that authenticates users based on existing domain cookies,[],"# datasette-auth-existing-cookies [](https://pypi.org/project/datasette-auth-existing-cookies/) [](https://circleci.com/gh/simonw/datasette-auth-existing-cookies) [](https://google.com/simonw/datasette-auth-existing-cookies/blob/master/LICENSE) Datasette plugin that authenticates users based on existing domain cookies. ## When to use this This plugin allows you to build custom authentication for Datasette when you are hosting a Datasette instance on the same domain as another, authenticated website. Consider a website on `www.example.com` which supports user authentication. You could run Datasette on `data.example.com` in a way that lets it see cookies that were set for the `.example.com` domain. Using this plugin, you could build an API endpoint at `www.example.com/user-for-cookies` which returns a JSON object representing the currently signed-in user, based on their cookies. The plugin can protect any hits to any `data.example.com` pages by passing their cookies through to that API and seeing if the user should be logged in or not. You can also use subclassing to decode existing cookies using some other mechanism. ## Configuration This plugin requires some configuration in the Datasette [metadata.json file](https://datasette.readthedocs.io/en/stable/plugins.html#plugin-configuration). It needs to know the following: * Which domain cookies should it be paying attention to? If you are authenticating against Dango this is probably `[""sessionid""]`. * What's an API it can send the incoming cookies to that will decipher them into some user information? * Where should it redirect the user if they need to sign in? Example configuration setting all three of these values looks like this: ```json { ""plugins"": { ""datasette-auth-existing-cookies"": { ""api_url"": ""http://www.example.com/user-from-cookies"", ""auth_redirect_url"": ""http://www.example.com/login"", ""original_cookies"": [""sessionid""] } } } ``` With this configuration the user's current `sessionid` cookie will be passed to the API URL, as a regular cookie header. You can use the `""headers_to_forward""` configuration option to specify a list of additional headers from the request that should be forwarded on to the `api_url` as querystring parameters. For example, if you add this to the above configuration: ```json ""headers_to_forward"": [""host"", ""x-forwarded-for""] ``` Then a hit to `https://data.example.com/` would make the following API call: http://www.example.com/user-from-cookies?host=data.example.com&x-forwarded-for=64.18.15.255 The API URL should then return either an empty JSON object if the user is not currently signed in: ```json {} ``` Or a JSON object representing the user if they ARE signed in: ```json { ""id"": 123, ""username"": ""simonw"" } ``` This object can contain any keys that you like - the information will be stored in a new signed cookie and made available to Datasette code as the `""auth""` dictionary on the ASGI `scope`. I suggest including at least an `id` and a `username`. ## Templates You probably want your user's to be able to see that they are signed in. The plugin makes the `auth` data from above directly available within Datasette's templates. You could use a custom `base.html` template (see [template documentation](https://datasette.readthedocs.io/en/stable/custom_templates.html#custom-templates)) that looks like this: ```html+django {% extends ""default:base.html"" %} {% block extra_head %} {% endblock %} {% block nav %} {{ super() }} {% if auth and auth.username %}{{ auth.username }} · Log out
{% endif %} {% endblock %} ``` ## Other options - `require_auth`. This defaults to `True`. You can set it to `False` if you want unauthenticated users to be able to view the Datasette instance. - `cookie_secret`. You can use this to set the signing secret that will be used for the cookie set by this plugin (you should use [secret configuration values](https://datasette.readthedocs.io/en/stable/plugins.html#secret-configuration-values) for this). If you do not set a secret the plugin will create one on first run and store it in an appropriate state directory based on your operating system (the `user_state_dir` according to [appdirs](https://pypi.org/project/appdirs/)). - `cookie_ttl`. The plugin sets its own cookie to avoid hitting the backend API for every incoming request. By default it still hits the API at most every 10 seconds, in case the user has signed out on the main site. You can raise or lower the timeout using this setting. - `trust_x_forwarded_proto`. If you are running behind a proxy that adds HTTPS support for you, you may find that the plugin incorrectly constructs `?next=` URLs with the incorrect scheme. If you know your proxy sends the `x-forwarded-proto` header (you can investigate this with the [datasette-debug-asgi](https://github.com/simonw/datasette-debug-asgi) plugin) setting the `trust_x_forwarded_proto` option to True will cause the plugin to trust that header. - `next_secret`. See below. ## Login redirect mechanism If the user does not have a valid authentication cookie they will be redirected to an existing login page. This page is specified using the `auth_redirect_url` setting. Given the above example configuration, the URL that the user should be sent to after they log in will be specified as the `?next=` parameter to that page, for example: http://www.example.com/login?next=http://foo.example.com/ It is up to you to program the login endpoint such that it is not vulnerable to an [Unvalidated redirect vulnerability](https://cheatsheetseries.owasp.org/cheatsheets/Unvalidated_Redirects_and_Forwards_Cheat_Sheet.html). One way to do this is by verifying that the URL passed to `?next=` is a URL that belongs to a trusted website. Django's own login view [does this](https://github.com/django/django/blob/50cf183d219face91822c75fa0a15fe2fe3cb32d/django/contrib/auth/views.py#L69-L80) by verifying that the URL hostname is on an approved list. Another way to do this is to use the `next_secret` configuration parameter to set a signing secret for that URL. This signing secret will be used to construct a `?next_sig=` signed token using the Python [itsdangerous](https://pythonhosted.org/itsdangerous/) module, like this: ?next_sig=Imh0dHBzOi8vZGVtby5leGFtcGxlLmNvbS9mb28vYmFyIg.7JdhRCoP7Ow1cRF1ZVengC-qk6c You should use Datasette's [secret configuration values](https://datasette.readthedocs.io/en/stable/plugins.html#secret-configuration-values) mechanism to set this secret from an environment variable, like so: { ""plugins"": { ""datasette-auth-existing-cookies"": { ""api_url"": ""http://www.example.com/user-from-cookies"", ""auth_redirect_url"": ""http://www.example.com/login"", ""original_cookies"": [""sessionid""], ""next_secret"": { ""$env"": ""NEXT_SECRET"" } } } } You can verify this secret in Python code for your own login form like so: ```python from itsdangerous import URLSafeSerializer, BadSignature def verify_next_sig(next_sig): signer = URLSafeSerializer(next_secret) try: decoded = signer.loads(next_sig) return True except BadSignature: return False ``` If you want to roll your own signing mechanism here you can do so by subclassing `ExistingCookiesAuth` and over-riding the `build_auth_redirect(next_url)` method. ## Permissions If the current user is signed in but should not have permission to access the Datasette instance, you can indicate so by having the API return the following: ```json { ""forbidden"": ""You do not have permission to access this page."" } ``` The key must be `""forbidden""`. The value can be any string - it will be displayed to the user. This is particularly useful when handling multiple different subdomains. You may get an API call to the following: http://www.example.com/user-from-cookies?host=a-team.example.com You can check if the authenticated user (based on their cookies) has permission to access to the `a-team` Datasette instance, and return a `""forbidden""` JSON object if they should not be able to view it. If a user is allowed to access Datasette (because the API returned their user identity as JSON), the plugin will set a cookie on that subdomain granting them access. This cookie defaults to expiring after ten seconds. This means that if a user has permission removed for any reason they will still have up to ten seconds in which they will be able to continue accessing Datasette. If this is not acceptable to you the `cookie_ttl` setting can be used to reduce this timeout, at the expense of incurring more frequent API calls to check user permissions. ",Simon Willison,,text/markdown,https://github.com/simonw/datasette-auth-existing-cookies,,"Apache License, Version 2.0",,,https://pypi.org/project/datasette-auth-existing-cookies/,,https://pypi.org/project/datasette-auth-existing-cookies/,"{""Homepage"": ""https://github.com/simonw/datasette-auth-existing-cookies""}",https://pypi.org/project/datasette-auth-existing-cookies/0.7/,"[""appdirs"", ""httpx"", ""itsdangerous"", ""datasette ; extra == 'test'"", ""pytest ; extra == 'test'"", ""pytest-asyncio ; extra == 'test'"", ""asgiref (~=3.1.2) ; extra == 'test'""]",>=3.6,0.7,0, datasette-auth-github,Datasette plugin and ASGI middleware that authenticates users against GitHub,[],"# datasette-auth-github [](https://pypi.org/project/datasette-auth-github/) [](https://github.com/simonw/datasette-auth-github/releases) [](https://github.com/simonw/datasette-auth-github/actions?query=workflow%3ATest) [](https://github.com/simonw/datasette-auth-github/blob/main/LICENSE) Datasette plugin that authenticates users against GitHub. - [Setup instructions](#setup-instructions) - [The authenticated actor](#the-authenticated-actor) - [Restricting access to specific users](#restricting-access-to-specific-users) - [Restricting access to specific GitHub organizations or teams](#restricting-access-to-specific-github-organizations-or-teams) - [What to do if a user is removed from an organization or team](#what-to-do-if-a-user-is-removed-from-an-organization-or-team) ## Setup instructions * Install the plugin: `datasette install datasette-auth-github` * Create a GitHub OAuth app: https://github.com/settings/applications/new * Set the Authorization callback URL to `http://127.0.0.1:8001/-/github-auth-callback` * Create a `metadata.json` file with the following structure: ```json { ""title"": ""datasette-auth-github demo"", ""plugins"": { ""datasette-auth-github"": { ""client_id"": {""$env"": ""GITHUB_CLIENT_ID""}, ""client_secret"": {""$env"": ""GITHUB_CLIENT_SECRET""} } } } ``` Now you can start Datasette like this, passing in the secrets as environment variables: $ GITHUB_CLIENT_ID=XXX GITHUB_CLIENT_SECRET=YYY datasette \ fixtures.db -m metadata.json Note that hard-coding secrets in `metadata.json` is a bad idea as they will be visible to anyone who can navigate to `/-/metadata`. Instead, we use Datasette's mechanism for [adding secret plugin configuration options](https://docs.datasette.io/en/stable/plugins.html#secret-configuration-values). By default anonymous users will still be able to interact with Datasette. If you wish all users to have to sign in with a GitHub account first, add this to your ``metadata.json``: ```json { ""allow"": { ""id"": ""*"" }, ""plugins"": { ""datasette-auth-github"": { ""..."": ""..."" } } } ``` ## The authenticated actor Visit `/-/actor` when signed in to see the shape of the authenticated actor. It should look something like this: ```json { ""actor"": { ""display"": ""simonw"", ""gh_id"": ""9599"", ""gh_name"": ""Simon Willison"", ""gh_login"": ""simonw"", ""gh_email"": ""..."", ""gh_orgs"": [ ""dogsheep"", ""datasette-project"" ], ""gh_teams"": [ ""dogsheep/test"" ] } } ``` The `gh_orgs` and `gh_teams` properties will only be present if you used `load_teams` or `load_orgs`, documented below. ## Restricting access to specific users You can use Datasette's [permissions mechanism](https://docs.datasette.io/en/stable/authentication.html) to specify which user or users are allowed to access your instance. Here's how to restrict access to just GitHub user `simonw`: ```json { ""allow"": { ""gh_login"": ""simonw"" }, ""plugins"": { ""datasette-auth-github"": { ""..."": ""..."" } } } ``` This `""allow""` block can be positioned at the database, table or query level instead: see [Configuring permissions in metadata.json](https://docs.datasette.io/en/stable/authentication.html#configuring-permissions-in-metadata-json) for details. Note that GitHub allows users to change their username, and it is possible for other people to claim old usernames. If you are concerned that your users may change their usernames you can key the allow blocks against GitHub user IDs instead, which do not change: ```json { ""allow"": { ""gh_id"": ""9599"" } } ``` ## Restricting access to specific GitHub organizations or teams You can also restrict access to users who are members of a specific GitHub organization. You'll need to configure the plugin to check if the user is a member of that organization when they first sign in. You can do that using the `""load_orgs""` plugin configuration option. Then you can use `""allow"": {""gh_orgs"": [...]}` to specify which organizations are allowed access. ```json { ""plugins"": { ""datasette-auth-github"": { ""..."": ""..."", ""load_orgs"": [""your-organization""] } }, ""allow"": { ""gh_orgs"": ""your-organization"" } } ``` If your organization is [arranged into teams](https://help.github.com/en/articles/organizing-members-into-teams) you can restrict access to a specific team like this: ```json { ""plugins"": { ""datasette-auth-github"": { ""..."": ""..."", ""load_teams"": [ ""your-organization/staff"", ""your-organization/engineering"", ] } }, ""allows"": { ""gh_team"": ""your-organization/engineering"" } } ``` ## What to do if a user is removed from an organization or team A user's organization and team memberships are checked once, when they first sign in. Those teams and organizations are then persisted in the user's signed `ds_actor` cookie. This means that if a user is removed from an organization or team but still has a Datasette cookie, they will still be able to access that Datasette instance. You can remedy this by rotating the `DATASETTE_SECRET` environment variable any time you make changes to your GitHub organization members. Changing this value will cause all of your existing users to be signed out, by invalidating their cookies. When they sign back in again their new memberships will be recorded in a new cookie. See [Configuring the secret](https://docs.datasette.io/en/stable/settings.html?highlight=secret#configuring-the-secret) in the Datasette documentation for more details. ",Simon Willison,,text/markdown,https://github.com/simonw/datasette-auth-github,,"Apache License, Version 2.0",,,https://pypi.org/project/datasette-auth-github/,,https://pypi.org/project/datasette-auth-github/,"{""Homepage"": ""https://github.com/simonw/datasette-auth-github""}",https://pypi.org/project/datasette-auth-github/0.13.1/,"[""datasette (>=0.51)"", ""datasette ; extra == 'test'"", ""pytest ; extra == 'test'"", ""pytest-asyncio ; extra == 'test'"", ""sqlite-utils ; extra == 'test'"", ""pytest-httpx ; extra == 'test'""]",,0.13.1,0, datasette-auth-passwords,Datasette plugin for authenticating access using passwords,[],"# datasette-auth-passwords [](https://pypi.org/project/datasette-auth-passwords/) [](https://github.com/simonw/datasette-auth-passwords/releases) [](https://github.com/simonw/datasette-auth-passwords/blob/master/LICENSE) Datasette plugin for authenticating access using passwords ## Installation Install this plugin in the same environment as Datasette. $ datasette install datasette-auth-passwords ## Demo A demo of this plugin is running at https://datasette-auth-passwords-demo.datasette.io/ The demo is configured to show the `public.db` database to everyone, but the `private.db` database only to logged in users. You can log in at https://datasette-auth-passwords-demo.datasette.io/-/login with username `root` and password `password!`. ## Usage This plugin works based on a list of username/password accounts that are hard-coded into the plugin configuration. First, you'll need to create a password hash. There are three ways to do that: - Install the plugin, then use the interactive tool located at `/-/password-tool` - Use the hosted version of that tool at https://datasette-auth-passwords-demo.datasette.io/-/password-tool - Use the `datasette hash-password` command, described below Now add the following to your `metadata.json`: ```json { ""plugins"": { ""datasette-auth-passwords"": { ""someusername_password_hash"": { ""$env"": ""PASSWORD_HASH_1"" } } } } ``` The password hash can now be specified in an environment variable when you run Datasette. You can do that like so: PASSWORD_HASH_1='pbkdf2_sha256$...' \ datasette -m metadata.json Be sure to use single quotes here otherwise the `$` symbols in the password hash may be incorrectly interpreted by your shell. You will now be able to log in to your instance using the form at `/-/login` with `someusername` as the username and the password that you used to create your hash as the password. You can include as many accounts as you like in the configuration, each with different usernames. ### datasette hash-password The plugin exposes a new CLI command, `datasette hash-password`. You can run this without arguments to interactively create a new password hash: ``` % datasette hash-password Password: Repeat for confirmation: pbkdf2_sha256$260000$1513... ``` Or if you want to use it as part of a script, you can add the `--no-confirm` option to generate a hash directly from a value passed to standard input: ``` % echo 'my password' | datasette hash-password --no-confirm pbkdf2_sha256$260000$daa... ``` ### Specifying actors By default, a logged in user will result in an [actor block](https://datasette.readthedocs.io/en/stable/authentication.html#actors) that just contains their username: ```json { ""id"": ""someusername"" } ``` You can customize the actor that will be used for a username by including an `""actors""` configuration block, like this: ```json { ""plugins"": { ""datasette-auth-passwords"": { ""someusername_password_hash"": { ""$env"": ""PASSWORD_HASH_1"" }, ""actors"": { ""someusername"": { ""id"": ""someusername"", ""name"": ""Some user"" } } } } } ``` ### HTTP Basic authentication option This plugin defaults to implementing login using an HTML form that sets a signed authentication cookie. You can alternatively configure it to use [HTTP Basic authentication](https://developer.mozilla.org/en-US/docs/Web/HTTP/Authentication#basic_authentication_scheme) instead. Do this by adding `""http_basic_auth"": true` to the `datasette-auth-passwords` block in your plugin configuration. This option introduces the following behaviour: - Account usernames and passwords are configured in the same way as form-based authentication - Every page within Datasette - even pages that normally do not use authentication, such as static assets - will display a browser login prompt - Users will be unable to log out without closing their browser entirely There is a demo of this mode at https://datasette-auth-passwords-http-basic-demo.datasette.io/ - sign in with username `root` and password `password!` ### Using with datasette publish If you are publishing data using a [datasette publish](https://datasette.readthedocs.io/en/stable/publish.html#datasette-publish) command you can use the `--plugin-secret` option to securely configure your password hashes (see [secret configuration values](https://datasette.readthedocs.io/en/stable/plugins.html#secret-configuration-values)). You would run the command something like this: datasette publish cloudrun mydatabase.db \ --install datasette-auth-passwords \ --plugin-secret datasette-auth-passwords root_password_hash 'pbkdf2_sha256$...' \ --service datasette-auth-passwords-demo This will allow you to log in as username `root` using the password that you used to create the hash. ## Development To set up this plugin locally, first checkout the code. Then create a new virtual environment: cd datasette-auth-passwords python3 -mvenv venv source venv/bin/activate Or if you are using `pipenv`: pipenv shell Now install the dependencies and tests: pip install -e '.[test]' To run the tests: pytest ",Simon Willison,,text/markdown,https://github.com/simonw/datasette-auth-passwords,,"Apache License, Version 2.0",,,https://pypi.org/project/datasette-auth-passwords/,,https://pypi.org/project/datasette-auth-passwords/,"{""CI"": ""https://github.com/simonw/datasette-auth-passwords/actions"", ""Changelog"": ""https://github.com/simonw/datasette-auth-passwords/releases"", ""Homepage"": ""https://github.com/simonw/datasette-auth-passwords"", ""Issues"": ""https://github.com/simonw/datasette-auth-passwords/issues""}",https://pypi.org/project/datasette-auth-passwords/1.0/,"[""datasette (>=0.59)"", ""pytest ; extra == 'test'"", ""pytest-asyncio ; extra == 'test'"", ""httpx ; extra == 'test'""]",,1.0,0, datasette-auth-tokens,Datasette plugin for authenticating access using API tokens,[],"# datasette-auth-tokens [](https://pypi.org/project/datasette-auth-tokens/) [](https://github.com/simonw/datasette-auth-tokens/releases) [](https://github.com/simonw/datasette-auth-tokens/actions?query=workflow%3ATest) [](https://github.com/simonw/datasette-auth-tokens/blob/main/LICENSE) Datasette plugin for authenticating access using API tokens ## Installation Install this plugin in the same environment as Datasette. $ pip install datasette-auth-tokens ## Hard-coded tokens Read about Datasette's [authentication and permissions system](https://datasette.readthedocs.io/en/latest/authentication.html). This plugin lets you configure secret API tokens which can be used to make authenticated requests to Datasette. First, create a random API token. A useful recipe for doing that is the following: $ python -c 'import secrets; print(secrets.token_hex(32))' 5f9a486dd807de632200b17508c75002bb66ca6fde1993db1de6cbd446362589 Decide on the actor that this token should represent, for example: ```json { ""bot_id"": ""my-bot"" } ``` You can then use `""allow""` blocks to provide that token with permission to access specific actions. To enable access to a configured writable SQL query you could use this in your `metadata.json`: ```json { ""plugins"": { ""datasette-auth-tokens"": { ""tokens"": [ { ""token"": { ""$env"": ""BOT_TOKEN"" }, ""actor"": { ""bot_id"": ""my-bot"" } } ] } }, ""databases"": { "":memory:"": { ""queries"": { ""show_version"": { ""sql"": ""select sqlite_version()"", ""allow"": { ""bot_id"": ""my-bot"" } } } } } } ``` This uses Datasette's [secret configuration values mechanism](https://datasette.readthedocs.io/en/stable/plugins.html#secret-configuration-values) to allow the secret token to be passed as an environment variable. Run Datasette like this: BOT_TOKEN=""this-is-the-secret-token"" \ datasette -m metadata.json You can now run authenticated API queries like this: $ curl -H 'Authorization: Bearer this-is-the-secret-token' \ 'http://127.0.0.1:8001/:memory:/show_version.json?_shape=array' [{""sqlite_version()"": ""3.31.1""}] Additionally you can allow passing the token as a query string parameter, although that's disabled by default given the security implications of URLs with secret tokens included. This may be useful to easily allow embedding data between different services. Simply enable it using the `param` config value: ```json { ""plugins"": { ""datasette-auth-tokens"": { ""tokens"": [ { ""token"": { ""$env"": ""BOT_TOKEN"" }, ""actor"": { ""bot_id"": ""my-bot"" }, } ], ""param"": ""_auth_token"" } }, ""databases"": { "":memory:"": { ""queries"": { ""show_version"": { ""sql"": ""select sqlite_version()"", ""allow"": { ""bot_id"": ""my-bot"" } } } } } } ``` You can now run authenticated API queries like this: $ curl http://127.0.0.1:8001/:memory:/show_version.json?_shape=array&_auth_token=this-is-the-secret-token [{""sqlite_version()"": ""3.31.1""}] ## Tokens from your database As an alternative (or in addition) to the hard-coded list of tokens you can store tokens in a database table and configure the plugin to access them using a SQL query. Your query needs to take a `:token_id` parameter and return at least two columns: one called `token_secret` and one called `actor_*` - usually `actor_id`. Further `actor_` prefixed columns can be returned to provide more details for the authenticated actor. Here's a simple example of a configuration query: ```sql select actor_id, actor_name, token_secret from tokens where token_id = :token_id ``` This can run against a table like this one: | token_id | token_secret | actor_id | actor_name | | -------- | ------------ | -------- | ---------- | | 1 | bd3c94f51fcd | 78 | Cleopaws | | 2 | 86681b4d6f66 | 32 | Pancakes | The tokens are formed as the token ID, then a hyphen, then the token secret. For example: - `1-bd3c94f51fcd` - `2-86681b4d6f66` The SQL query will be executed with the portion before the hyphen as the `:token_id` parameter. The `token_secret` value returned by the query will be compared to the portion of the token after the hyphen to check if the token is valid. Columns with a prefix of `actor_` will be used to populate the actor dictionary. In the above example, a token of `2-86681b4d6f66` will become an actor dictionary of `{""id"": 32, ""name"": ""Pancakes""}`. To configure this, use a `""query""` block in your plugin configuration like this: ```json { ""plugins"": { ""datasette-auth-tokens"": { ""query"": { ""sql"": ""select actor_id, actor_name, token_secret from tokens where token_id = :token_id"", ""database"": ""tokens"" } } }, ""databases"": { ""tokens"": { ""allow"": {} } } } ``` The `""sql""` key here contains the SQL query. The `""database""` key has the name of the attached database file that the query should be executed against - in this case it would execute against `tokens.db`. ### Securing your tokens Anyone with access to your Datasette instance can use it to read the `token_secret` column in your tokens table. This probably isn't what you want! To avoid this, you should lock down access to that table. The configuration example above shows how to do this using an `""allow"": {}` block. Consult Datasette's [Permissions documentation](https://datasette.readthedocs.io/en/stable/authentication.html#permissions) for more information about how to lock down this kind of access. ",Simon Willison,,text/markdown,https://github.com/simonw/datasette-auth-tokens,,"Apache License, Version 2.0",,,https://pypi.org/project/datasette-auth-tokens/,,https://pypi.org/project/datasette-auth-tokens/,"{""CI"": ""https://github.com/simonw/datasette-auth-tokens/actions"", ""Changelog"": ""https://github.com/simonw/datasette-auth-tokens/releases"", ""Homepage"": ""https://github.com/simonw/datasette-auth-tokens"", ""Issues"": ""https://github.com/simonw/datasette-auth-tokens/issues""}",https://pypi.org/project/datasette-auth-tokens/0.3/,"[""datasette (>=0.44)"", ""pytest ; extra == 'test'"", ""pytest-asyncio ; extra == 'test'"", ""httpx ; extra == 'test'"", ""sqlite-utils ; extra == 'test'""]",,0.3,0, datasette-auth0,Datasette plugin that authenticates users using Auth0,"[""Framework :: Datasette"", ""License :: OSI Approved :: Apache Software License""]","# datasette-auth0 [](https://pypi.org/project/datasette-auth0/) [](https://github.com/simonw/datasette-auth0/releases) [](https://github.com/simonw/datasette-auth0/actions?query=workflow%3ATest) [](https://github.com/simonw/datasette-auth0/blob/main/LICENSE) Datasette plugin that authenticates users using [Auth0](https://auth0.com/) See [Simplest possible OAuth authentication with Auth0](https://til.simonwillison.net/auth0/oauth-with-auth0) for more about how this plugin works. ## Installation Install this plugin in the same environment as Datasette. $ datasette install datasette-auth0 ## Demo You can try this out at [datasette-auth0-demo.datasette.io](https://datasette-auth0-demo.datasette.io/) - click on the top right menu icon and select ""Sign in with Auth0"". ## Initial configuration First, create a new application in Auth0. You will need the domain, client ID and client secret for that application. The domain should be something like `mysite.us.auth0.com`. Add `http://127.0.0.1:8001/-/auth0-callback` to the list of Allowed Callback URLs. Then configure these plugin secrets using `metadata.yml`: ```yaml plugins: datasette-auth0: domain: ""$env"": AUTH0_DOMAIN client_id: ""$env"": AUTH0_CLIENT_ID client_secret: ""$env"": AUTH0_CLIENT_SECRET ``` Only the `client_secret` needs to be kept secret, but for consistency I recommend using the `$env` mechanism for all three. In development, you can run Datasette and pass in environment variables like this: ``` AUTH0_DOMAIN=""your-domain.us.auth0.com"" \ AUTH0_CLIENT_ID=""...client-id-goes-here..."" \ AUTH0_CLIENT_SECRET=""...secret-goes-here..."" \ datasette -m metadata.yml ``` If you are deploying using `datasette publish` you can pass these using `--plugin-secret`. For example, to deploy using Cloud Run you might run the following: ``` datasette publish cloudrun mydatabase.db \ --install datasette-auth0 \ --plugin-secret datasette-auth0 domain ""your-domain.us.auth0.com"" \ --plugin-secret datasette-auth0 client_id ""your-client-id"" \ --plugin-secret datasette-auth0 client_secret ""your-client-secret"" \ --service datasette-auth0-demo ``` Once your Datasette instance is deployed, you will need to add its callback URL to the ""Allowed Callback URLs"" list in Auth0. The callback URL should be something like: https://url-to-your-datasette/-/auth0-callback ## Usage Once installed, a ""Sign in with Auth0"" menu item will appear in the Datasette main menu. You can sign in and then visit the `/-/actor` page to see full details of the `auth0` profile that has been authenticated. You can then use [Datasette permissions](https://docs.datasette.io/en/stable/authentication.html#configuring-permissions-in-metadata-json) to grant or deny access to different parts of Datasette based on the authenticated user. ## Development To set up this plugin locally, first checkout the code. Then create a new virtual environment: cd datasette-auth0 python3 -mvenv venv source venv/bin/activate Now install the dependencies and test dependencies: pip install -e '.[test]' To run the tests: pytest ",Simon Willison,,text/markdown,https://github.com/simonw/datasette-auth0,,"Apache License, Version 2.0",,,https://pypi.org/project/datasette-auth0/,,https://pypi.org/project/datasette-auth0/,"{""CI"": ""https://github.com/simonw/datasette-auth0/actions"", ""Changelog"": ""https://github.com/simonw/datasette-auth0/releases"", ""Homepage"": ""https://github.com/simonw/datasette-auth0"", ""Issues"": ""https://github.com/simonw/datasette-auth0/issues""}",https://pypi.org/project/datasette-auth0/0.1/,"[""datasette"", ""pytest ; extra == 'test'"", ""pytest-asyncio ; extra == 'test'"", ""pytest-httpx ; extra == 'test'""]",>=3.7,0.1,0, datasette-backup,Plugin adding backup options to Datasette,[],"# datasette-backup [](https://pypi.org/project/datasette-backup/) [](https://github.com/simonw/datasette-backup/releases) [](https://github.com/simonw/datasette-backup/actions?query=workflow%3ATest) [](https://github.com/simonw/datasette-backup/blob/main/LICENSE) Plugin adding backup options to Datasette ## Installation Install this plugin in the same environment as Datasette. $ datasette install datasette-backup ## Usage Once installed, you can download a SQL backup of any of your databases from: /-/backup/dbname.sql ## Development To set up this plugin locally, first checkout the code. Then create a new virtual environment: cd datasette-backup python3 -mvenv venv source venv/bin/activate Or if you are using `pipenv`: pipenv shell Now install the dependencies and tests: pip install -e '.[test]' To run the tests: pytest ",Simon Willison,,text/markdown,https://github.com/simonw/datasette-backup,,"Apache License, Version 2.0",,,https://pypi.org/project/datasette-backup/,,https://pypi.org/project/datasette-backup/,"{""CI"": ""https://github.com/simonw/datasette-backup/actions"", ""Changelog"": ""https://github.com/simonw/datasette-backup/releases"", ""Homepage"": ""https://github.com/simonw/datasette-backup"", ""Issues"": ""https://github.com/simonw/datasette-backup/issues""}",https://pypi.org/project/datasette-backup/0.1/,"[""datasette"", ""sqlite-dump (>=0.1.1)"", ""pytest ; extra == 'test'"", ""pytest-asyncio ; extra == 'test'"", ""httpx ; extra == 'test'"", ""sqlite-utils ; extra == 'test'""]",,0.1,0, datasette-basemap,A basemap for Datasette and datasette-leaflet,[],"# datasette-basemap [](https://pypi.org/project/datasette-basemap/) [](https://github.com/simonw/datasette-basemap/releases) [](https://github.com/simonw/datasette-basemap/actions?query=workflow%3ATest) [](https://github.com/simonw/datasette-basemap/blob/main/LICENSE) A basemap for Datasette and datasette-leaflet ## Installation Install this plugin in the same environment as Datasette. $ datasette install datasette-basemap ## Usage This plugin will make a `basemap` database available containing OpenStreetMap tiles in the [mbtiles](https://github.com/mapbox/mbtiles-spec) format. It is designed for use with the [datasette-tiles](https://datasette.io/plugins/datasette-tiles) tile server plugin. ## Demo You can preview this map at https://datasette-tiles-demo.datasette.io/-/tiles/basemap and browse the database directly at https://datasette-tiles-demo.datasette.io/basemap ## License The data bundled with this package is © OpenStreetMap contributors, licensed under the [Open Data Commons Open Database License](https://opendatacommons.org/licenses/odbl/). See [this page](https://www.openstreetmap.org/copyright) for more details. ## Development To set up this plugin locally, first checkout the code. Then create a new virtual environment: cd datasette-basemap python3 -mvenv venv source venv/bin/activate Or if you are using `pipenv`: pipenv shell Now install the dependencies and tests: pip install -e '.[test]' To run the tests: pytest ",Simon Willison,,text/markdown,https://github.com/simonw/datasette-basemap,,"Apache License, Version 2.0",,,https://pypi.org/project/datasette-basemap/,,https://pypi.org/project/datasette-basemap/,"{""CI"": ""https://github.com/simonw/datasette-basemap/actions"", ""Changelog"": ""https://github.com/simonw/datasette-basemap/releases"", ""Homepage"": ""https://github.com/simonw/datasette-basemap"", ""Issues"": ""https://github.com/simonw/datasette-basemap/issues""}",https://pypi.org/project/datasette-basemap/0.2/,"[""datasette"", ""pytest ; extra == 'test'"", ""pytest-asyncio ; extra == 'test'""]",>=3.6,0.2,0, datasette-block,Block all access to specific path prefixes,[],"# datasette-block [](https://pypi.org/project/datasette-block/) [](https://github.com/simonw/datasette-block/releases) [](https://github.com/simonw/datasette-block/actions?query=workflow%3ATest) [](https://github.com/simonw/datasette-block/blob/main/LICENSE) Block all access to specific path prefixes ## Installation Install this plugin in the same environment as Datasette. $ datasette install datasette-block ## Configuration Add the following to `metadata.json` to block specific path prefixes: ```json { ""plugins"": { ""datasette-block"": { ""prefixes"": [""/all/""] } } } ``` This will cause a 403 error to be returned for any path beginning with `/all/`. This blocking happens as an ASGI wrapper around Datasette. ## Why would you need this? You almost always would not. I use it with `datasette-ripgrep` to block access to static assets for unauthenticated users. ## Development To set up this plugin locally, first checkout the code. Then create a new virtual environment: cd datasette-block python3 -mvenv venv source venv/bin/activate Or if you are using `pipenv`: pipenv shell Now install the dependencies and tests: pip install -e '.[test]' To run the tests: pytest ",Simon Willison,,text/markdown,https://github.com/simonw/datasette-block,,"Apache License, Version 2.0",,,https://pypi.org/project/datasette-block/,,https://pypi.org/project/datasette-block/,"{""CI"": ""https://github.com/simonw/datasette-block/actions"", ""Changelog"": ""https://github.com/simonw/datasette-block/releases"", ""Homepage"": ""https://github.com/simonw/datasette-block"", ""Issues"": ""https://github.com/simonw/datasette-block/issues""}",https://pypi.org/project/datasette-block/0.1.1/,"[""datasette"", ""pytest ; extra == 'test'"", ""pytest-asyncio ; extra == 'test'"", ""asgi-lifespan ; extra == 'test'""]",>=3.6,0.1.1,0, datasette-block-robots,Datasette plugin that blocks all robots using robots.txt,[],"# datasette-block-robots [](https://pypi.org/project/datasette-block-robots/) [](https://github.com/simonw/datasette-block-robots/releases) [](https://github.com/simonw/datasette-block-robots/blob/master/LICENSE) Datasette plugin that blocks robots and crawlers using robots.txt ## Installation Install this plugin in the same environment as Datasette. $ pip install datasette-block-robots ## Usage Having installed the plugin, `/robots.txt` on your Datasette instance will return the following: User-agent: * Disallow: / This will request all robots and crawlers not to visit any of the pages on your site. Here's a demo of the plugin in action: https://sqlite-generate-demo.datasette.io/robots.txt ## Configuration By default the plugin will block all access to the site, using `Disallow: /`. If you want the index page to be indexed by search engines without crawling the database, table or row pages themselves, you can use the following: ```json { ""plugins"": { ""datasette-block-robots"": { ""allow_only_index"": true } } } ``` This will return a `/robots.txt` like so: User-agent: * Disallow: /db1 Disallow: /db2 With a `Disallow` line for every attached database. To block access to specific areas of the site using custom paths, add this to your `metadata.json` configuration file: ```json { ""plugins"": { ""datasette-block-robots"": { ""disallow"": [""/mydatabase/mytable""] } } } ``` This will result in a `/robots.txt` that looks like this: User-agent: * Disallow: /mydatabase/mytable Alternatively you can set the full contents of the `robots.txt` file using the `literal` configuration option. Here's how to do that if you are using YAML rather than JSON and have a `metadata.yml` file: ```yaml plugins: datasette-block-robots: literal: |- User-agent: * Disallow: / User-agent: Bingbot User-agent: Googlebot Disallow: ``` This example would block all crawlers with the exception of Googlebot and Bingbot, which are allowed to crawl the entire site. ## Extending this with other plugins This plugin adds a new [plugin hook](https://docs.datasette.io/en/stable/plugin_hooks.html) to Datasete called `block_robots_extra_lines()` which can be used by other plugins to add their own additional lines to the `robots.txt` file. The hook can optionally accept these parameters: - `datasette`: The current [Datasette instance](https://docs.datasette.io/en/stable/internals.html#datasette-class). You can use this to execute SQL queries or read plugin configuration settings. - `request`: The [Request object](https://docs.datasette.io/en/stable/internals.html#request-object) representing the incoming request to `/robots.txt`. The hook should return a list of strings, each representing a line to be added to the `robots.txt` file. It can also return an `async def` function, which will be awaited and used to generate a list of lines. Use this option if you need to make `await` calls inside you hook implementation. This example uses the hook to add a `Sitemap: http://example.com/sitemap.xml` line to the `robots.txt` file: ```python from datasette import hookimpl @hookimpl def block_robots_extra_lines(datasette, request): return [ ""Sitemap: {}"".format(datasette.absolute_url(request, ""/sitemap.xml"")), ] ``` This example blocks access to paths based on a database query: ```python @hookimpl def block_robots_extra_lines(datasette): async def inner(): db = datasette.get_database() result = await db.execute(""select path from mytable"") return [ ""Disallow: /{}"".format(row[""path""]) for row in result ] return inner ``` [datasette-sitemap](https://datasette.io/plugins/datasette-sitemap) is an example of a plugin that uses this hook. ## Development To set up this plugin locally, first checkout the code. Then create a new virtual environment: cd datasette-block-robots python3 -mvenv venv source venv/bin/activate Or if you are using `pipenv`: pipenv shell Now install the dependencies and tests: pip install -e '.[test]' To run the tests: pytest ",Simon Willison,,text/markdown,https://github.com/simonw/datasette-block-robots,,"Apache License, Version 2.0",,,https://pypi.org/project/datasette-block-robots/,,https://pypi.org/project/datasette-block-robots/,"{""CI"": ""https://github.com/simonw/datasette-block-robots/actions"", ""Changelog"": ""https://github.com/simonw/datasette-block-robots/releases"", ""Homepage"": ""https://github.com/simonw/datasette-block-robots"", ""Issues"": ""https://github.com/simonw/datasette-block-robots/issues""}",https://pypi.org/project/datasette-block-robots/1.1/,"[""datasette (>=0.50)"", ""pytest ; extra == 'test'"", ""pytest-asyncio ; extra == 'test'"", ""httpx ; extra == 'test'""]",,1.1,0, datasette-bplist,Datasette plugin for working with Apple's binary plist format,[],"# datasette-bplist [](https://pypi.org/project/datasette-bplist/) [](https://circleci.com/gh/simonw/datasette-bplist) [](https://github.com/simonw/datasette-bplist/blob/master/LICENSE) Datasette plugin for working with Apple's [binary plist](https://en.wikipedia.org/wiki/Property_list) format. This plugin adds two features: a display hook and a SQL function. The display hook will detect any database values that are encoded using the binary plist format. It will decode them, convert them into JSON and display them pretty-printed in the Datasette UI. The SQL function `bplist_to_json(value)` can be used inside a SQL query to convert a binary plist value into a JSON string. This can then be used with SQLite's `json_extract()` function or with the [datasette-jq](https://github.com/simonw/datasette-jq) plugin to further analyze that data as part of a SQL query. Install this plugin in the same environment as Datasette to enable this new functionality: pip install datasette-bplist ## Trying it out If you use a Mac you already have plenty of SQLite databases that contain binary plist data. One example is the database that powers the Apple Photos app. This database tends to be locked, so you will need to create a copy of the database in order to run queries against it: cp ~/Pictures/Photos\ Library.photoslibrary/database/photos.db /tmp/photos.db The database also makes use of custom SQLite extensions which prevent it from opening in Datasette. You can work around this by exporting the data that you want to experiment with into a new SQLite file. I recommend trying this plugin against the `RKMaster_dataNote` table, which contains plist-encoded EXIF metadata about the photos you have taken. You can export that table into a fresh database like so: sqlite3 /tmp/photos.db "".dump RKMaster_dataNote"" | sqlite3 /tmp/exif.db Now run `datasette /tmp/exif.db` and you can start trying out the plugin. ## Using the bplist_to_json() SQL function Once you have the `exif.db` demo working, you can try the `bplist_to_json()` SQL function. Here's a query that shows the camera lenses you have used the most often to take photos: select json_extract( bplist_to_json(value), ""$.{Exif}.LensModel"" ) as lens, count(*) as n from RKMaster_dataNote group by lens order by n desc; If you have a large number of photos this query can take a long time to execute, so you may need to increase the SQL time limit enforced by Datasette like so: $ datasette /tmp/exif.db \ --config sql_time_limit_ms:10000 Here's another query, showing the time at which you took every photo in your library which is classified as as screenshot: select attachedToId, json_extract( bplist_to_json(value), ""$.{Exif}.DateTimeOriginal"" ) from RKMaster_dataNote where json_extract( bplist_to_json(value), ""$.{Exif}.UserComment"" ) = ""Screenshot"" And if you install the [datasette-cluster-map](https://github.com/simonw/datasette-cluster-map) plugin, this query will show you a map of your most recent 1000 photos: select *, json_extract( bplist_to_json(value), ""$.{GPS}.Latitude"" ) as latitude, -json_extract( bplist_to_json(value), ""$.{GPS}.Longitude"" ) as longitude, json_extract( bplist_to_json(value), ""$.{Exif}.DateTimeOriginal"" ) as datetime from RKMaster_dataNote where latitude is not null order by attachedToId desc ",Simon Willison,,text/markdown,https://github.com/simonw/datasette-bplist,,"Apache License, Version 2.0",,,https://pypi.org/project/datasette-bplist/,,https://pypi.org/project/datasette-bplist/,"{""Homepage"": ""https://github.com/simonw/datasette-bplist""}",https://pypi.org/project/datasette-bplist/0.1/,"[""datasette"", ""bpylist"", ""pytest ; extra == 'test'""]",,0.1,0, datasette-clone,Create a local copy of database files from a Datasette instance,[],"# datasette-clone [](https://pypi.org/project/datasette-clone/) [](https://circleci.com/gh/simonw/datasette-clone) [](https://github.com/simonw/datasette-clone/blob/master/LICENSE) Create a local copy of database files from a Datasette instance. See [datasette-clone](https://simonwillison.net/2020/Apr/14/datasette-clone/) on my blog for background on this project. ## How to install $ pip install datasette-clone ## Usage This only works against Datasette instances running immutable databases (with the `-i` option). Databases published using the `datasette publish` command should be compatible with this tool. To download copies of all `.db` files from an instance, run: datasette-clone https://latest.datasette.io You can provide an optional second argument to specify a directory: datasette-clone https://latest.datasette.io /tmp/here-please The command stores its own copy of a `databases.json` manifest and uses it to only download databases that have changed the next time you run the command. It also stores a copy of the instance's `metadata.json` to ensure you have a copy of any source and licensing information for the downloaded databases. If your instance is protected by an API token, you can use `--token` to provide it: datasette-clone https://latest.datasette.io --token=xyz For verbose output showing what the tool is doing, use `-v`. ",Simon Willison,,text/markdown,https://github.com/simonw/datasette-clone,,"Apache License, Version 2.0",,,https://pypi.org/project/datasette-clone/,,https://pypi.org/project/datasette-clone/,"{""Homepage"": ""https://github.com/simonw/datasette-clone""}",https://pypi.org/project/datasette-clone/0.5/,"[""requests"", ""click"", ""pytest ; extra == 'test'"", ""requests-mock ; extra == 'test'""]",,0.5,0, datasette-cluster-map,Datasette plugin that shows a map for any data with latitude/longitude columns,"[""Framework :: Datasette"", ""License :: OSI Approved :: Apache Software License""]","# datasette-cluster-map [](https://pypi.org/project/datasette-cluster-map/) [](https://github.com/simonw/datasette-cluster-map/releases) [](https://github.com/simonw/datasette-cluster-map/blob/main/LICENSE) A [Datasette plugin](https://docs.datasette.io/en/stable/plugins.html) that detects tables with `latitude` and `longitude` columns and then plots them on a map using [Leaflet.markercluster](https://github.com/Leaflet/Leaflet.markercluster). More about this project: [Datasette plugins, and building a clustered map visualization](https://simonwillison.net/2018/Apr/20/datasette-plugins/). ## Demo [global-power-plants.datasettes.com](https://global-power-plants.datasettes.com/global-power-plants/global-power-plants) hosts a demo of this plugin running against a database of 33,000 power plants around the world.  ## Installation Run `datasette install datasette-cluster-map` to add this plugin to your Datasette virtual environment. Datasette will automatically load the plugin if it is installed in this way. If you are deploying using the `datasette publish` command you can use the `--install` option: datasette publish cloudrun mydb.db --install=datasette-cluster-map If any of your tables have a `latitude` and `longitude` column, a map will be automatically displayed. ## Configuration If your columns are called something else you can configure the column names using [plugin configuration](https://docs.datasette.io/en/stable/plugins.html#plugin-configuration) in a `metadata.json` file. For example, if all of your columns are called `xlat` and `xlng` you can create a `metadata.json` file like this: ```json { ""title"": ""Regular metadata keys can go here too"", ""plugins"": { ""datasette-cluster-map"": { ""latitude_column"": ""xlat"", ""longitude_column"": ""xlng"" } } } ``` Then run Datasette like this: datasette mydata.db -m metadata.json This will configure the required column names for every database loaded by that Datasette instance. If you want to customize the column names for just one table in one database, you can do something like this: ```json { ""databases"": { ""polar-bears"": { ""tables"": { ""USGS_WC_eartag_deployments_2009-2011"": { ""plugins"": { ""datasette-cluster-map"": { ""latitude_column"": ""Capture Latitude"", ""longitude_column"": ""Capture Longitude"" } } } } } } } ``` You can also use a custom SQL query to rename those columns to `latitude` and `longitude`, [for example](https://polar-bears.now.sh/polar-bears?sql=select+*%2C%0D%0A++++%22Capture+Latitude%22+as+latitude%2C%0D%0A++++%22Capture+Longitude%22+as+longitude%0D%0Afrom+%5BUSGS_WC_eartag_deployments_2009-2011%5D): ```sql select *, ""Capture Latitude"" as latitude, ""Capture Longitude"" as longitude from [USGS_WC_eartag_deployments_2009-2011] ``` The map defaults to being displayed above the main results table on the page. You can use the `""container""` plugin setting to provide a CSS selector indicating an element that the map should be appended to instead. ## Custom tile layers You can customize the tile layer used by the maps using the `tile_layer` and `tile_layer_options` configuration settings. For example, to use the [Stamen Watercolor tiles](http://maps.stamen.com/watercolor/#12/37.7706/-122.3782) you can use these settings: ```json { ""plugins"": { ""datasette-cluster-map"": { ""tile_layer"": ""https://stamen-tiles-{s}.a.ssl.fastly.net/watercolor/{z}/{x}/{y}.{ext}"", ""tile_layer_options"": { ""attribution"": ""Map tiles by Stamen Design, CC BY 3.0 — Map data © OpenStreetMap contributors"", ""subdomains"": ""abcd"", ""minZoom"": 1, ""maxZoom"": 16, ""ext"": ""jpg"" } } } } ``` The [Leaflet Providers preview list](https://leaflet-extras.github.io/leaflet-providers/preview/index.html) has details of many other tile layers you can use. ## Custom marker popups The marker popup defaults to displaying the data for the underlying database row. You can customize this by including a `popup` column in your results containing JSON that defines a more useful popup. The JSON in the popup column should look something like this: ```json { ""image"": ""https://niche-museums.imgix.net/dodgems.heic?w=800&h=400&fit=crop"", ""alt"": ""Dingles Fairground Heritage Centre"", ""title"": ""Dingles Fairground Heritage Centre"", ""description"": ""Home of the National Fairground Collection, Dingles has over 45,000 indoor square feet of vintage fairground rides... and you can go on them! Highlights include the last complete surviving and opera"", ""link"": ""/browse/museums/26"" } ``` Each of these columns is optional. - `title` is the title to show at the top of the popup - `image` is the URL to an image to display in the popup - `alt` is the alt attribute to use for that image - `description` is a longer string of text to use as a description - `link` is a URL that the marker content should link to You can use the SQLite `json_object()` function to construct this data dynamically as part of your SQL query. Here's an example: ```sql select json_object( 'image', photo_url || '?w=800&h=400&fit=crop', 'title', name, 'description', substr(description, 0, 200), 'link', '/browse/museums/' || id ) as popup, latitude, longitude from museums where id in (26, 27) order by id ``` [Try that example here](https://www.niche-museums.com/browse?sql=select+json_object%28%0D%0A++%27image%27%2C+photo_url+%7C%7C+%27%3Fw%3D800%26h%3D400%26fit%3Dcrop%27%2C%0D%0A++%27title%27%2C+name%2C%0D%0A++%27description%27%2C+substr%28description%2C+0%2C+200%29%2C%0D%0A++%27link%27%2C+%27%2Fbrowse%2Fmuseums%2F%27+%7C%7C+id%0D%0A++%29+as+popup%2C%0D%0A++latitude%2C+longitude+from+museums) or take a look at [this demo built using a SQL view](https://dogsheep-photos.dogsheep.net/public/photos_on_a_map). ## How I deployed the demo datasette publish cloudrun global-power-plants.db \ --service global-power-plants \ --metadata metadata.json \ --install=datasette-cluster-map \ --extra-options=""--config facet_time_limit_ms:1000"" ## Development To set up this plugin locally, first checkout the code. Then create a new virtual environment: cd datasette-cluster-map python3 -mvenv venv source venv/bin/activate Or if you are using `pipenv`: pipenv shell Now install the dependencies and tests: pip install -e '.[test]' To run the tests: pytest ",Simon Willison,,text/markdown,https://github.com/simonw/datasette-cluster-map,,"Apache License, Version 2.0",,,https://pypi.org/project/datasette-cluster-map/,,https://pypi.org/project/datasette-cluster-map/,"{""CI"": ""https://github.com/simonw/datasette-cluster-map/actions"", ""Changelog"": ""https://github.com/simonw/datasette-cluster-map/releases"", ""Homepage"": ""https://github.com/simonw/datasette-cluster-map"", ""Issues"": ""https://github.com/simonw/datasette-cluster-map/issues""}",https://pypi.org/project/datasette-cluster-map/0.17.2/,"[""datasette (>=0.54)"", ""datasette-leaflet (>=0.2.2)"", ""pytest ; extra == 'test'"", ""pytest-asyncio ; extra == 'test'"", ""httpx ; extra == 'test'"", ""sqlite-utils ; extra == 'test'""]",,0.17.2,0, datasette-column-inspect,Experimental Datasette plugin for inspecting columns,[],"# datasette-column-inspect [](https://pypi.org/project/datasette-column-inspect/) [](https://github.com/simonw/datasette-column-inspect/releases) [](https://github.com/simonw/datasette-column-inspect/actions?query=workflow%3ATest) [](https://github.com/simonw/datasette-column-inspect/blob/main/LICENSE) Highly experimental Datasette plugin for inspecting columns. ## Installation Install this plugin in the same environment as Datasette. $ pip install datasette-column-inspect ## Usage This plugin adds an icon to each column on the table page which opens an inspection side panel. ",Simon Willison,,text/markdown,https://github.com/simonw/datasette-column-inspect,,"Apache License, Version 2.0",,,https://pypi.org/project/datasette-column-inspect/,,https://pypi.org/project/datasette-column-inspect/,"{""Homepage"": ""https://github.com/simonw/datasette-column-inspect""}",https://pypi.org/project/datasette-column-inspect/0.2a0/,"[""datasette"", ""pytest ; extra == 'test'"", ""pytest-asyncio ; extra == 'test'"", ""httpx ; extra == 'test'"", ""sqlite-utils ; extra == 'test'""]",,0.2a0,0, datasette-configure-asgi,Datasette plugin for configuring arbitrary ASGI middleware,[],"# datasette-configure-asgi [](https://pypi.org/project/datasette-configure-asgi/) [](https://circleci.com/gh/simonw/datasette-configure-asgi) [](https://github.com/simonw/datasette-configure-asgi/blob/master/LICENSE) Datasette plugin for configuring arbitrary ASGI middleware ## Installation pip install datasette-configure-asgi ## Usage This plugin only takes effect if your `metadata.json` file contains relevant top-level plugin configuration in a `""datasette-configure-asgi""` configuration key. For example, to wrap your Datasette instance in the `asgi-log-to-sqlite` middleware configured to write logs to `/tmp/log.db` you would use the following: ```json { ""plugins"": { ""datasette-configure-asgi"": [ { ""class"": ""asgi_log_to_sqlite.AsgiLogToSqlite"", ""args"": { ""file"": ""/tmp/log.db"" } } ] } } ``` The `""datasette-configure-asgi""` key should be a list of JSON objects. Each object should have a `""class""` key indicating the class to be used, and an optional `""args""` key providing any necessary arguments to be passed to that class constructor. ## Plugin structure This plugin can be used to wrap your Datasette instance in any ASGI middleware that conforms to the following structure: ```python class SomeAsgiMiddleware: def __init__(self, app, arg1, arg2): self.app = app self.arg1 = arg1 self.arg2 = arg2 async def __call__(self, scope, receive, send): start = time.time() await self.app(scope, receive, send) end = time.time() print(""Time taken: {}"".format(end - start)) ``` So the middleware is a class with a constructor which takes the wrapped application as a first argument, `app`, followed by further named arguments to configure the middleware. It provides an `async def __call__(self, scope, receive, send)` method to implement the middleware's behavior. ",Simon Willison,,text/markdown,https://github.com/simonw/datasette-configure-asgi,,"Apache License, Version 2.0",,,https://pypi.org/project/datasette-configure-asgi/,,https://pypi.org/project/datasette-configure-asgi/,"{""Homepage"": ""https://github.com/simonw/datasette-configure-asgi""}",https://pypi.org/project/datasette-configure-asgi/0.1/,"[""pytest ; extra == 'test'"", ""pytest-asyncio ; extra == 'test'"", ""asgiref (==3.1.2) ; extra == 'test'"", ""datasette ; extra == 'test'""]",,0.1,0, datasette-configure-fts,Datasette plugin for enabling full-text search against selected table columns,[],"# datasette-configure-fts [](https://pypi.org/project/datasette-configure-fts/) [](https://github.com/simonw/datasette-configure-fts/releases) [](https://github.com/simonw/datasette-configure-fts/actions?query=workflow%3ATest) [](https://github.com/simonw/datasette-configure-fts/blob/main/LICENSE) Datasette plugin for enabling full-text search against selected table columns ## Installation Install this plugin in the same environment as Datasette. $ datasette install datasette-configure-fts ## Usage Having installed the plugin, visit `/-/configure-fts` on your Datasette instance to configure FTS for tables on attached writable databases. By default only [the root actor](https://datasette.readthedocs.io/en/stable/authentication.html#using-the-root-actor) can access the page - so you'll need to run Datasette with the `--root` option and click on the link shown in the terminal to sign in and access the page. The `configure-fts` permission governs access. You can use permission plugins such as [datasette-permissions-sql](https://github.com/simonw/datasette-permissions-sql) to grant additional access to the write interface. ",Simon Willison,,text/markdown,https://github.com/simonw/datasette-configure-fts,,"Apache License, Version 2.0",,,https://pypi.org/project/datasette-configure-fts/,,https://pypi.org/project/datasette-configure-fts/,"{""Homepage"": ""https://github.com/simonw/datasette-configure-fts""}",https://pypi.org/project/datasette-configure-fts/1.1/,"[""datasette (>=0.51)"", ""sqlite-utils (>=2.10)"", ""pytest ; extra == 'test'"", ""pytest-asyncio ; extra == 'test'"", ""httpx ; extra == 'test'""]",,1.1,0, datasette-copy-to-memory,Copy database files into an in-memory database on startup,"[""Framework :: Datasette"", ""License :: OSI Approved :: Apache Software License""]","# datasette-copy-to-memory [](https://pypi.org/project/datasette-copy-to-memory/) [](https://github.com/simonw/datasette-copy-to-memory/releases) [](https://github.com/simonw/datasette-copy-to-memory/actions?query=workflow%3ATest) [](https://github.com/simonw/datasette-copy-to-memory/blob/main/LICENSE) Copy database files into an in-memory database on startup This plugin is **highly experimental**. It currently exists to support Datasette performance research, and is not designed for actual production usage. ## Installation Install this plugin in the same environment as Datasette. datasette install datasette-copy-to-memory ## Usage On startup, Datasette will create an in-memory named database for each attached database. This database will have the same name but with `_memory` at the end. So running this: datasette fixtures.db Will serve two databases: the original at `/fixtures` and the in-memory copy at `/fixtures_memory`. ## Demo A demo is running on [latest-with-plugins.datasette.io](https://latest-with-plugins.datasette.io/) - the [/fixtures_memory](https://latest-with-plugins.datasette.io/fixtures_memory) table there is provided by this plugin. ## Configuration By default every attached database file will be loaded into a `_memory` copy. You can use plugin configuration to specify just a subset of the database. For example, to create `github_memory` but not `fixtures_memory` you would use the following `metadata.yml` file: ```yaml plugins: datasette-copy-to-memory: databases: - github ``` Then start Datasette like this: datasette github.db fixtures.db -m metadata.yml If you don't want to have a `fixtures` and `fixtures_memory` database, you can use `replace: true` to have the plugin replace the file-backed database with the new in-memory one, reusing the same database name: ```yaml plugins: datasette-copy-to-memory: replace: true ``` Then: datasette github.db fixtures.db -m metadata.yml This will result in both `/github` and `/fixtures` but no `/github_memory` or `/fixtures_memory`. ## Development To set up this plugin locally, first checkout the code. Then create a new virtual environment: cd datasette-copy-to-memory python3 -m venv venv source venv/bin/activate Now install the dependencies and test dependencies: pip install -e '.[test]' To run the tests: pytest ",Simon Willison,,text/markdown,https://github.com/simonw/datasette-copy-to-memory,,"Apache License, Version 2.0",,,https://pypi.org/project/datasette-copy-to-memory/,,https://pypi.org/project/datasette-copy-to-memory/,"{""CI"": ""https://github.com/simonw/datasette-copy-to-memory/actions"", ""Changelog"": ""https://github.com/simonw/datasette-copy-to-memory/releases"", ""Homepage"": ""https://github.com/simonw/datasette-copy-to-memory"", ""Issues"": ""https://github.com/simonw/datasette-copy-to-memory/issues""}",https://pypi.org/project/datasette-copy-to-memory/0.2/,"[""datasette"", ""pytest ; extra == 'test'"", ""pytest-asyncio ; extra == 'test'"", ""sqlite-utils ; extra == 'test'""]",>=3.7,0.2,0, datasette-copyable,Datasette plugin for outputting tables in formats suitable for copy and paste,[],"# datasette-copyable [](https://pypi.org/project/datasette-copyable/) [](https://github.com/simonw/datasette-copyable/releases) [](https://github.com/simonw/datasette-copyable/blob/master/LICENSE) Datasette plugin for outputting tables in formats suitable for copy and paste ## Installation Install this plugin in the same environment as Datasette. $ pip install datasette-copyable ## Demo You can try this plugin on [fivethirtyeight.datasettes.com](https://fivethirtyeight.datasettes.com/) - browse for tables or queries there and look for the ""copyable"" link. Here's an example for a table of [airline safety data](https://fivethirtyeight.datasettes.com/fivethirtyeight/airline-safety%2Fairline-safety.copyable). ## Usage This plugin adds a `.copyable` output extension to every table, view and query. Navigating to this page will show an interface allowing you to select a format for copying and pasting the demo. The default is TSV, which is suitable for copying into Google Sheets or Excel. You can add `?_raw=1` to get back just the raw data. ## Development To set up this plugin locally, first checkout the code. Then create a new virtual environment: cd datasette-copyable python3 -mvenv venv source venv/bin/activate Or if you are using `pipenv`: pipenv shell Now install the dependencies and tests: pip install -e '.[test]' To run the tests: pytest ",Simon Willison,,text/markdown,https://github.com/simonw/datasette-copyable,,"Apache License, Version 2.0",,,https://pypi.org/project/datasette-copyable/,,https://pypi.org/project/datasette-copyable/,"{""CI"": ""https://github.com/simonw/datasette-copyable/actions"", ""Changelog"": ""https://github.com/simonw/datasette-copyable/releases"", ""Homepage"": ""https://github.com/simonw/datasette-copyable"", ""Issues"": ""https://github.com/simonw/datasette-copyable/issues""}",https://pypi.org/project/datasette-copyable/0.3.1/,"[""datasette (>=0.49)"", ""tabulate"", ""pytest ; extra == 'test'"", ""pytest-asyncio ; extra == 'test'"", ""httpx ; extra == 'test'"", ""sqlite-utils ; extra == 'test'""]",,0.3.1,0, datasette-cors,Datasette plugin for configuring CORS headers,[],"# datasette-cors [](https://pypi.org/project/datasette-cors/) [](https://circleci.com/gh/simonw/datasette-cors) [](https://github.com/simonw/datasette-cors/blob/master/LICENSE) Datasette plugin for configuring CORS headers, based on https://github.com/simonw/asgi-cors You can use this plugin to allow JavaScript running on a whitelisted set of domains to make `fetch()` calls to the JSON API provided by your Datasette instance. ## Installation pip install datasette-cors ## Configuration You need to add some configuration to your Datasette `metadata.json` file for this plugin to take effect. To whitelist specific domains, use this: ```json { ""plugins"": { ""datasette-cors"": { ""hosts"": [""https://www.example.com""] } } } ``` You can also whitelist patterns like this: ```json { ""plugins"": { ""datasette-cors"": { ""host_wildcards"": [""https://*.example.com""] } } } ``` ## Testing it To test this plugin out, run it locally by saving one of the above examples as `metadata.json` and running this: $ datasette --memory -m metadata.json Now visit https://www.example.com/ in your browser, open the browser developer console and paste in the following: ```javascript fetch(""http://127.0.0.1:8001/:memory:.json?sql=select+sqlite_version%28%29"").then(r => r.json()).then(console.log) ``` If the plugin is running correctly, you will see the JSON response output to the console. ",Simon Willison,,text/markdown,https://github.com/simonw/datasette-cors,,"Apache License, Version 2.0",,,https://pypi.org/project/datasette-cors/,,https://pypi.org/project/datasette-cors/,"{""Homepage"": ""https://github.com/simonw/datasette-cors""}",https://pypi.org/project/datasette-cors/0.3/,"[""asgi-cors (~=0.3)"", ""datasette (~=0.29) ; extra == 'test'"", ""pytest ; extra == 'test'"", ""pytest-asyncio ; extra == 'test'"", ""asgiref (~=3.1.2) ; extra == 'test'""]",,0.3,0, datasette-css-properties,Experimental Datasette output plugin using CSS properties,[],"# datasette-css-properties [](https://pypi.org/project/datasette-css-properties/) [](https://github.com/simonw/datasette-css-properties/releases) [](https://github.com/simonw/datasette-css-properties/actions?query=workflow%3ATest) [](https://github.com/simonw/datasette-css-properties/blob/main/LICENSE) Extremely experimental Datasette output plugin using CSS properties, inspired by [Custom Properties as State](https://css-tricks.com/custom-properties-as-state/) by Chris Coyier. ## Installation Install this plugin in the same environment as Datasette. $ datasette install datasette-css-properties ## Usage Once installed, this plugin adds a `.css` output format to every query result. This will return the first row in the query as a valid CSS file, defining each column as a custom property: Example: https://latest-with-plugins.datasette.io/fixtures/roadside_attractions.css produces: ```css :root { --pk: '1'; --name: 'The Mystery Spot'; --address: '465 Mystery Spot Road, Santa Cruz, CA 95065'; --latitude: '37.0167'; --longitude: '-122.0024'; } ``` If you link this stylesheet to your page you can then do things like this; ```htmlAttraction name:
``` Values will be quoted as CSS strings by default. If you want to return a ""raw"" value without the quotes - for example to set a CSS property that is numeric or a color, you can specify that column name using the `?_raw=column-name` parameter. This can be passed multiple times. Consider [this example query](https://latest-with-plugins.datasette.io/github?sql=select%0D%0A++%27%23%27+||+substr(sha%2C+0%2C+6)+as+[custom-bg]%0D%0Afrom%0D%0A++commits%0D%0Aorder+by%0D%0A++author_date+desc%0D%0Alimit%0D%0A++1%3B): ```sql select '#' || substr(sha, 0, 6) as [custom-bg] from commits order by author_date desc limit 1; ``` This returns the first 6 characters of the most recently authored commit with a `#` prefix. The `.css` [output rendered version](https://latest-with-plugins.datasette.io/github.css?sql=select%0D%0A++%27%23%27+||+substr(sha%2C+0%2C+6)+as+[custom-bg]%0D%0Afrom%0D%0A++commits%0D%0Aorder+by%0D%0A++author_date+desc%0D%0Alimit%0D%0A++1%3B) looks like this: ```css :root { --custom-bg: '#97fb1'; } ``` Adding `?_raw=custom-bg` to the URL produces [this instead](https://latest-with-plugins.datasette.io/github.css?sql=select%0D%0A++%27%23%27+||+substr(sha%2C+0%2C+6)+as+[custom-bg]%0D%0Afrom%0D%0A++commits%0D%0Aorder+by%0D%0A++author_date+desc%0D%0Alimit%0D%0A++1%3B&_raw=custom-bg): ```css :root { --custom-bg: #97fb1; } ``` This can then be used as a color value like so: ```css h1 { background-color: var(--custom-bg); } ``` ## Development To set up this plugin locally, first checkout the code. Then create a new virtual environment: cd datasette-css-properties python3 -mvenv venv source venv/bin/activate Or if you are using `pipenv`: pipenv shell Now install the dependencies and tests: pip install -e '.[test]' To run the tests: pytest ",Simon Willison,,text/markdown,https://github.com/simonw/datasette-css-properties,,"Apache License, Version 2.0",,,https://pypi.org/project/datasette-css-properties/,,https://pypi.org/project/datasette-css-properties/,"{""CI"": ""https://github.com/simonw/datasette-css-properties/actions"", ""Changelog"": ""https://github.com/simonw/datasette-css-properties/releases"", ""Homepage"": ""https://github.com/simonw/datasette-css-properties"", ""Issues"": ""https://github.com/simonw/datasette-css-properties/issues""}",https://pypi.org/project/datasette-css-properties/0.2/,"[""datasette"", ""pytest ; extra == 'test'"", ""pytest-asyncio ; extra == 'test'""]",>=3.6,0.2,0, datasette-dashboards,Datasette plugin providing data dashboards from metadata,[],"# datasette-dashboards > Datasette plugin providing data dashboards from metadata [](https://pypi.org/project/datasette-dashboards/) [](https://github.com/rclement/datasette-dashboards/actions/workflows/ci-cd.yml) [](https://codecov.io/gh/rclement/datasette-dashboards) [](https://github.com/rclement/datasette-dashboards/blob/master/LICENSE) Try out a live demo at [https://datasette-dashboards-demo.vercel.app](https://datasette-dashboards-demo.vercel.app/-/dashboards) **WARNING**: this plugin is still experimental and not ready for production. Some breaking changes might happen between releases before reaching a stable version. Use it at your own risks! 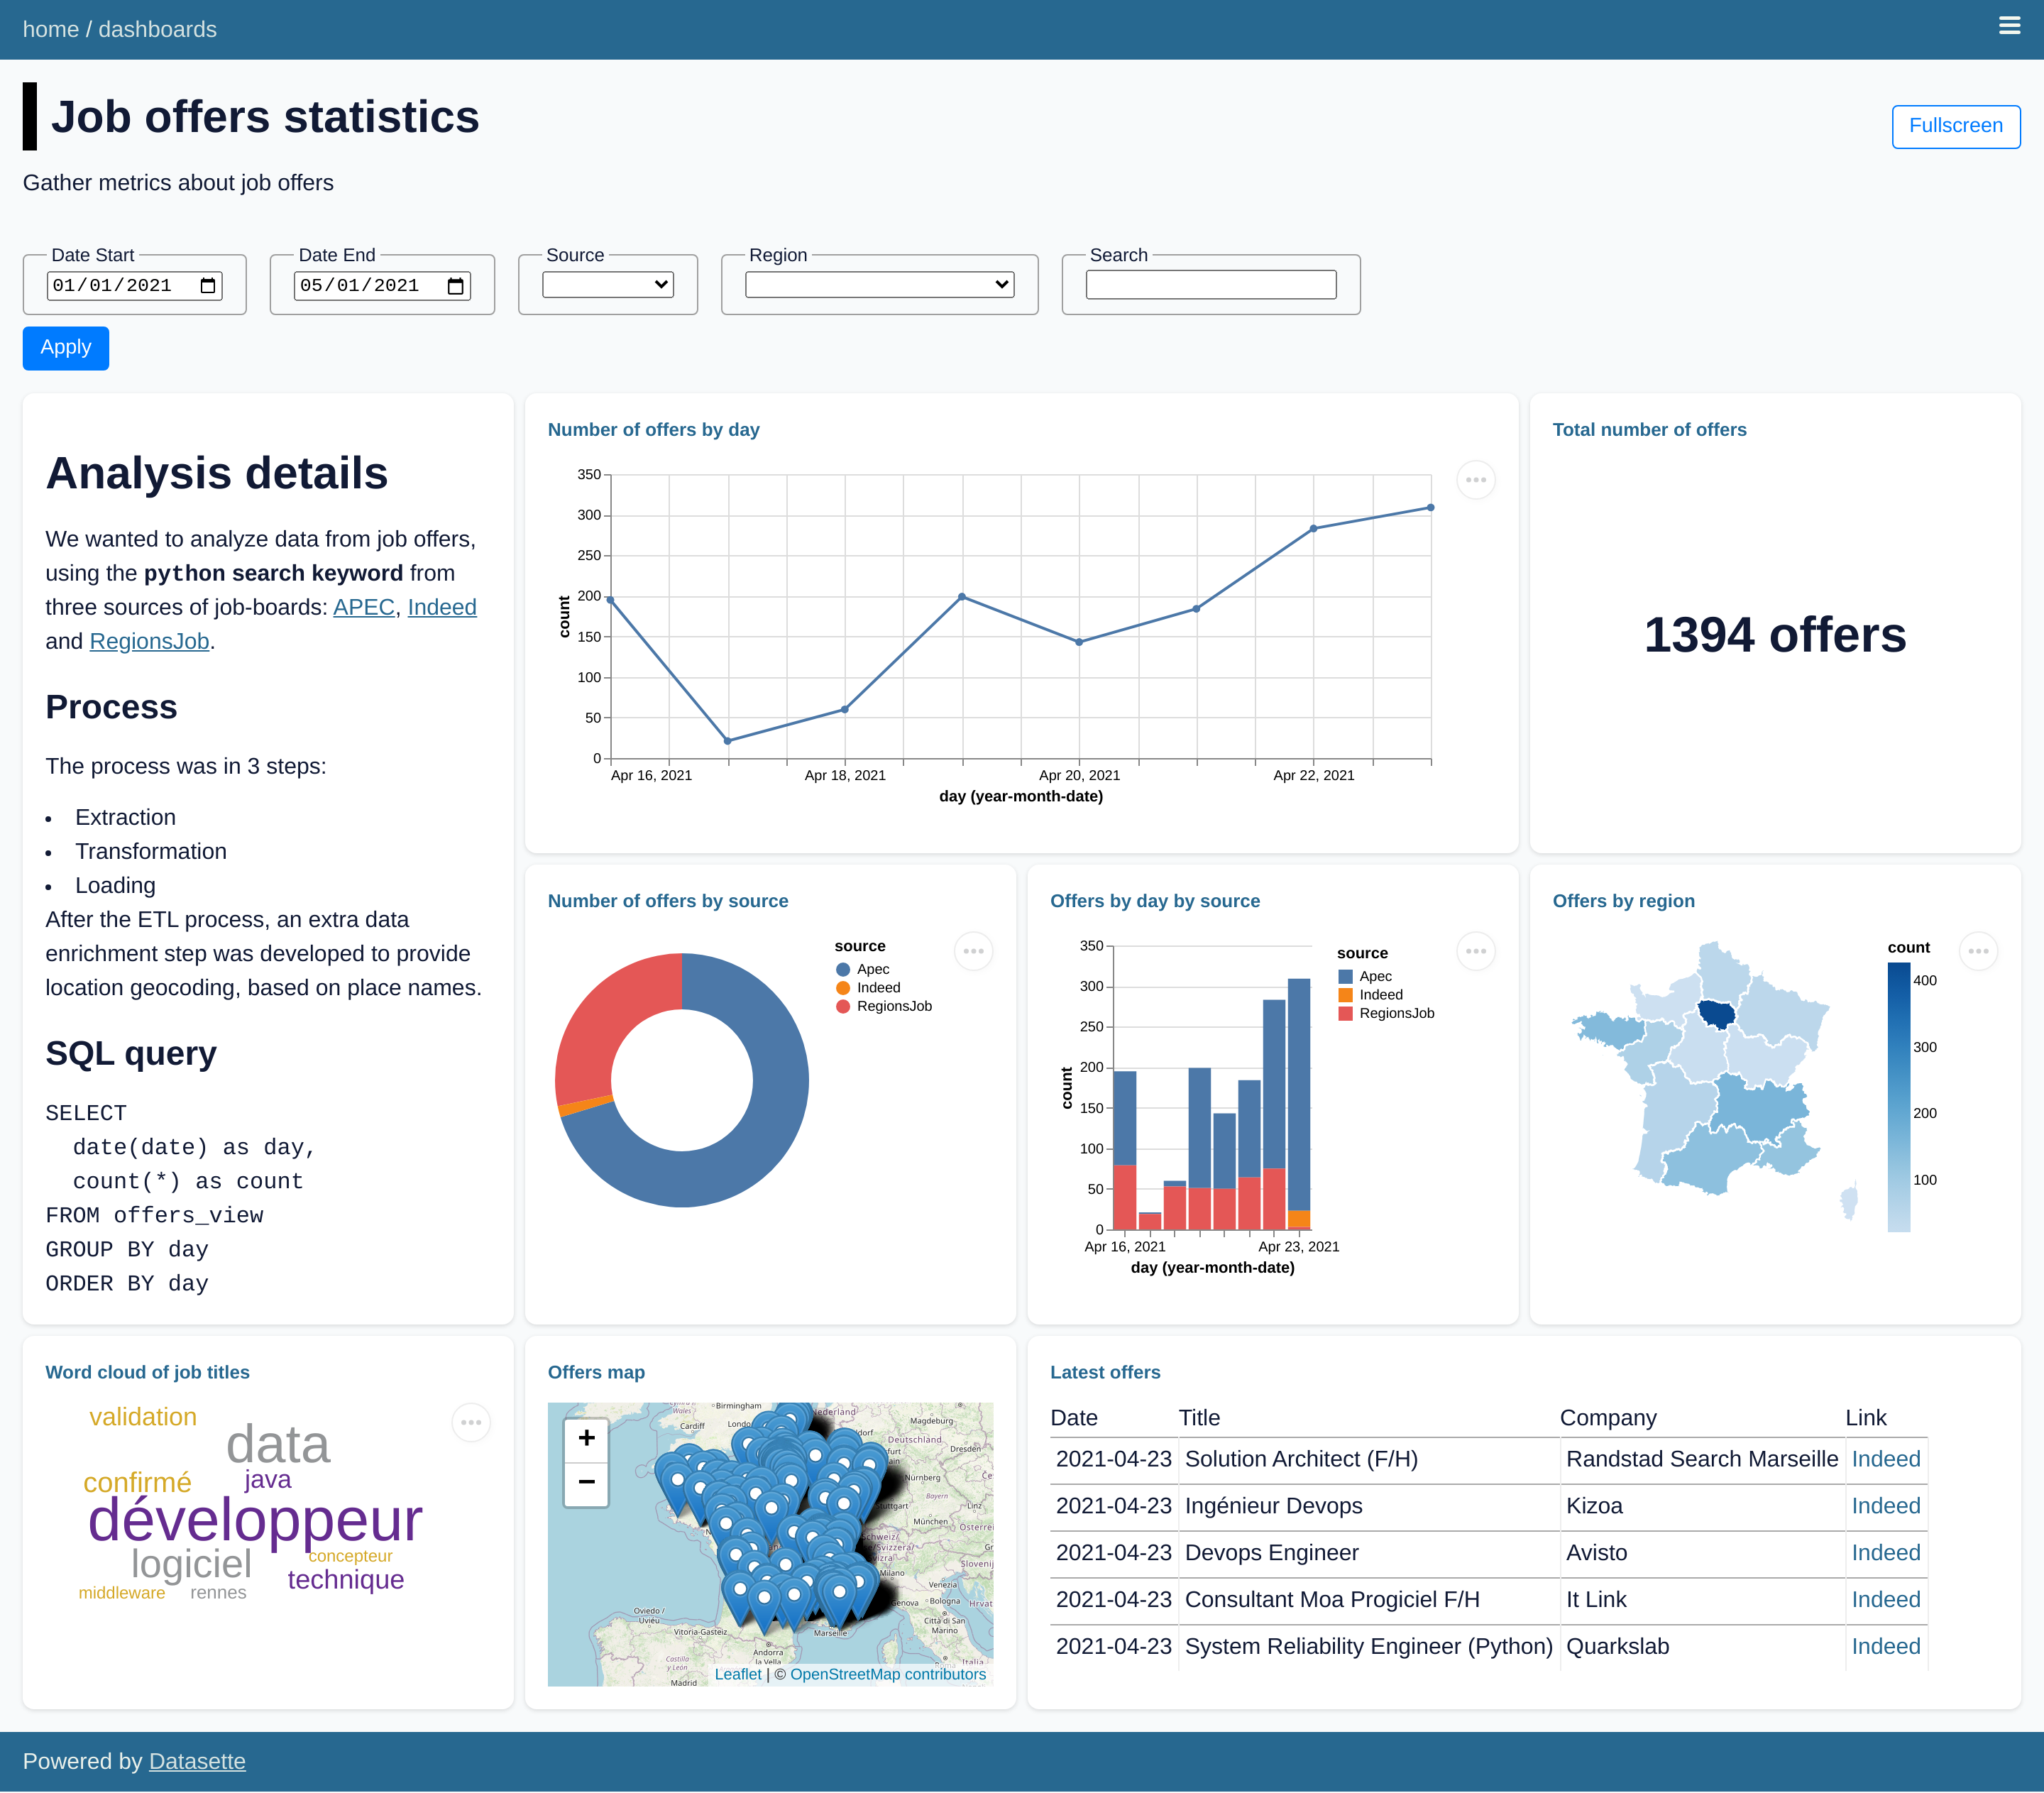 ## Installation Install this plugin in the same environment as Datasette: ```bash $ datasette install datasette-dashboards ``` ## Usage Define dashboards within `metadata.yml` / `metadata.json`: ```yaml plugins: datasette-dashboards: my-dashboard: title: My Dashboard description: Showing some nice metrics layout: - [analysis-note, events-count] - [analysis-note, events-source] filters: date_start: name: Date Start type: date default: ""2021-01-01"" date_end: name: Date End type: date charts: analysis-note: library: markdown display: |- # Analysis notes > A quick rundown of events statistics and KPIs events-count: title: Total number of events db: jobs query: SELECT count(*) as count FROM events library: metric display: field: count prefix: suffix: events-source: title: Number of events by source db: jobs query: SELECT source, count(*) as count FROM events WHERE TRUE [[ AND date >= date(:date_start) ]] [[ AND date <= date(:date_end) ]] GROUP BY source ORDER BY count DESC library: vega display: mark: { type: bar, tooltip: true } encoding: color: { field: source, type: nominal } theta: { field: count, type: quantitative } ``` A new menu entry is now available, pointing at `/-/dashboards` to access all defined dashboards. ### Properties Dashboard properties: | Property | Type | Description | | ------------- | -------- | --------------------- | | `title` | `string` | Dashboard title | | `description` | `string` | Dashboard description | | `layout` | `array` | Dashboard layout | | `filters` | `object` | Dashboard filters | Dashboard filters: | Property | Type | Description | | --------- | ------------------ | -------------------------------------- | | `name` | `string` | Filter display name | | `type` | `string` | Filter type (`text`, `date`, `number`) | | `default` | `string`, `number` | (optional) Filter default value | | `min` | `number` | (optional) Filter minimum value | | `max` | `number` | (optional) Filter maximum value | | `step` | `number` | (optional) Filter stepping value | Common chart properties for all chart types: | Property | Type | Description | | --------- | -------- | -------------------------------------------------------- | | `title` | `string` | Chart title | | `db` | `string` | Database name against which to run the query | | `query` | `string` | SQL query to run and extract data from | | `library` | `string` | One of supported libraries: `vega`, `markdown`, `metric` | | `display` | `object` | Chart display specification (depend on the used library) | To define SQL queries using dashboard filters: ```sql SELECT * FROM mytable [[ WHERE col >= :my_filter ]] ``` ```sql SELECT * FROM mytable WHERE TRUE [[ AND col1 = :my_filter_1 ]] [[ AND col2 = :my_filter_2 ]] ``` #### Vega properties Available configuration for `vega` charts: | Property | Type | Description | | --------- | -------- | ------------------------- | | `library` | `string` | Must be set to `vega` | | `display` | `object` | Vega specification object | Notes about the `display` property: - Requires a valid [Vega specification object](https://vega.github.io/vega-lite/docs/) - Some fields are pre-defined: `$schema`, `title`, `width`, `view`, `config`, `data` - All fields are passed along as-is (overriding pre-defined fields if any) - Only `mark` and `encoding` fields are required as the bare-minimum #### Markdown properties Available configuration for `markdown` chart: | Property | Type | Description | | --------- | -------- | ------------------------------------------------- | | `library` | `string` | Must be set to `markdown` | | `display` | `string` | Multi-line string containing the Markdown content | Note : - Some common properties do not apply and can be omitted: `title`, `db`, `query` - Markdown rendering is done by [`datasette-render-markdown`](https://datasette.io/plugins/datasette-render-markdown) - To configure Markdown rendering, extensions can be enabled in [metadata](https://datasette.io/plugins/datasette-render-markdown#user-content-markdown-extensions) #### Metric properties Available configuration for `metric` chart: | Property | Type | Description | | ---------------- | -------- | ----------------------------------------- | | `library` | `string` | Must be set to `metric` | | `display.field` | `string` | Numerical field to be displayed as metric | | `display.prefix` | `string` | Prefix to be displayed before metric | | `display.suffix` | `string` | Prefix to be displayed after metric | Note: - The `display.field` must reference a single-numerical value from the SQL query (e.g. numerical `number` field in `SELECT count(*) as number FROM events`) ### Dashboard layout The default dashboard layout will present two charts per row (one per row on mobile). To make use of custom dashboard layout using [CSS Grid Layout](https://developer.mozilla.org/en-US/docs/Web/CSS/CSS_Grid_Layout), define the `layout` array property as a grid / matrix: - Each entry represents a row of charts - Each column is referring a chart by its property name ## Development To set up this plugin locally, first checkout the code. Then create a new virtual environment and the required dependencies: ```bash pipenv install -d pipenv shell ``` To run the tests: ```bash pytest ``` ## Demo With the developmnent environment setup, you can run the demo locally: ```bash datasette --metadata demo/metadata.yml demo/jobs.db ``` ## License Licensed under Apache License, Version 2.0 Copyright (c) 2021 - present Romain Clement ",Romain Clement,,text/markdown,https://github.com/rclement/datasette-dashboards,,"Apache License, Version 2.0",,,https://pypi.org/project/datasette-dashboards/,,https://pypi.org/project/datasette-dashboards/,"{""Changelog"": ""https://github.com/rclement/datasette-dashboards/blob/master/CHANGELOG.md"", ""Homepage"": ""https://github.com/rclement/datasette-dashboards""}",https://pypi.org/project/datasette-dashboards/0.2.0/,"[""datasette"", ""datasette-render-markdown"", ""faker ; extra == 'test'"", ""pytest ; extra == 'test'"", ""pytest-asyncio ; extra == 'test'"", ""sqlite-utils ; extra == 'test'""]",>=3.7,0.2.0,0, datasette-dateutil,dateutil functions for Datasette,[],"# datasette-dateutil [](https://pypi.org/project/datasette-dateutil/) [](https://github.com/simonw/datasette-dateutil/releases) [](https://github.com/simonw/datasette-dateutil/actions?query=workflow%3ATest) [](https://github.com/simonw/datasette-dateutil/blob/main/LICENSE) dateutil functions for Datasette ## Installation Install this plugin in the same environment as Datasette. $ datasette install datasette-dateutil ## Usage This function adds custom SQL functions that expose functionality from the [dateutil](https://dateutil.readthedocs.io/) Python library. Once installed, the following SQL functions become available: ### Parsing date strings - `dateutil_parse(text)` - returns an ISO8601 date string parsed from the text, or `null` if the input could not be parsed. `dateutil_parse(""10 october 2020 3pm"")` returns `2020-10-10T15:00:00`. - `dateutil_parse_fuzzy(text)` - same as `dateutil_parse()` but this also works against strings that contain a date somewhere within them - that date will be returned, or `null` if no dates could be found. `dateutil_parse_fuzzy(""This is due 10 september"")` returns `2020-09-10T00:00:00` (but will start returning the 2021 version of that if the year is 2021). The `dateutil_parse()` and `dateutil_parse_fuzzy()` functions both follow the American convention of assuming that `1/2/2020` lists the month first, evaluating this example to the 2nd of January. If you want to assume that the day comes first, use these two functions instead: - `dateutil_parse_dayfirst(text)` - `dateutil_parse_fuzzy_dayfirst(text)` Here's a query demonstrating these functions: ```sql select dateutil_parse(""10 october 2020 3pm""), dateutil_parse_fuzzy(""This is due 10 september""), dateutil_parse(""1/2/2020""), dateutil_parse(""2020-03-04""), dateutil_parse_dayfirst(""2020-03-04""); ``` [Try that query](https://latest-with-plugins.datasette.io/fixtures?sql=select%0D%0A++dateutil_parse%28%2210+october+2020+3pm%22%29%2C%0D%0A++dateutil_parse_fuzzy%28%22This+is+due+10+september%22%29%2C%0D%0A++dateutil_parse%28%221%2F2%2F2020%22%29%2C%0D%0A++dateutil_parse%28%222020-03-04%22%29%2C%0D%0A++dateutil_parse_dayfirst%28%222020-03-04%22%29%3B) ### Optional default dates The `dateutil_parse()`, `dateutil_parse_fuzzy()`, `dateutil_parse_dayfirst()` and `dateutil_parse_fuzzy_dayfirst()` functions all accept an optional second argument specifying a ""default"" datetime to consider if some of the details are missing. For example, the following: ```sql select dateutil_parse('1st october', '1985-01-01') ``` Will return `1985-10-01T00:00:00` - the missing year is replaced with the year from the default date. [Example query demonstrating the default date argument](https://latest-with-plugins.datasette.io/fixtures?sql=with+times+as+%28%0D%0A++select%0D%0A++++datetime%28%27now%27%29+as+t%0D%0A++union%0D%0A++select%0D%0A++++datetime%28%27now%27%2C+%27-1+year%27%29%0D%0A++union%0D%0A++select%0D%0A++++datetime%28%27now%27%2C+%27-3+years%27%29%0D%0A%29%0D%0Aselect+t%2C+dateutil_parse_fuzzy%28%22This+is+due+10+september%22%2C+t%29+from+times) ### Calculating Easter - `dateutil_easter(year)` - returns the date for Easter in that year, for example `dateutil_easter(""2020"")` returns `2020-04-12`. [Example Easter query](https://latest-with-plugins.datasette.io/fixtures?sql=select%0D%0A++dateutil_easter%282019%29%2C%0D%0A++dateutil_easter%282020%29%2C%0D%0A++dateutil_easter%282021%29) ### JSON arrays of dates Several functions return JSON arrays of date strings. These can be used with SQLite's `json_each()` function to perform joins against dates from a specific date range or recurrence rule. These functions can return up to 10,000 results. They will return an error if more than 10,000 dates would be returned - this is to protect against denial of service attacks. - `dateutil_dates_between('1 january 2020', '5 jan 2020')` - given two dates (in any format that can be handled by `dateutil_parse()`) this function returns a JSON string containing the dates between those two days, inclusive. This example returns `[""2020-01-01"", ""2020-01-02"", ""2020-01-03"", ""2020-01-04"", ""2020-01-05""]`. - `dateutil_dates_between('1 january 2020', '5 jan 2020', 0)` - set the optional third argument to `0` to specify that you would like this to be exclusive of the last day. This example returns `[""2020-01-01"", ""2020-01-02"", ""2020-01-03"", ""2020-01-04""]`. [Try these queries](https://latest-with-plugins.datasette.io/fixtures?sql=select%0D%0A++dateutil_dates_between%28%271+january+2020%27%2C+%275+jan+2020%27%29%2C%0D%0A++dateutil_dates_between%28%271+january+2020%27%2C+%275+jan+2020%27%2C+0%29) The `dateutil_rrule()` and `dateutil_rrule_date()` functions accept the iCalendar standard ``rrule` format - see [the dateutil documentation](https://dateutil.readthedocs.io/en/stable/rrule.html#rrulestr-examples) for more examples. This format lets you specify recurrence rules such as ""the next four last mondays of the month"". - `dateutil_rrule(rrule, optional_dtsart)` - given an rrule returns a JSON array of ISO datetimes. The second argument is optional and will be treated as the start date for the rule. - `dateutil_rrule_date(rrule, optional_dtsart)` - same as `dateutil_rrule()` but returns ISO dates. Example query: ```sql select dateutil_rrule('FREQ=HOURLY;COUNT=5'), dateutil_rrule_date( 'FREQ=DAILY;COUNT=3', '1st jan 2020' ); ``` [Try the rrule example query](https://latest-with-plugins.datasette.io/fixtures?sql=select%0D%0A++dateutil_rrule('FREQ%3DHOURLY%3BCOUNT%3D5')%2C%0D%0A++dateutil_rrule_date(%0D%0A++++'FREQ%3DDAILY%3BCOUNT%3D3'%2C%0D%0A++++'1st+jan+2020'%0D%0A++)%3B) ### Joining data using json_each() SQLite's [json_each() function](https://www.sqlite.org/json1.html#jeach) can be used to turn a JSON array of dates into a table that can be joined against other data. Here's a query that returns a table showing every day in January 2019: ```sql select value as date from json_each( dateutil_dates_between('1 Jan 2019', '31 Jan 2019') ) ``` [Try that query](https://latest-with-plugins.datasette.io/fixtures?sql=select%0D%0A++value+as+date%0D%0Afrom%0D%0A++json_each%28%0D%0A++++dateutil_dates_between%28%271+Jan+2019%27%2C+%2731+Jan+2019%27%29%0D%0A++%29) You can run joins against this table by assigning it a name using SQLite's [support for Common Table Expressions (CTEs)](https://sqlite.org/lang_with.html). This example query uses `substr(created, 0, 11)` to retrieve the date portion of the `created` column in the [facetable demo table](https://latest-with-plugins.datasette.io/fixtures/facetable), then joins that against the table of days in January to calculate the count of rows created on each day. The `LEFT JOIN` against `days_in_january` ensures that days which had no created records are still returned in the results, with a count of 0. ```sql with created_dates as ( select substr(created, 0, 11) as date from facetable ), days_in_january as ( select value as date from json_each( dateutil_dates_between('1 Jan 2019', '31 Jan 2019') ) ) select days_in_january.date, count(created_dates.date) as total from days_in_january left join created_dates on days_in_january.date = created_dates.date group by days_in_january.date; ``` [Try that query](https://latest-with-plugins.datasette.io/fixtures?sql=with+created_dates+as+%28%0D%0A++select%0D%0A++++substr%28created%2C+0%2C+11%29+as+date%0D%0A++from%0D%0A++++facetable%0D%0A%29%2C%0D%0Adays_in_january+as+%28%0D%0A++select%0D%0A++++value+as+date%0D%0A++from%0D%0A++++json_each%28%0D%0A++++++dateutil_dates_between%28%271+Jan+2019%27%2C+%2731+Jan+2019%27%29%0D%0A++++%29%0D%0A%29%0D%0Aselect%0D%0A++days_in_january.date%2C%0D%0A++count%28created_dates.date%29+as+total%0D%0Afrom%0D%0A++days_in_january%0D%0A++left+join+created_dates+on+days_in_january.date+%3D+created_dates.date%0D%0Agroup+by%0D%0A++days_in_january.date%3B#g.mark=bar&g.x_column=date&g.x_type=ordinal&g.y_column=total&g.y_type=quantitative) with a bar chart rendered using the [datasette-vega](https://github.com/simonw/datasette-vega) plugin. ## Development To set up this plugin locally, first checkout the code. Then create a new virtual environment: cd datasette-dateutil python3 -mvenv venv source venv/bin/activate Or if you are using `pipenv`: pipenv shell Now install the dependencies and tests: pip install -e '.[test]' To run the tests: pytest ",Simon Willison,,text/markdown,https://github.com/simonw/datasette-dateutil,,"Apache License, Version 2.0",,,https://pypi.org/project/datasette-dateutil/,,https://pypi.org/project/datasette-dateutil/,"{""CI"": ""https://github.com/simonw/datasette-dateutil/actions"", ""Changelog"": ""https://github.com/simonw/datasette-dateutil/releases"", ""Homepage"": ""https://github.com/simonw/datasette-dateutil"", ""Issues"": ""https://github.com/simonw/datasette-dateutil/issues""}",https://pypi.org/project/datasette-dateutil/0.3/,"[""datasette"", ""python-dateutil"", ""pytest ; extra == 'test'"", ""pytest-asyncio ; extra == 'test'"", ""httpx ; extra == 'test'""]",,0.3,0, datasette-debug-asgi,Datasette plugin for dumping out the ASGI scope,[],"# datasette-debug-asgi [](https://pypi.org/project/datasette-debug-asgi/) [](https://github.com/simonw/datasette-debug-asgi/releases) [](https://github.com/simonw/datasette-debug-asgi/actions?query=workflow%3ATest) [](https://github.com/simonw/datasette-debug-asgi/blob/main/LICENSE) Datasette plugin for dumping out the ASGI scope. Adds a new URL at `/-/asgi-scope` which shows the current ASGI scope. Demo here: https://datasette.io/-/asgi-scope ## Installation pip install datasette-debug-asgi ## Usage Visit `/-/asgi-scope` to see debug output showing the ASGI scope. You can add query string parameters such as `/-/asgi-scope?q=hello`. You can also add extra path components such as `/-/asgi-scope/more/path/here`. ",Simon Willison,,text/markdown,https://github.com/simonw/datasette-debug-asgi,,"Apache License, Version 2.0",,,https://pypi.org/project/datasette-debug-asgi/,,https://pypi.org/project/datasette-debug-asgi/,"{""CI"": ""https://github.com/simonw/datasette-debug-asgi/actions"", ""Changelog"": ""https://github.com/simonw/datasette-debug-asgi/releases"", ""Homepage"": ""https://github.com/simonw/datasette-debug-asgi"", ""Issues"": ""https://github.com/simonw/datasette-debug-asgi/issues""}",https://pypi.org/project/datasette-debug-asgi/1.1/,"[""datasette (>=0.50)"", ""pytest ; extra == 'test'"", ""pytest-asyncio ; extra == 'test'""]",>=3.6,1.1,0, datasette-edit-schema,Datasette plugin for modifying table schemas,[],"# datasette-edit-schema [](https://pypi.org/project/datasette-edit-schema/) [](https://github.com/simonw/datasette-edit-schema/releases) [](https://github.com/simonw/datasette-edit-schema/actions?query=workflow%3ATest) [](https://github.com/simonw/datasette-edit-schema/blob/master/LICENSE) Datasette plugin for modifying table schemas ## Features * Add new columns to a table * Rename columns in a table * Modify the type of columns in a table * Re-order the columns in a table * Rename a table * Delete a table ## Installation Install this plugin in the same environment as Datasette. $ pip install datasette-edit-schema ## Usage Navigate to `/-/edit-schema/dbname/tablename` on your Datasette instance to edit a specific table. Use `/-/edit-schema/dbname` to create a new table in a specific database. By default only [the root actor](https://datasette.readthedocs.io/en/stable/authentication.html#using-the-root-actor) can access the page - so you'll need to run Datasette with the `--root` option and click on the link shown in the terminal to sign in and access the page. ## Permissions The `edit-schema` permission governs access. You can use permission plugins such as [datasette-permissions-sql](https://github.com/simonw/datasette-permissions-sql) to grant additional access to the write interface. These permission checks will call the `permission_allowed()` plugin hook with three arguments: - `action` will be the string `""edit-schema""` - `actor` will be the currently authenticated actor - usually a dictionary - `resource` will be the string name of the database ## Screenshot 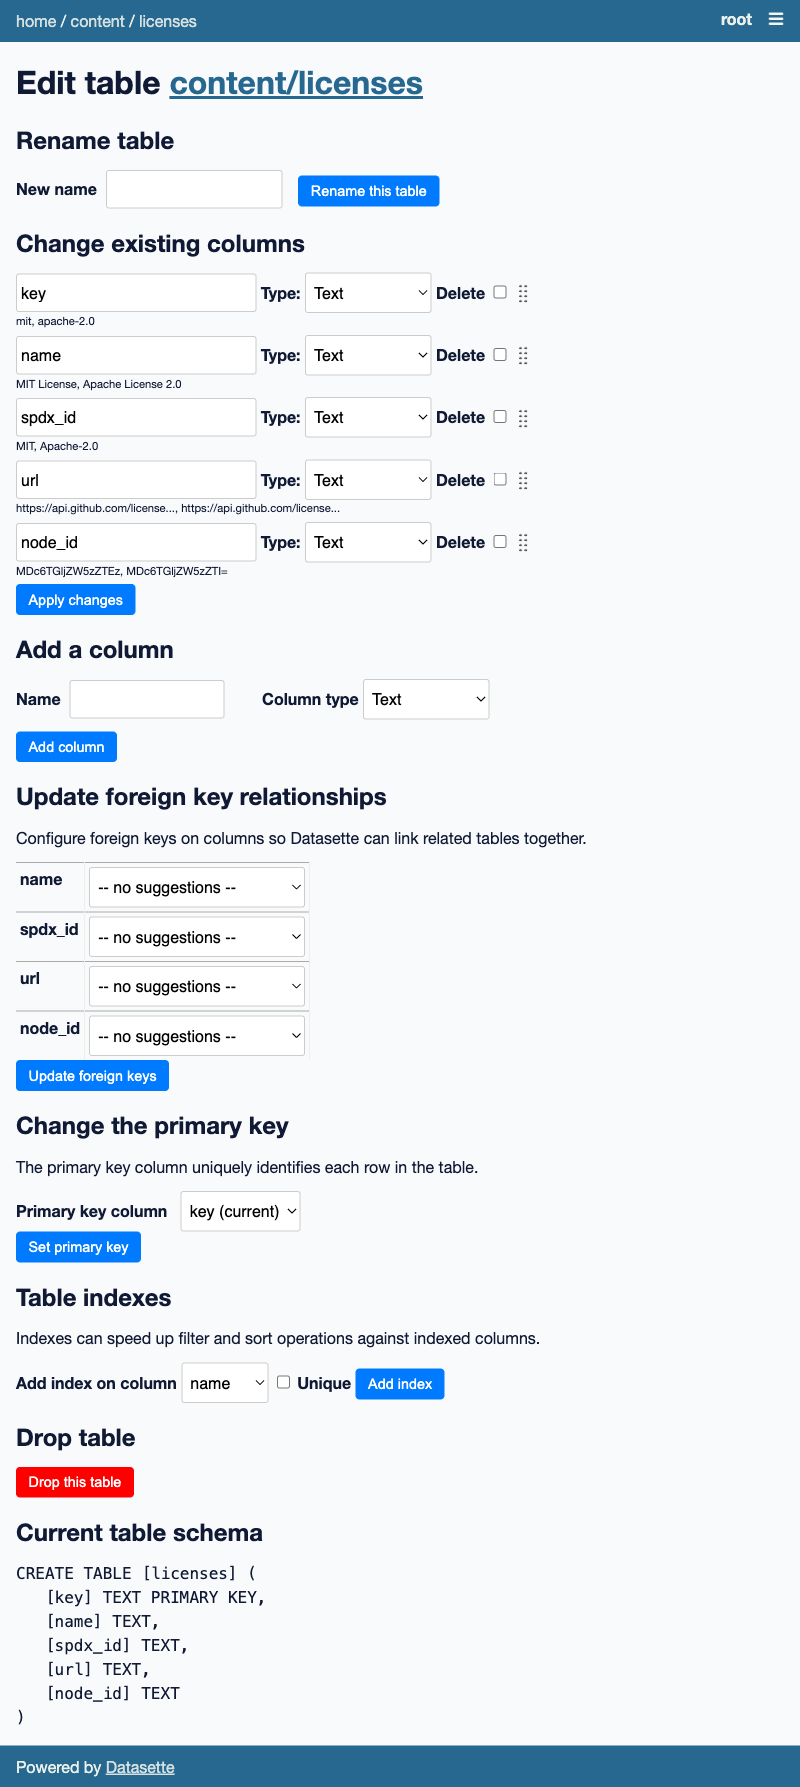 ## Development To set up this plugin locally, first checkout the code. Then create a new virtual environment: cd datasette-edit-schema python3 -mvenv venv source venv/bin/activate Or if you are using `pipenv`: pipenv shell Now install the dependencies and tests: pip install -e '.[test]' To run the tests: pytest ",Simon Willison,,text/markdown,https://github.com/simonw/datasette-edit-schema,,"Apache License, Version 2.0",,,https://pypi.org/project/datasette-edit-schema/,,https://pypi.org/project/datasette-edit-schema/,"{""Homepage"": ""https://github.com/simonw/datasette-edit-schema""}",https://pypi.org/project/datasette-edit-schema/0.5.1/,"[""datasette (>=0.59)"", ""sqlite-utils (>=3.10)"", ""pytest ; extra == 'test'"", ""pytest-asyncio ; extra == 'test'""]",>=3.7,0.5.1,0, datasette-edit-templates,Plugin allowing Datasette templates to be edited within Datasette,[],"# datasette-edit-templates [](https://pypi.org/project/datasette-edit-templates/) [](https://github.com/simonw/datasette-edit-templates/releases) [](https://github.com/simonw/datasette-edit-templates/actions?query=workflow%3ATest) [](https://github.com/simonw/datasette-edit-templates/blob/main/LICENSE) Plugin allowing Datasette templates to be edited within Datasette. ## Installation Install this plugin in the same environment as Datasette. $ datasette install datasette-edit-templates ## Usage Once installed, sign in as the root user using `datasette mydb.db --root`. On startup. a `_templates_` table will be created in the database you are running Datasette against. Use the app menu to navigate to the `/-/edit-templates` page, and edit templates there. Changes should become visible instantly, and will be persisted to your database. ## Development To set up this plugin locally, first checkout the code. Then create a new virtual environment: cd datasette-edit-templates python3 -mvenv venv source venv/bin/activate Or if you are using `pipenv`: pipenv shell Now install the dependencies and tests: pip install -e '.[test]' To run the tests: pytest ",Simon Willison,,text/markdown,https://github.com/simonw/datasette-edit-templates,,"Apache License, Version 2.0",,,https://pypi.org/project/datasette-edit-templates/,,https://pypi.org/project/datasette-edit-templates/,"{""CI"": ""https://github.com/simonw/datasette-edit-templates/actions"", ""Changelog"": ""https://github.com/simonw/datasette-edit-templates/releases"", ""Homepage"": ""https://github.com/simonw/datasette-edit-templates"", ""Issues"": ""https://github.com/simonw/datasette-edit-templates/issues""}",https://pypi.org/project/datasette-edit-templates/0.1/,"[""datasette (>=0.63)"", ""pytest ; extra == 'test'"", ""pytest-asyncio ; extra == 'test'"", ""sqlite-utils ; extra == 'test'""]",>=3.7,0.1,0, datasette-export-notebook,Datasette plugin providing instructions for exporting data to Jupyter or Observable,[],"# datasette-export-notebook [](https://pypi.org/project/datasette-export-notebook/) [](https://github.com/simonw/datasette-export-notebook/releases) [](https://github.com/simonw/datasette-export-notebook/actions?query=workflow%3ATest) [](https://github.com/simonw/datasette-export-notebook/blob/main/LICENSE) Datasette plugin providing instructions for exporting data to a [Jupyter](https://jupyter.org/) or [Observable](https://observablehq.com/) notebook. ## Installation Install this plugin in the same environment as Datasette. $ datasette install datasette-export-notebook ## Usage Once installed, the plugin will add a `.Notebook` export option to every table and query. Clicking on this link will show instructions for exporting the data to Jupyter or Observable. ## Demo You can see this plugin in action on the [latest-with-plugins.datasette.io](https://latest-with-plugins.datasette.io/) Datasette instance - for example on [/github/commits.Notebook](https://latest-with-plugins.datasette.io/github/commits.Notebook). ## Development To set up this plugin locally, first checkout the code. Then create a new virtual environment: cd datasette-export-notebook python3 -mvenv venv source venv/bin/activate Or if you are using `pipenv`: pipenv shell Now install the dependencies and tests: pip install -e '.[test]' To run the tests: pytest ",Simon Willison,,text/markdown,https://github.com/simonw/datasette-export-notebook,,"Apache License, Version 2.0",,,https://pypi.org/project/datasette-export-notebook/,,https://pypi.org/project/datasette-export-notebook/,"{""CI"": ""https://github.com/simonw/datasette-export-notebook/actions"", ""Changelog"": ""https://github.com/simonw/datasette-export-notebook/releases"", ""Homepage"": ""https://github.com/simonw/datasette-export-notebook"", ""Issues"": ""https://github.com/simonw/datasette-export-notebook/issues""}",https://pypi.org/project/datasette-export-notebook/1.0/,"[""datasette"", ""pytest ; extra == 'test'"", ""pytest-asyncio ; extra == 'test'"", ""sqlite-utils ; extra == 'test'""]",>=3.6,1.0,0, datasette-expose-env,Datasette plugin to expose selected environment variables at /-/env for debugging,"[""Framework :: Datasette"", ""License :: OSI Approved :: Apache Software License""]","# datasette-expose-env [](https://pypi.org/project/datasette-expose-env/) [](https://github.com/simonw/datasette-expose-env/releases) [](https://github.com/simonw/datasette-expose-env/actions?query=workflow%3ATest) [](https://github.com/simonw/datasette-expose-env/blob/main/LICENSE) Datasette plugin to expose selected environment variables at `/-/env` for debugging ## Installation Install this plugin in the same environment as Datasette. datasette install datasette-expose-env ## Configuration Decide on a list of environment variables you would like to expose, then add the following to your `metadata.yml` configuration: ```yaml plugins: datasette-expose-env: - ENV_VAR_1 - ENV_VAR_2 - ENV_VAR_3 ``` If you are using JSON in a `metadata.json` file use the following: ```json { ""plugins"": { ""datasette-expose-env"": [ ""ENV_VAR_1"", ""ENV_VAR_2"", ""ENV_VAR_3"" ] } } ``` Visit `/-/env` on your Datasette instance to see the values of the environment variables. ## Development To set up this plugin locally, first checkout the code. Then create a new virtual environment: cd datasette-expose-env python3 -m venv venv source venv/bin/activate Now install the dependencies and test dependencies: pip install -e '.[test]' To run the tests: pytest ",Simon Willison,,text/markdown,https://github.com/simonw/datasette-expose-env,,"Apache License, Version 2.0",,,https://pypi.org/project/datasette-expose-env/,,https://pypi.org/project/datasette-expose-env/,"{""CI"": ""https://github.com/simonw/datasette-expose-env/actions"", ""Changelog"": ""https://github.com/simonw/datasette-expose-env/releases"", ""Homepage"": ""https://github.com/simonw/datasette-expose-env"", ""Issues"": ""https://github.com/simonw/datasette-expose-env/issues""}",https://pypi.org/project/datasette-expose-env/0.1/,"[""datasette"", ""pytest ; extra == 'test'"", ""pytest-asyncio ; extra == 'test'""]",>=3.7,0.1,0, datasette-external-links-new-tabs,Datasette plugin to open external links in new tabs,"[""Framework :: Datasette"", ""License :: OSI Approved :: Apache Software License""]","# datasette-external-links-new-tabs [](https://pypi.org/project/datasette-external-links-new-tabs/) [](https://github.com/ocdtrekkie/datasette-external-links-new-tabs/releases) [](https://github.com/ocdtrekkie/datasette-external-links-new-tabs/actions?query=workflow%3ATest) [](https://github.com/ocdtrekkie/datasette-external-links-new-tabs/blob/main/LICENSE) Datasette plugin to open external links in new tabs ## Installation Install this plugin in the same environment as Datasette. datasette install datasette-external-links-new-tabs ## Usage There are no usage instructions, it simply opens external links in a new tab. ## Development To set up this plugin locally, first checkout the code. Then create a new virtual environment: cd datasette-external-links-new-tabs python3 -m venv venv source venv/bin/activate Now install the dependencies and test dependencies: pip install -e '.[test]' To run the tests: pytest ",Jacob Weisz,,text/markdown,https://github.com/ocdtrekkie/datasette-external-links-new-tabs,,"Apache License, Version 2.0",,,https://pypi.org/project/datasette-external-links-new-tabs/,,https://pypi.org/project/datasette-external-links-new-tabs/,"{""CI"": ""https://github.com/ocdtrekkie/datasette-external-links-new-tabs/actions"", ""Changelog"": ""https://github.com/ocdtrekkie/datasette-external-links-new-tabs/releases"", ""Homepage"": ""https://github.com/ocdtrekkie/datasette-external-links-new-tabs"", ""Issues"": ""https://github.com/ocdtrekkie/datasette-external-links-new-tabs/issues""}",https://pypi.org/project/datasette-external-links-new-tabs/0.1/,"[""datasette"", ""pytest ; extra == 'test'"", ""pytest-asyncio ; extra == 'test'""]",>=3.7,0.1,0, datasette-geojson,Add GeoJSON as an output option,[],"# datasette-geojson [](https://pypi.org/project/datasette-geojson/) [](https://github.com/eyeseast/datasette-geojson/releases) [](https://github.com/eyeseast/datasette-geojson/actions?query=workflow%3ATest) [](https://github.com/eyeseast/datasette-geojson/blob/main/LICENSE) Add GeoJSON as an output option for datasette queries. ## Installation Install this plugin in the same environment as Datasette. datasette install datasette-geojson ## Usage To render GeoJSON, add a `.geojson` extension to any query URL that includes a `geometry` column. That column should be a valid [GeoJSON geometry](https://datatracker.ietf.org/doc/html/rfc7946#section-3.1). For example, you might use [geojson-to-sqlite](https://pypi.org/project/geojson-to-sqlite/) or [shapefile-to-sqlite](https://pypi.org/project/shapefile-to-sqlite/) to load [neighborhood boundaries](https://bostonopendata-boston.opendata.arcgis.com/datasets/3525b0ee6e6b427f9aab5d0a1d0a1a28_0/explore) into a SQLite database. ```sh wget -O neighborhoods.geojson https://opendata.arcgis.com/datasets/3525b0ee6e6b427f9aab5d0a1d0a1a28_0.geojson geojson-to-sqlite boston.db neighborhoods neighborhoods.geojson --spatial-index # create a spatial index datasette serve boston.db --load-extension spatialite ``` If you're using Spatialite, the geometry column will be in a binary format. If not, make sure the `geometry` column is a well-formed [GeoJSON geometry](https://datatracker.ietf.org/doc/html/rfc7946#section-3.1). If you used `geojson-to-sqlite` or `shapefile-to-sqlite`, you should be all set. Run this query in Datasette and you'll see a link to download GeoJSON: ```sql select rowid, OBJECTID, Name, Acres, Neighborhood_ID, SqMiles, ShapeSTArea, ShapeSTLength, geometry from neighborhoods order by rowid limit 101 ``` Note that the geometry column needs to be explicitly _named_ `geometry` or you won't get the option to export GeoJSON. If you want to use a different column, rename it with `AS`: `SELECT other AS geometry FROM my_table`.  ## Development To set up this plugin locally, first checkout the code. Then create a new virtual environment: cd datasette-geojson python3 -mvenv venv source venv/bin/activate Or if you are using `pipenv`: pipenv shell Now install the dependencies and tests: pip install -e '.[test]' To run the tests: pytest ",Chris Amico,,text/markdown,https://github.com/eyeseast/datasette-geojson,,"Apache License, Version 2.0",,,https://pypi.org/project/datasette-geojson/,,https://pypi.org/project/datasette-geojson/,"{""CI"": ""https://github.com/eyeseast/datasette-geojson/actions"", ""Changelog"": ""https://github.com/eyeseast/datasette-geojson/releases"", ""Homepage"": ""https://github.com/eyeseast/datasette-geojson"", ""Issues"": ""https://github.com/eyeseast/datasette-geojson/issues""}",https://pypi.org/project/datasette-geojson/0.3.1/,"[""datasette"", ""geojson"", ""pytest ; extra == 'test'"", ""pytest-asyncio ; extra == 'test'"", ""geojson-to-sqlite ; extra == 'test'""]",>=3.6,0.3.1,0, datasette-geojson-map,Render a map for any query with a geometry column,[],"# datasette-geojson-map [](https://pypi.org/project/datasette-geojson-map/) [](https://github.com/eyeseast/datasette-geojson-map/releases) [](https://github.com/eyeseast/datasette-geojson-map/actions?query=workflow%3ATest) [](https://github.com/eyeseast/datasette-geojson-map/blob/main/LICENSE) Render a map for any query with a geometry column ## Installation Install this plugin in the same environment as Datasette. $ datasette install datasette-geojson-map ## Usage Start by loading a GIS file. For example, you might use [geojson-to-sqlite](https://pypi.org/project/geojson-to-sqlite/) or [shapefile-to-sqlite](https://pypi.org/project/shapefile-to-sqlite/) to load [neighborhood boundaries](https://bostonopendata-boston.opendata.arcgis.com/datasets/3525b0ee6e6b427f9aab5d0a1d0a1a28_0/explore) into a SQLite database. ```sh wget -O neighborhoods.geojson https://opendata.arcgis.com/datasets/3525b0ee6e6b427f9aab5d0a1d0a1a28_0.geojson geojson-to-sqlite boston.db neighborhoods neighborhoods.geojson ``` (The command above uses Spatialite, but that's not required.) Start up `datasette` and navigate to the `neighborhoods` table. ```sh datasette serve boston.db # in another terminal tab open http://localhost:8001/boston/neighborhoods ``` You should see a map centered on Boston with each neighborhood outlined. Clicking a boundary will bring up a popup with details on that feature.  This plugin relies on (and will install) [datasette-geojson](https://github.com/eyeseast/datasette-geojson). Any query that includes a `geometry` column will produce a map of the results. This also includes single row views. Run the included `demo` project to see it live. ## Configuration This project uses the same map configuration as [datasette-cluster-map](https://github.com/simonw/datasette-cluster-map). Here's how you would use [Stamen's terrain tiles](http://maps.stamen.com/terrain/#12/37.7706/-122.3782): ```yaml plugins: datasette-geojson-map: tile_layer: https://stamen-tiles-{s}.a.ssl.fastly.net/terrain/{z}/{x}/{y}.{ext} tile_layer_options: attribution: >- Map tiles by Stamen Design, under CC BY 3.0. Data by OpenStreetMap, under ODbL. subdomains: abcd minZoom: 1 maxZoom: 16 ext: jpg ``` Options: - `tile_layer`: Use a URL template that can be passed to a [Leaflet Tilelayer](https://leafletjs.com/reference-1.7.1.html#tilelayer) - `tile_layer_options`: All options will be passed to the tile layer. See [Leaflet documentation](https://leafletjs.com/reference-1.7.1.html#tilelayer) for more on possible values here. ## Styling map features Map features can be styled using the [simplestyle-spec](https://github.com/mapbox/simplestyle-spec). This requires setting specific fields on returned rows. Here's an example: ```sql SELECT Name, geometry, ""#ff0000"" as fill, ""#0000ff"" as stroke, 0.2 as stroke-width, from neighborhoods ``` That will render a neighborhood map where each polygon is filled in red, outlined in blue and lines are 0.2 pixels wide. A more useful approach would use the `CASE` statement to color features based on data: ```sql SELECT Name, geometry, CASE Name WHEN ""Roslindale"" THEN ""#ff0000"" WHEN ""Dorchester"" THEN ""#0000ff"" ELSE ""#dddddd"" END fill FROM neighborhoods ``` This will fill Roslindale in red, Dorchester in blue and all other neighborhoods in gray. ## Development To set up this plugin locally, first checkout the code. Then create a new virtual environment: cd datasette-geojson-map python3 -mvenv venv source venv/bin/activate Or if you are using `pipenv`: pipenv shell Now install the dependencies and test dependencies: pip install -e '.[test]' To run the tests: pytest ",Chris Amico,,text/markdown,https://github.com/eyeseast/datasette-geojson-map,,"Apache License, Version 2.0",,,https://pypi.org/project/datasette-geojson-map/,,https://pypi.org/project/datasette-geojson-map/,"{""CI"": ""https://github.com/eyeseast/datasette-geojson-map/actions"", ""Changelog"": ""https://github.com/eyeseast/datasette-geojson-map/releases"", ""Homepage"": ""https://github.com/eyeseast/datasette-geojson-map"", ""Issues"": ""https://github.com/eyeseast/datasette-geojson-map/issues""}",https://pypi.org/project/datasette-geojson-map/0.4.0/,"[""datasette"", ""datasette-geojson"", ""datasette-leaflet"", ""pytest ; extra == 'test'"", ""pytest-asyncio ; extra == 'test'"", ""geojson-to-sqlite ; extra == 'test'""]",>=3.6,0.4.0,0, datasette-glitch,Utilities to help run Datasette on Glitch,[],"# datasette-glitch [](https://pypi.org/project/datasette-glitch/) [](https://github.com/simonw/datasette-glitch/releases) [](https://github.com/simonw/datasette-glitch/blob/master/LICENSE) Utilities to help run Datasette on Glitch ## Installation Install this plugin in the same environment as Datasette. $ pip install datasette-glitch ## Usage This plugin outputs a special link which will sign you into Datasette as the root user. Click Tools -> Logs in the Glitch editor interface after your app starts to see the link. ",Simon Willison,,text/markdown,https://github.com/simonw/datasette-glitch,,"Apache License, Version 2.0",,,https://pypi.org/project/datasette-glitch/,,https://pypi.org/project/datasette-glitch/,"{""CI"": ""https://github.com/simonw/datasette-glitch/actions"", ""Changelog"": ""https://github.com/simonw/datasette-glitch/releases"", ""Homepage"": ""https://github.com/simonw/datasette-glitch"", ""Issues"": ""https://github.com/simonw/datasette-glitch/issues""}",https://pypi.org/project/datasette-glitch/0.1/,"[""datasette (>=0.45)"", ""pytest ; extra == 'test'"", ""pytest-asyncio ; extra == 'test'"", ""httpx ; extra == 'test'""]",,0.1,0, datasette-graphql,Datasette plugin providing an automatic GraphQL API for your SQLite databases,[],"# datasette-graphql [](https://pypi.org/project/datasette-graphql/) [](https://github.com/simonw/datasette-graphql/releases) [](https://github.com/simonw/datasette-graphql/actions?query=workflow%3ATest) [](https://github.com/simonw/datasette-graphql/blob/main/LICENSE) **Datasette plugin providing an automatic GraphQL API for your SQLite databases** Read more about this project: [GraphQL in Datasette with the new datasette-graphql plugin](https://simonwillison.net/2020/Aug/7/datasette-graphql/) Try out a live demo at [datasette-graphql-demo.datasette.io/graphql](https://datasette-graphql-demo.datasette.io/graphql?query=%7B%0A%20%20repos(first%3A10%2C%20search%3A%20%22sql%22%2C%20sort_desc%3A%20created_at)%20%7B%0A%20%20%20%20totalCount%0A%20%20%20%20pageInfo%20%7B%0A%20%20%20%20%20%20endCursor%0A%20%20%20%20%20%20hasNextPage%0A%20%20%20%20%7D%0A%20%20%20%20nodes%20%7B%0A%20%20%20%20%20%20full_name%0A%20%20%20%20%20%20description_%0A%20%20%20%20%09stargazers_count%0A%20%20%20%20%20%20created_at%0A%20%20%20%20%20%20owner%20%7B%0A%20%20%20%20%20%20%20%20name%0A%20%20%20%20%20%20%20%20html_url%0A%20%20%20%20%20%20%7D%0A%20%20%20%20%7D%0A%20%20%7D%0A%7D%0A) - [Installation](#installation) - [Usage](#usage) * [Querying for tables and columns](#querying-for-tables-and-columns) * [Fetching a single record](#fetching-a-single-record) * [Accessing nested objects](#accessing-nested-objects) * [Accessing related objects](#accessing-related-objects) * [Filtering tables](#filtering-tables) * [Sorting](#sorting) * [Pagination](#pagination) * [Search](#search) * [Columns containing JSON strings](#columns-containing-json-strings) * [Auto camelCase](#auto-camelcase) * [CORS](#cors) * [Execution limits](#execution-limits) - [The graphql() template function](#the-graphql-template-function) - [Adding custom fields with plugins](#adding-custom-fields-with-plugins) - [Development](#development)  ## Installation Install this plugin in the same environment as Datasette. $ datasette install datasette-graphql ## Usage This plugin sets up `/graphql` as a GraphQL endpoint for the first attached database. If you have multiple attached databases each will get its own endpoint at `/graphql/name_of_database`. The automatically generated GraphQL schema is available at `/graphql/name_of_database.graphql` - here's [an example](https://datasette-graphql-demo.datasette.io/graphql/github.graphql). ### Querying for tables and columns Individual tables (and SQL views) can be queried like this: ```graphql { repos { nodes { id full_name description_ } } } ``` [Try this query](https://datasette-graphql-demo.datasette.io/graphql?query=%0A%7B%0A%20%20repos%20%7B%0A%20%20%20%20nodes%20%7B%0A%20%20%20%20%20%20id%0A%20%20%20%20%20%20full_name%0A%20%20%20%20%20%20description_%0A%20%20%20%20%7D%0A%20%20%7D%0A%7D%0A) In this example query the underlying database table is called `repos` and its columns include `id`, `full_name` and `description`. Since `description` is a reserved word the query needs to ask for `description_` instead. ### Fetching a single record If you only want to fetch a single record - for example if you want to fetch a row by its primary key - you can use the `tablename_row` field: ```graphql { repos_row(id: 107914493) { id full_name description_ } } ``` [Try this query](https://datasette-graphql-demo.datasette.io/graphql?query=%0A%7B%0A%20%20repos_row%28id%3A%20107914493%29%20%7B%0A%20%20%20%20id%0A%20%20%20%20full_name%0A%20%20%20%20description_%0A%20%20%7D%0A%7D%0A) The `tablename_row` field accepts the primary key column (or columns) as arguments. It also supports the same `filter:`, `search:`, `sort:` and `sort_desc:` arguments as the `tablename` field, described below. ### Accessing nested objects If a column is a foreign key to another table, you can request columns from the table pointed to by that foreign key using a nested query like this: ```graphql { repos { nodes { id full_name owner { id login } } } } ``` [Try this query](https://datasette-graphql-demo.datasette.io/graphql?query=%0A%7B%0A%20%20repos%20%7B%0A%20%20%20%20nodes%20%7B%0A%20%20%20%20%20%20id%0A%20%20%20%20%20%20full_name%0A%20%20%20%20%20%20owner%20%7B%0A%20%20%20%20%20%20%20%20id%0A%20%20%20%20%20%20%20%20login%0A%20%20%20%20%20%20%7D%0A%20%20%20%20%7D%0A%20%20%7D%0A%7D%0A) ### Accessing related objects If another table has a foreign key back to the table you are accessing, you can fetch rows from that related table. Consider a `users` table which is related to `repos` - a repo has a foreign key back to the user that owns the repository. The `users` object type will have a `repos_by_owner_list` field which can be used to access those related repos: ```graphql { users(first: 1, search: ""simonw"") { nodes { name repos_by_owner_list(first: 5) { totalCount nodes { full_name } } } } } ``` [Try this query](https://datasette-graphql-demo.datasette.io/graphql?query=%0A%7B%0A%20%20users%28first%3A%201%2C%20search%3A%20%22simonw%22%29%20%7B%0A%20%20%20%20nodes%20%7B%0A%20%20%20%20%20%20name%0A%20%20%20%20%20%20repos_by_owner_list%28first%3A%205%29%20%7B%0A%20%20%20%20%20%20%20%20totalCount%0A%20%20%20%20%20%20%20%20nodes%20%7B%0A%20%20%20%20%20%20%20%20%20%20full_name%0A%20%20%20%20%20%20%20%20%7D%0A%20%20%20%20%20%20%7D%0A%20%20%20%20%7D%0A%20%20%7D%0A%7D%0A) ### Filtering tables You can filter the rows returned for a specific table using the `filter:` argument. This accepts a filter object mapping columns to operations. For example, to return just repositories with the Apache 2 license and more than 10 stars: ```graphql { repos(filter: {license: {eq: ""apache-2.0""}, stargazers_count: {gt: 10}}) { nodes { full_name stargazers_count license { key } } } } ``` [Try this query](https://datasette-graphql-demo.datasette.io/graphql?query=%0A%7B%0A%20%20repos%28filter%3A%20%7Blicense%3A%20%7Beq%3A%20%22apache-2.0%22%7D%2C%20stargazers_count%3A%20%7Bgt%3A%2010%7D%7D%29%20%7B%0A%20%20%20%20nodes%20%7B%0A%20%20%20%20%20%20full_name%0A%20%20%20%20%20%20stargazers_count%0A%20%20%20%20%20%20license%20%7B%0A%20%20%20%20%20%20%20%20key%0A%20%20%20%20%20%20%7D%0A%20%20%20%20%7D%0A%20%20%7D%0A%7D%0A) See [table filters examples](https://github.com/simonw/datasette-graphql/blob/main/examples/filters.md) for more operations, and [column filter arguments](https://docs.datasette.io/en/stable/json_api.html#column-filter-arguments) in the Datasette documentation for details of how those operations work. These same filters can be used on nested relationships, like so: ```graphql { users_row(id: 9599) { name repos_by_owner_list(filter: {name: {startswith: ""datasette-""}}) { totalCount nodes { full_name } } } } ``` [Try this query](https://datasette-graphql-demo.datasette.io/graphql?query=%0A%7B%0A%20%20users_row%28id%3A%209599%29%20%7B%0A%20%20%20%20name%0A%20%20%20%20repos_by_owner_list%28filter%3A%20%7Bname%3A%20%7Bstartswith%3A%20%22datasette-%22%7D%7D%29%20%7B%0A%20%20%20%20%20%20totalCount%0A%20%20%20%20%20%20nodes%20%7B%0A%20%20%20%20%20%20%20%20full_name%0A%20%20%20%20%20%20%7D%0A%20%20%20%20%7D%0A%20%20%7D%0A%7D%0A) The `where:` argument can be used as an alternative to `filter:` when the thing you are expressing is too complex to be modeled using a filter expression. It accepts a string fragment of SQL that will be included in the `WHERE` clause of the SQL query. ```graphql { repos(where: ""name='sqlite-utils' or name like 'datasette-%'"") { totalCount nodes { full_name } } } ``` [Try this query](https://datasette-graphql-demo.datasette.io/graphql?query=%0A%7B%0A%20%20repos%28where%3A%20%22name%3D%27sqlite-utils%27%20or%20name%20like%20%27datasette-%25%27%22%29%20%7B%0A%20%20%20%20totalCount%0A%20%20%20%20nodes%20%7B%0A%20%20%20%20%20%20full_name%0A%20%20%20%20%7D%0A%20%20%7D%0A%7D%0A) ### Sorting You can set a sort order for results from a table using the `sort:` or `sort_desc:` arguments. The value for this argument should be the name of the column you wish to sort (or sort-descending) by. ```graphql { repos(sort_desc: stargazers_count) { nodes { full_name stargazers_count } } } ``` [Try this query](https://datasette-graphql-demo.datasette.io/graphql?query=%0A%7B%0A%20%20repos%28sort_desc%3A%20stargazers_count%29%20%7B%0A%20%20%20%20nodes%20%7B%0A%20%20%20%20%20%20full_name%0A%20%20%20%20%20%20stargazers_count%0A%20%20%20%20%7D%0A%20%20%7D%0A%7D%0A) ### Pagination By default the first 10 rows will be returned. You can control this using the `first:` argument. ```graphql { repos(first: 20) { totalCount pageInfo { hasNextPage endCursor } nodes { full_name stargazers_count license { key } } } } ``` [Try this query](https://datasette-graphql-demo.datasette.io/graphql?query=%0A%7B%0A%20%20repos%28first%3A%2020%29%20%7B%0A%20%20%20%20totalCount%0A%20%20%20%20pageInfo%20%7B%0A%20%20%20%20%20%20hasNextPage%0A%20%20%20%20%20%20endCursor%0A%20%20%20%20%7D%0A%20%20%20%20nodes%20%7B%0A%20%20%20%20%20%20full_name%0A%20%20%20%20%20%20stargazers_count%0A%20%20%20%20%20%20license%20%7B%0A%20%20%20%20%20%20%20%20key%0A%20%20%20%20%20%20%7D%0A%20%20%20%20%7D%0A%20%20%7D%0A%7D%0A) The `totalCount` field returns the total number of records that match the query. Requesting the `pageInfo.endCursor` field provides you with the value you need to request the next page. You can pass this to the `after:` argument to request the next page. ```graphql { repos(first: 20, after: ""134874019"") { totalCount pageInfo { hasNextPage endCursor } nodes { full_name stargazers_count license { key } } } } ``` [Try this query](https://datasette-graphql-demo.datasette.io/graphql?query=%0A%7B%0A%20%20repos%28first%3A%2020%2C%20after%3A%20%22134874019%22%29%20%7B%0A%20%20%20%20totalCount%0A%20%20%20%20pageInfo%20%7B%0A%20%20%20%20%20%20hasNextPage%0A%20%20%20%20%20%20endCursor%0A%20%20%20%20%7D%0A%20%20%20%20nodes%20%7B%0A%20%20%20%20%20%20full_name%0A%20%20%20%20%20%20stargazers_count%0A%20%20%20%20%20%20license%20%7B%0A%20%20%20%20%20%20%20%20key%0A%20%20%20%20%20%20%7D%0A%20%20%20%20%7D%0A%20%20%7D%0A%7D%0A) The `hasNextPage` field tells you if there are any more records. ### Search If a table has been configured to use SQLite full-text search you can execute searches against it using the `search:` argument: ```graphql { repos(search: ""datasette"") { totalCount pageInfo { hasNextPage endCursor } nodes { full_name description_ } } } ``` [Try this query](https://datasette-graphql-demo.datasette.io/graphql?query=%0A%7B%0A%20%20repos%28search%3A%20%22datasette%22%29%20%7B%0A%20%20%20%20totalCount%0A%20%20%20%20pageInfo%20%7B%0A%20%20%20%20%20%20hasNextPage%0A%20%20%20%20%20%20endCursor%0A%20%20%20%20%7D%0A%20%20%20%20nodes%20%7B%0A%20%20%20%20%20%20full_name%0A%20%20%20%20%20%20description_%0A%20%20%20%20%7D%0A%20%20%7D%0A%7D%0A) The [sqlite-utils](https://sqlite-utils.datasette.io/) Python library and CLI tool can be used to add full-text search to an existing database table. ### Columns containing JSON strings If your table has a column that contains data encoded as JSON, `datasette-graphql` will make that column available as an encoded JSON string. Clients calling your API will need to parse the string as JSON in order to access the data. You can return the data as a nested structure by configuring that column to be treated as a JSON column. The [plugin configuration](https://docs.datasette.io/en/stable/plugins.html#plugin-configuration) for that in `metadata.json` looks like this: ```json { ""databases"": { ""test"": { ""tables"": { ""repos"": { ""plugins"": { ""datasette-graphql"": { ""json_columns"": [ ""tags"" ] } } } } } } } ``` ### Auto camelCase The names of your columns and tables default to being matched by their representations in GraphQL. If you have tables with `names_like_this` you may want to work with them in GraphQL using `namesLikeThis`, for consistency with GraphQL and JavaScript conventions. You can turn on automatic camelCase using the `""auto_camelcase""` plugin configuration setting in `metadata.json`, like this: ```json { ""plugins"": { ""datasette-graphql"": { ""auto_camelcase"": true } } } ``` ### CORS This plugin obeys the `--cors` option passed to the `datasette` command-line tool. If you pass `--cors` it adds the following CORS HTTP headers to allow JavaScript running on other domains to access the GraphQL API: access-control-allow-headers: content-type access-control-allow-method: POST access-control-allow-origin: * ### Execution limits The plugin implements two limits by default: - The total time spent executing all of the underlying SQL queries that make up the GraphQL execution must not exceed 1000ms (one second) - The total number of SQL table queries executed as a result of nested GraphQL fields must not exceed 100 These limits can be customized using the `num_queries_limit` and `time_limit_ms` plugin configuration settings, for example in `metadata.json`: ```json { ""plugins"": { ""datasette-graphql"": { ""num_queries_limit"": 200, ""time_limit_ms"": 5000 } } } ``` Setting these to `0` will disable the limit checks entirely. ## The graphql() template function The plugin also makes a Jinja template function available called `graphql()`. You can use that function in your Datasette [custom templates](https://docs.datasette.io/en/stable/custom_templates.html#custom-templates) like so: ```html+jinja {% set users = graphql("""""" { users { nodes { name points score } } } """""")[""users""] %} {% for user in users.nodes %}{{ user.name }} - points: {{ user.points }}, score = {{ user.score }}
{% endfor %} ``` The function executes a GraphQL query against the generated schema and returns the results. You can assign those results to a variable in your template and then loop through and display them. By default the query will be run against the first attached database. You can use the optional second argument to the function to specify a different database - for example, to run against an attached `github.db` database you would do this: ```html+jinja {% set user = graphql("""""" { users_row(id:9599) { name login avatar_url } } """""", ""github"")[""users_row""] %}Hello, {{ user.name }}
``` You can use [GraphQL variables](https://graphql.org/learn/queries/#variables) in these template calls by passing them to the `variables=` argument: ```html+jinja {% set user = graphql("""""" query ($id: Int) { users_row(id: $id) { name login avatar_url } } """""", database=""github"", variables={""id"": 9599})[""users_row""] %}Hello, {{ user.name }}
``` ## Adding custom fields with plugins `datasette-graphql` adds a new [plugin hook](https://docs.datasette.io/en/stable/writing_plugins.html) to Datasette which can be used to add custom fields to your GraphQL schema. The plugin hook looks like this: ```python @hookimpl def graphql_extra_fields(datasette, database): ""A list of (name, field_type) tuples to include in the GraphQL schema"" ``` You can use this hook to return a list of tuples describing additional fields that should be exposed in your schema. Each tuple should consist of a string naming the new field, plus a [Graphene Field object](https://docs.graphene-python.org/en/latest/types/objecttypes/) that specifies the schema and provides a `resolver` function. This example implementation uses `pkg_resources` to return a list of currently installed Python packages: ```python import graphene from datasette import hookimpl import pkg_resources @hookimpl def graphql_extra_fields(): class Package(graphene.ObjectType): ""An installed package"" name = graphene.String() version = graphene.String() def resolve_packages(root, info): return [ {""name"": d.project_name, ""version"": d.version} for d in pkg_resources.working_set ] return [ ( ""packages"", graphene.Field( graphene.List(Package), description=""List of installed packages"", resolver=resolve_packages, ), ), ] ``` With this plugin installed, the following GraphQL query can be used to retrieve a list of installed packages: ```graphql { packages { name version } } ``` ## Development To set up this plugin locally, first checkout the code. Then create a new virtual environment: cd datasette-graphql python3 -mvenv venv source venv/bin/activate Or if you are using `pipenv`: pipenv shell Now install the dependencies and tests: pip install -e '.[test]' To run the tests: pytest ",Simon Willison,,text/markdown,https://github.com/simonw/datasette-graphql,,"Apache License, Version 2.0",,,https://pypi.org/project/datasette-graphql/,,https://pypi.org/project/datasette-graphql/,"{""CI"": ""https://github.com/simonw/datasette-graphql/actions"", ""Changelog"": ""https://github.com/simonw/datasette-graphql/releases"", ""Homepage"": ""https://github.com/simonw/datasette-graphql"", ""Issues"": ""https://github.com/simonw/datasette-graphql/issues""}",https://pypi.org/project/datasette-graphql/2.1.1/,"[""datasette (>=0.58.1)"", ""graphene (<4.0,>=3.1.0)"", ""graphql-core (>=3.2.1)"", ""sqlite-utils"", ""pytest ; extra == 'test'"", ""pytest-asyncio ; extra == 'test'""]",,2.1.1,0, datasette-gunicorn,Run a Datasette server using Gunicorn,"[""Framework :: Datasette"", ""License :: OSI Approved :: Apache Software License""]","# datasette-gunicorn [](https://pypi.org/project/datasette-gunicorn/) [](https://github.com/simonw/datasette-gunicorn/releases) [](https://github.com/simonw/datasette-gunicorn/actions?query=workflow%3ATest) [](https://github.com/simonw/datasette-gunicorn/blob/main/LICENSE) Run a [Datasette](https://datasette.io/) server using [Gunicorn](https://gunicorn.org/) ## Installation Install this plugin in the same environment as Datasette. datasette install datasette-gunicorn ## Usage The plugin adds a new `datasette gunicorn` command. This takes most of the same options as `datasette serve`, plus one more option for setting the number of Gunicorn workers to start: `-w/--workers X` - set the number of workers. Defaults to 1. To start serving a database using 4 workers, run the following: datasette gunicorn fixtures.db -w 4 It is advisable to switch your datasette [into WAL mode](https://til.simonwillison.net/sqlite/enabling-wal-mode) to get the best performance out of this configuration: sqlite3 fixtures.db 'PRAGMA journal_mode=WAL;' Run `datasette gunicorn --help` for a full list of options (which are the same as `datasette serve --help`, with the addition of the new `-w` option). ## datasette gunicorn --help Not all of the options to `datasette serve` are supported. Here's the full list of available options: ``` Usage: datasette gunicorn [OPTIONS] [FILES]... Start a Gunicorn server running to serve Datasette Options: -i, --immutable PATH Database files to open in immutable mode -h, --host TEXT Host for server. Defaults to 127.0.0.1 which means only connections from the local machine will be allowed. Use 0.0.0.0 to listen to all IPs and allow access from other machines. -p, --port INTEGER RANGE Port for server, defaults to 8001. Use -p 0 to automatically assign an available port. [0<=x<=65535] --cors Enable CORS by serving Access-Control-Allow-Origin: * --load-extension TEXT Path to a SQLite extension to load --inspect-file TEXT Path to JSON file created using ""datasette inspect"" -m, --metadata FILENAME Path to JSON/YAML file containing license/source metadata --template-dir DIRECTORY Path to directory containing custom templates --plugins-dir DIRECTORY Path to directory containing custom plugins --static MOUNT:DIRECTORY Serve static files from this directory at /MOUNT/... --memory Make /_memory database available --config CONFIG Deprecated: set config option using configname:value. Use --setting instead. --setting SETTING... Setting, see docs.datasette.io/en/stable/settings.html --secret TEXT Secret used for signing secure values, such as signed cookies --version-note TEXT Additional note to show on /-/versions --help-settings Show available settings --create Create database files if they do not exist --crossdb Enable cross-database joins using the /_memory database --nolock Ignore locking, open locked files in read-only mode -w, --workers INTEGER Number of Gunicorn workers [default: 1] --help Show this message and exit. ``` ## Development To set up this plugin locally, first checkout the code. Then create a new virtual environment: cd datasette-gunicorn python3 -m venv venv source venv/bin/activate Now install the dependencies and test dependencies: pip install -e '.[test]' To run the tests: pytest ",Simon Willison,,text/markdown,https://github.com/simonw/datasette-gunicorn,,"Apache License, Version 2.0",,,https://pypi.org/project/datasette-gunicorn/,,https://pypi.org/project/datasette-gunicorn/,"{""CI"": ""https://github.com/simonw/datasette-gunicorn/actions"", ""Changelog"": ""https://github.com/simonw/datasette-gunicorn/releases"", ""Homepage"": ""https://github.com/simonw/datasette-gunicorn"", ""Issues"": ""https://github.com/simonw/datasette-gunicorn/issues""}",https://pypi.org/project/datasette-gunicorn/0.1/,"[""datasette"", ""gunicorn"", ""pytest ; extra == 'test'"", ""pytest-asyncio ; extra == 'test'"", ""cogapp ; extra == 'test'""]",>=3.7,0.1,0, datasette-gzip,Add gzip compression to Datasette,"[""Framework :: Datasette"", ""License :: OSI Approved :: Apache Software License""]","# datasette-gzip [](https://pypi.org/project/datasette-gzip/) [](https://github.com/simonw/datasette-gzip/releases) [](https://github.com/simonw/datasette-gzip/actions?query=workflow%3ATest) [](https://github.com/simonw/datasette-gzip/blob/main/LICENSE) Add gzip compression to Datasette ## Installation Install this plugin in the same environment as Datasette. datasette install datasette-gzip ## Usage Once installed, Datasette will obey the `Accept-Encoding:` header sent by browsers or other user agents and return content compressed in the most appropriate way. This plugin is a thin wrapper for the [asgi-gzip library](https://github.com/simonw/asgi-gzip), which extracts the [GzipMiddleware](https://www.starlette.io/middleware/#gzipmiddleware) from Starlette. ## Development To set up this plugin locally, first checkout the code. Then create a new virtual environment: cd datasette-gzip python3 -mvenv venv source venv/bin/activate Now install the dependencies and test dependencies: pip install -e '.[test]' To run the tests: pytest ",Simon Willison,,text/markdown,https://github.com/simonw/datasette-gzip,,"Apache License, Version 2.0",,,https://pypi.org/project/datasette-gzip/,,https://pypi.org/project/datasette-gzip/,"{""CI"": ""https://github.com/simonw/datasette-gzip/actions"", ""Changelog"": ""https://github.com/simonw/datasette-gzip/releases"", ""Homepage"": ""https://github.com/simonw/datasette-gzip"", ""Issues"": ""https://github.com/simonw/datasette-gzip/issues""}",https://pypi.org/project/datasette-gzip/0.2/,"[""datasette"", ""asgi-gzip"", ""pytest ; extra == 'test'"", ""pytest-asyncio ; extra == 'test'""]",>=3.7,0.2,0, datasette-hashed-urls,Optimize Datasette performance behind a caching proxy,"[""Framework :: Datasette"", ""License :: OSI Approved :: Apache Software License""]","# datasette-hashed-urls [](https://pypi.org/project/datasette-hashed-urls/) [](https://github.com/simonw/datasette-hashed-urls/releases) [](https://github.com/simonw/datasette-hashed-urls/actions?query=workflow%3ATest) [](https://github.com/simonw/datasette-hashed-urls/blob/main/LICENSE) Optimize Datasette performance behind a caching proxy When you open a database file in immutable mode using the `-i` option, Datasette calculates a SHA-256 hash of the contents of that file on startup. This content hash can then optionally be used to create URLs that are guaranteed to change if the contents of the file changes in the future. The result is pages that can be cached indefinitely by both browsers and caching proxies - providing a significant performance boost. ## Demo A demo of this plugin is running at https://datasette-hashed-urls.vercel.app/ ## Installation Install this plugin in the same environment as Datasette. $ datasette install datasette-hashed-urls ## Usage Once installed, this plugin will act on any immutable database files that are loaded into Datasette: datasette -i fixtures.db The database will automatically be renamed to incorporate a hash of the contents of the SQLite file - so the above database would be served as: http://127.0.0.1:8001/fixtures-aa7318b Every page that accesss that database, including JSON endpoints, will be served with the following far-future cache expiry header: cache-control: max-age=31536000, public Here `max-age=31536000` is the number of seconds in a year. A caching proxy such as Cloudflare can then be used to cache and accelerate content served by Datasette. When the database file is updated and the server is restarted, the hash will change and content will be served from a new URL. Any hits to the previous hashed URLs will be automatically redirected. If you run Datasette using the `--crossdb` option to enable [cross-database queries](https://docs.datasette.io/en/stable/sql_queries.html#cross-database-queries) the `_memory` database will also have a hash added to its URL - in this case, the hash will be a combination of the hashes of the other attached databases. ## Configuration You can use the `max_age` plugin configuration setting to change the cache duration specified in the `cache-control` HTTP header. To set the cache expiry time to one hour you would add this to your Datasette `metadata.json` configuration file: ```json { ""plugins"": { ""datasette-hashed-urls"": { ""max_age"": 3600 } } } ``` ## History This functionality used to ship as part of Datasette itself, as a feature called [Hashed URL mode](https://docs.datasette.io/en/0.60.2/performance.html#hashed-url-mode). That feature has been deprecated and will be removed in Datasette 1.0. This plugin should be used as an alternative. ## Development To set up this plugin locally, first checkout the code. Then create a new virtual environment: cd datasette-hashed-urls python3 -mvenv venv source venv/bin/activate Or if you are using `pipenv`: pipenv shell Now install the dependencies and test dependencies: pip install -e '.[test]' To run the tests: pytest ",Simon Willison,,text/markdown,https://github.com/simonw/datasette-hashed-urls,,"Apache License, Version 2.0",,,https://pypi.org/project/datasette-hashed-urls/,,https://pypi.org/project/datasette-hashed-urls/,"{""CI"": ""https://github.com/simonw/datasette-hashed-urls/actions"", ""Changelog"": ""https://github.com/simonw/datasette-hashed-urls/releases"", ""Homepage"": ""https://github.com/simonw/datasette-hashed-urls"", ""Issues"": ""https://github.com/simonw/datasette-hashed-urls/issues""}",https://pypi.org/project/datasette-hashed-urls/0.4/,"[""datasette (>=0.61.1)"", ""pytest ; extra == 'test'"", ""pytest-asyncio ; extra == 'test'"", ""sqlite-utils ; extra == 'test'""]",>=3.7,0.4,0, datasette-haversine,Datasette plugin that adds a custom SQL function for haversine distances,[],"# datasette-haversine [](https://pypi.org/project/datasette-haversine/) [](https://github.com/simonw/datasette-haversine/releases) [](https://github.com/simonw/datasette-haversine/actions?query=workflow%3ATest) [](https://github.com/simonw/datasette-haversine/blob/main/LICENSE) Datasette plugin that adds a custom SQL function for haversine distances Install this plugin in the same environment as Datasette to enable the `haversine()` SQL function. $ pip install datasette-haversine The plugin is built on top of the [haversine](https://github.com/mapado/haversine) library. ## haversine() to calculate distances ```sql select haversine(lat1, lon1, lat2, lon2); ``` This will return the distance in kilometers between the point defined by `(lat1, lon1)` and the point defined by `(lat2, lon2)`. ## Custom units By default `haversine()` returns results in km. You can pass an optional third argument to get results in a different unit: - `ft` for feet - `m` for meters - `in` for inches - `mi` for miles - `nmi` for nautical miles - `km` for kilometers (the default) ```sql select haversine(lat1, lon1, lat2, lon2, 'mi'); ``` ",Simon Willison,,text/markdown,https://github.com/simonw/datasette-haversine,,"Apache License, Version 2.0",,,https://pypi.org/project/datasette-haversine/,,https://pypi.org/project/datasette-haversine/,"{""Homepage"": ""https://github.com/simonw/datasette-haversine""}",https://pypi.org/project/datasette-haversine/0.2/,"[""datasette"", ""haversine"", ""pytest ; extra == 'test'""]",,0.2,0, datasette-hovercards,Add preview hovercards to links in Datasette,"[""Framework :: Datasette"", ""License :: OSI Approved :: Apache Software License""]","# datasette-hovercards [](https://pypi.org/project/datasette-hovercards/) [](https://github.com/simonw/datasette-hovercards/releases) [](https://github.com/simonw/datasette-hovercards/actions?query=workflow%3ATest) [](https://github.com/simonw/datasette-hovercards/blob/main/LICENSE) Add preview hovercards to links in Datasette ## Installation Install this plugin in the same environment as Datasette. $ datasette install datasette-hovercards ## Usage Once installed, hovering over a link to a row within the Datasette interface - for example a foreign key reference on the table page - should show a hovercard with a preview of that row. ## Development To set up this plugin locally, first checkout the code. Then create a new virtual environment: cd datasette-hovercards python3 -mvenv venv source venv/bin/activate Or if you are using `pipenv`: pipenv shell Now install the dependencies and test dependencies: pip install -e '.[test]' To run the tests: pytest ",Simon Willison,,text/markdown,https://github.com/simonw/datasette-hovercards,,"Apache License, Version 2.0",,,https://pypi.org/project/datasette-hovercards/,,https://pypi.org/project/datasette-hovercards/,"{""CI"": ""https://github.com/simonw/datasette-hovercards/actions"", ""Changelog"": ""https://github.com/simonw/datasette-hovercards/releases"", ""Homepage"": ""https://github.com/simonw/datasette-hovercards"", ""Issues"": ""https://github.com/simonw/datasette-hovercards/issues""}",https://pypi.org/project/datasette-hovercards/0.1a0/,"[""datasette"", ""pytest ; extra == 'test'"", ""pytest-asyncio ; extra == 'test'""]",>=3.6,0.1a0,0, datasette-ics,Datasette plugin for outputting iCalendar files,"[""Framework :: Datasette"", ""License :: OSI Approved :: Apache Software License""]","# datasette-ics [](https://pypi.org/project/datasette-ics/) [](https://github.com/simonw/datasette-ics/releases) [](https://github.com/simonw/datasette-ics/actions?query=workflow%3ATest) [](https://github.com/simonw/datasette-ics/blob/main/LICENSE) Datasette plugin that adds support for generating [iCalendar .ics files](https://tools.ietf.org/html/rfc5545) with the results of a SQL query. ## Installation Install this plugin in the same environment as Datasette to enable the `.ics` output extension. $ pip install datasette-ics ## Usage To create an iCalendar file you need to define a custom SQL query that returns a required set of columns: * `event_name` - the short name for the event * `event_dtstart` - when the event starts The following columns are optional: * `event_dtend` - when the event ends * `event_duration` - the duration of the event (use instead of `dtend`) * `event_description` - a longer description of the event * `event_uid` - a globally unique identifier for this event * `event_tzid` - the timezone for the event, e.g. `America/Chicago` A query that returns these columns can then be returned as an ics feed by adding the `.ics` extension. ## Demo [This SQL query]([https://www.rockybeaches.com/data?sql=with+inner+as+(%0D%0A++select%0D%0A++++datetime%2C%0D%0A++++substr(datetime%2C+0%2C+11)+as+date%2C%0D%0A++++mllw_feet%2C%0D%0A++++lag(mllw_feet)+over+win+as+previous_mllw_feet%2C%0D%0A++++lead(mllw_feet)+over+win+as+next_mllw_feet%0D%0A++from%0D%0A++++tide_predictions%0D%0A++where%0D%0A++++station_id+%3D+%3Astation_id%0D%0A++++and+datetime+%3E%3D+date()%0D%0A++++window+win+as+(%0D%0A++++++order+by%0D%0A++++++++datetime%0D%0A++++)%0D%0A++order+by%0D%0A++++datetime%0D%0A)%2C%0D%0Alowest_tide_per_day+as+(%0D%0A++select%0D%0A++++date%2C%0D%0A++++datetime%2C%0D%0A++++mllw_feet%0D%0A++from%0D%0A++++inner%0D%0A++where%0D%0A++++mllw_feet+%3C%3D+previous_mllw_feet%0D%0A++++and+mllw_feet+%3C%3D+next_mllw_feet%0D%0A)%0D%0Aselect%0D%0A++min(datetime)+as+event_dtstart%2C%0D%0A++%27Low+tide%3A+%27+||+mllw_feet+||+%27+feet%27+as+event_name%2C%0D%0A++%27America%2FLos_Angeles%27+as+event_tzid%0D%0Afrom%0D%0A++lowest_tide_per_day%0D%0Agroup+by%0D%0A++date%0D%0Aorder+by%0D%0A++date&station_id=9414131) calculates the lowest tide per day at Pillar Point in Half Moon Bay, California. Since the query returns `event_name`, `event_dtstart` and `event_tzid` columns it produces [this ICS feed](https://www.rockybeaches.com/data.ics?sql=with+inner+as+(%0D%0A++select%0D%0A++++datetime%2C%0D%0A++++substr(datetime%2C+0%2C+11)+as+date%2C%0D%0A++++mllw_feet%2C%0D%0A++++lag(mllw_feet)+over+win+as+previous_mllw_feet%2C%0D%0A++++lead(mllw_feet)+over+win+as+next_mllw_feet%0D%0A++from%0D%0A++++tide_predictions%0D%0A++where%0D%0A++++station_id+%3D+%3Astation_id%0D%0A++++and+datetime+%3E%3D+date()%0D%0A++++window+win+as+(%0D%0A++++++order+by%0D%0A++++++++datetime%0D%0A++++)%0D%0A++order+by%0D%0A++++datetime%0D%0A)%2C%0D%0Alowest_tide_per_day+as+(%0D%0A++select%0D%0A++++date%2C%0D%0A++++datetime%2C%0D%0A++++mllw_feet%0D%0A++from%0D%0A++++inner%0D%0A++where%0D%0A++++mllw_feet+%3C%3D+previous_mllw_feet%0D%0A++++and+mllw_feet+%3C%3D+next_mllw_feet%0D%0A)%0D%0Aselect%0D%0A++min(datetime)+as+event_dtstart%2C%0D%0A++%27Low+tide%3A+%27+||+mllw_feet+||+%27+feet%27+as+event_name%2C%0D%0A++%27America%2FLos_Angeles%27+as+event_tzid%0D%0Afrom%0D%0A++lowest_tide_per_day%0D%0Agroup+by%0D%0A++date%0D%0Aorder+by%0D%0A++date&station_id=9414131). If you subscribe to that in a calendar application such as Apple Calendar you get something that looks like this:  ## Using a canned query Datasette's [canned query mechanism](https://datasette.readthedocs.io/en/stable/sql_queries.html#canned-queries) can be used to configure calendars. If a canned query definition has a `title` that will be used as the title of the calendar. Here's an example, defined using a `metadata.yaml` file: ```yaml databases: mydatabase: queries: calendar: title: My Calendar sql: |- select title as event_name, start as event_dtstart, description as event_description from events order by start limit 100 ``` This will result in a calendar feed at `http://localhost:8001/mydatabase/calendar.ics` ",Simon Willison,,text/markdown,https://github.com/simonw/datasette-ics,,"Apache License, Version 2.0",,,https://pypi.org/project/datasette-ics/,,https://pypi.org/project/datasette-ics/,"{""CI"": ""https://github.com/simonw/datasette-ics/actions"", ""Changelog"": ""https://github.com/simonw/datasette-ics/releases"", ""Homepage"": ""https://github.com/simonw/datasette-ics"", ""Issues"": ""https://github.com/simonw/datasette-ics/issues""}",https://pypi.org/project/datasette-ics/0.5.2/,"[""datasette (>=0.49)"", ""ics (==0.7.2)"", ""pytest ; extra == 'test'"", ""pytest-asyncio ; extra == 'test'""]",,0.5.2,0, datasette-import-table,Datasette plugin for importing tables from other Datasette instances,[],"# datasette-import-table [](https://pypi.org/project/datasette-import-table/) [](https://github.com/simonw/datasette-import-table/releases) [](https://github.com/simonw/datasette-import-table/actions?query=workflow%3ATest) [](https://github.com/simonw/datasette-import-table/blob/main/LICENSE) Datasette plugin for importing tables from other Datasette instances ## Installation Install this plugin in the same environment as Datasette. $ datasette install datasette-import-table ## Usage Visit `/-/import-table` for the interface. Paste in the URL to a table page on another Datasette instance and click the button to import that table. By default only [the root actor](https://datasette.readthedocs.io/en/stable/authentication.html#using-the-root-actor) can access the page - so you'll need to run Datasette with the `--root` option and click on the link shown in the terminal to sign in and access the page. The `import-table` permission governs access. You can use permission plugins such as [datasette-permissions-sql](https://github.com/simonw/datasette-permissions-sql) to grant additional access to the write interface. ## Development To set up this plugin locally, first checkout the code. Then create a new virtual environment: cd datasette-import-table python3 -mvenv venv source venv/bin/activate Or if you are using `pipenv`: pipenv shell Now install the dependencies and tests: pip install -e '.[test]' To run the tests: pytest ",Simon Willison,,text/markdown,https://github.com/simonw/datasette-import-table,,"Apache License, Version 2.0",,,https://pypi.org/project/datasette-import-table/,,https://pypi.org/project/datasette-import-table/,"{""CI"": ""https://github.com/simonw/datasette-import-table/actions"", ""Changelog"": ""https://github.com/simonw/datasette-import-table/releases"", ""Homepage"": ""https://github.com/simonw/datasette-import-table"", ""Issues"": ""https://github.com/simonw/datasette-import-table/issues""}",https://pypi.org/project/datasette-import-table/0.3/,"[""datasette"", ""httpx"", ""sqlite-utils"", ""pytest ; extra == 'test'"", ""pytest-asyncio ; extra == 'test'"", ""httpx ; extra == 'test'"", ""pytest-httpx ; extra == 'test'""]",,0.3,0, datasette-indieauth,Datasette authentication using IndieAuth and RelMeAuth,[],"# datasette-indieauth [](https://pypi.org/project/datasette-indieauth/) [](https://github.com/simonw/datasette-indieauth/releases) [](https://codecov.io/gh/simonw/datasette-indieauth) [](https://github.com/simonw/datasette-indieauth/actions?query=workflow%3ATest) [](https://github.com/simonw/datasette-indieauth/blob/main/LICENSE) Datasette authentication using [IndieAuth](https://indieauth.net/). ## Demo You can try out the latest version of this plugin at [datasette-indieauth-demo.datasette.io](https://datasette-indieauth-demo.datasette.io/-/indieauth) ## Installation Install this plugin in the same environment as Datasette. $ datasette install datasette-indieauth ## Usage Ensure you have a website with a domain that supports IndieAuth or RelMeAuth. The easiest way to do that is to add the following HTML to your homepage, linking to your personal GitHub profile: ```html ``` Your GitHub profile needs to link back to your website, to prove that your GitHub account should be a valid identifier for that page. Now visit `/-/indieauth` on your Datasette instance to begin the sign-in progress. ## Actor When a user signs in using IndieAuth they will be recieve a signed `ds_actor` cookie identifying them as an [actor](https://docs.datasette.io/en/stable/authentication.html#actors) that looks like this: ```json { ""me"": ""https://simonwillison.net/"", ""display"": ""simonwillison.net"" } ``` If the IndieAuth server returned additional `""profile""` fields those will be merged into the actor. You can visit `/-/actor` on your Datasette instance to see the full actor you are currently signed in as. ## Restricting access with the restrict_access plugin configuration You can use [Datasette's permissions system](https://docs.datasette.io/en/stable/authentication.html#permissions) to control permissions of authenticated users - by default, an authenticated user will be able to perform the same actions as an unauthenticated user. As a shortcut if you want to lock down access to your instance entirely to just specific users, you can use the `restrict_access` plugin configuration option like this: ```json { ""plugins"": { ""datasette-indieauth"": { ""restrict_access"": ""https://simonwillison.net/"" } } } ``` This can be a string or a list of user identifiers. It can also be a space separated list, which means you can use it with the [datasette publish](https://docs.datasette.io/en/stable/publish.html#datasette-publish) `--plugin-secret` configuration option to set permissions as part of a deployment, like this: ``` datasette publish vercel mydb.db --project my-secret-db \ --install datasette-indieauth \ --plugin-secret datasette-indieauth restrict_access https://simonwillison.net/ ``` ## Development To set up this plugin locally, first checkout the code. Then create a new virtual environment: cd datasette-indieauth python3 -mvenv venv source venv/bin/activate Or if you are using `pipenv`: pipenv shell Now install the dependencies and tests: pip install -e '.[test]' To run the tests: pytest ",Simon Willison,,text/markdown,https://github.com/simonw/datasette-indieauth,,"Apache License, Version 2.0",,,https://pypi.org/project/datasette-indieauth/,,https://pypi.org/project/datasette-indieauth/,"{""CI"": ""https://github.com/simonw/datasette-indieauth/actions"", ""Changelog"": ""https://github.com/simonw/datasette-indieauth/releases"", ""Homepage"": ""https://github.com/simonw/datasette-indieauth"", ""Issues"": ""https://github.com/simonw/datasette-indieauth/issues""}",https://pypi.org/project/datasette-indieauth/1.2.1/,"[""datasette"", ""pytest ; extra == 'test'"", ""pytest-asyncio ; extra == 'test'"", ""httpx ; extra == 'test'"", ""pytest-httpx ; extra == 'test'"", ""mf2py ; extra == 'test'""]",>=3.7,1.2.1,0, datasette-init,Ensure specific tables and views exist on startup,[],"# datasette-init [](https://pypi.org/project/datasette-init/) [](https://github.com/simonw/datasette-init/releases) [](https://github.com/simonw/datasette-init/blob/master/LICENSE) Ensure specific tables and views exist on startup ## Installation Install this plugin in the same environment as Datasette. $ pip install datasette-init ## Usage This plugin is configured using `metadata.json` (or `metadata.yaml`). ### Creating tables Add a block like this that specifies the tables you would like to ensure exist: ```json { ""plugins"": { ""datasette-init"": { ""my_database"": { ""tables"": { ""dogs"": { ""columns"": { ""id"": ""integer"", ""name"": ""text"", ""age"": ""integer"", ""weight"": ""float"" }, ""pk"": ""id"" } } } } } } ``` Any tables that do not yet exist will be created when Datasette first starts. Valid column types are `""integer""`, `""text""`, `""float""` and `""blob""`. The `""pk""` is optional, and is used to define the primary key. To define a compound primary key (across more than one column) use a list of column names here: ```json ""pk"": [""id1"", ""id2""] ``` ### Creating views The plugin can also be used to create views: ```json { ""plugins"": { ""datasette-init"": { ""my_database"": { ""views"": { ""my_view"": ""select 1 + 1"" } } } } } ``` Each view in the ``""views""`` block will be created when the Database first starts. If a view with the same name already exists it will be replaced with the new definition. ## Development To set up this plugin locally, first checkout the code. Then create a new virtual environment: cd datasette-init python3 -mvenv venv source venv/bin/activate Or if you are using `pipenv`: pipenv shell Now install the dependencies and tests: pip install -e '.[test]' To run the tests: pytest ",Simon Willison,,text/markdown,https://github.com/simonw/datasette-init,,"Apache License, Version 2.0",,,https://pypi.org/project/datasette-init/,,https://pypi.org/project/datasette-init/,"{""CI"": ""https://github.com/simonw/datasette-init/actions"", ""Changelog"": ""https://github.com/simonw/datasette-init/releases"", ""Homepage"": ""https://github.com/simonw/datasette-init"", ""Issues"": ""https://github.com/simonw/datasette-init/issues""}",https://pypi.org/project/datasette-init/0.2/,"[""datasette (>=0.45)"", ""sqlite-utils"", ""pytest ; extra == 'test'"", ""pytest-asyncio ; extra == 'test'"", ""httpx ; extra == 'test'""]",,0.2,0, datasette-insert,Datasette plugin for inserting and updating data,[],"# datasette-insert [](https://pypi.org/project/datasette-insert/) [](https://github.com/simonw/datasette-insert/releases) [](https://github.com/simonw/datasette-insert/blob/master/LICENSE) Datasette plugin for inserting and updating data ## Installation Install this plugin in the same environment as Datasette. $ pip install datasette-insert This plugin should always be deployed with additional configuration to prevent unauthenticated access, see notes below. If you are trying it out on your own local machine, you can `pip install` the [datasette-insert-unsafe](https://github.com/simonw/datasette-insert-unsafe) plugin to allow access without needing to set up authentication or permissions separately. ## Inserting data and creating tables Start datasette and make sure it has a writable SQLite database attached to it. If you have not yet created a database file you can use this: datasette data.db --create The `--create` option will create a new empty `data.db` database file if it does not already exist. The plugin adds an endpoint that allows data to be inserted or updated and tables to be created by POSTing JSON data to the following URL: /-/insert/name-of-database/name-of-table The JSON should look like this: ```json [ { ""id"": 1, ""name"": ""Cleopaws"", ""age"": 5 }, { ""id"": 2, ""name"": ""Pancakes"", ""age"": 5 } ] ``` The first time data is posted to the URL a table of that name will be created if it does not aready exist, with the desired columns. You can specify which column should be used as the primary key using the `?pk=` URL argument. Here's how to POST to a database and create a new table using the Python `requests` library: ```python import requests requests.post(""http://localhost:8001/-/insert/data/dogs?pk=id"", json=[ { ""id"": 1, ""name"": ""Cleopaws"", ""age"": 5 }, { ""id"": 2, ""name"": ""Pancakes"", ""age"": 4 } ]) ``` And here's how to do the same thing using `curl`: ``` curl --request POST \ --data '[ { ""id"": 1, ""name"": ""Cleopaws"", ""age"": 5 }, { ""id"": 2, ""name"": ""Pancakes"", ""age"": 4 } ]' \ 'http://localhost:8001/-/insert/data/dogs?pk=id' ``` Or by piping in JSON like so: cat dogs.json | curl --request POST -d @- \ 'http://localhost:8001/-/insert/data/dogs?pk=id' ### Inserting a single row If you are inserting a single row you can optionally send it as a dictionary rather than a list with a single item: ``` curl --request POST \ --data '{ ""id"": 1, ""name"": ""Cleopaws"", ""age"": 5 }' \ 'http://localhost:8001/-/insert/data/dogs?pk=id' ``` ### Automatically adding new columns If you send data to an existing table with keys that are not reflected by the existing columns, you will get an HTTP 400 error with a JSON response like this: ```json { ""status"": 400, ""error"": ""Unknown keys: 'foo'"", ""error_code"": ""unknown_keys"" } ``` If you add `?alter=1` to the URL you are posting to any missing columns will be automatically added: ``` curl --request POST \ --data '[ { ""id"": 3, ""name"": ""Boris"", ""age"": 1, ""breed"": ""Husky"" } ]' \ 'http://localhost:8001/-/insert/data/dogs?alter=1' ``` ## Upserting data An ""upsert"" operation can be used to partially update a record. With upserts you can send a subset of the keys and, if the ID matches the specified primary key, they will be used to update an existing record. Upserts can be sent to the `/-/upsert` API endpoint. This example will update the dog with ID=1's age from 5 to 7: ``` curl --request POST \ --data '{ ""id"": 1, ""age"": 7 }' \ 'http://localhost:3322/-/upsert/data/dogs?pk=id' ``` Like the `/-/insert` endpoint, the `/-/upsert` endpoint can accept an array of objects too. It also supports the `?alter=1` option. ## Permissions and authentication This plugin defaults to denying all access, to help ensure people don't accidentally deploy it on the open internet in an unsafe configuration. You can read about [Datasette's approach to authentication](https://datasette.readthedocs.io/en/stable/authentication.html) in the Datasette manual. You can install the `datasette-insert-unsafe` plugin to run in unsafe mode, where all access is allowed by default. I recommend using this plugin in conjunction with [datasette-auth-tokens](https://github.com/simonw/datasette-auth-tokens), which provides a mechanism for making authenticated calls using API tokens. You can then use [""allow"" blocks](https://datasette.readthedocs.io/en/stable/authentication.html#defining-permissions-with-allow-blocks) in the `datasette-insert` plugin configuration to specify which authenticated tokens are allowed to make use of the API. Here's an example `metadata.json` file which restricts access to the `/-/insert` API to an API token defined in an `INSERT_TOKEN` environment variable: ```json { ""plugins"": { ""datasette-insert"": { ""allow"": { ""bot"": ""insert-bot"" } }, ""datasette-auth-tokens"": { ""tokens"": [ { ""token"": { ""$env"": ""INSERT_TOKEN"" }, ""actor"": { ""bot"": ""insert-bot"" } } ] } } } ``` With this configuration in place you can start Datasette like this: INSERT_TOKEN=abc123 datasette data.db -m metadata.json You can now send data to the API using `curl` like this: ``` curl --request POST \ -H ""Authorization: Bearer abc123"" \ --data '[ { ""id"": 3, ""name"": ""Boris"", ""age"": 1, ""breed"": ""Husky"" } ]' \ 'http://localhost:8001/-/insert/data/dogs' ``` Or using the Python `requests` library like so: ```python requests.post( ""http://localhost:8001/-/insert/data/dogs"", json={""id"": 1, ""name"": ""Cleopaws"", ""age"": 5}, headers={""Authorization"": ""bearer abc123""}, ) ``` ### Finely grained permissions Using an `""allow""` block as described above grants full permission to the features enabled by the API. The API implements several new Datasett permissions, which other plugins can use to make more finely grained decisions. The full set of permissions are as follows: - `insert:all` - all permissions - this is used by the `""allow""` block described above. Argument: `database_name` - `insert:insert-update` - the ability to insert data into an existing table, or to update data by its primary key. Arguments: `(database_name, table_name)` - `insert:create-table` - the ability to create a new table. Argument: `database_name` - `insert:alter-table` - the ability to add columns to an existing table (using `?alter=1`). Arguments: `(database_name, table_name)` You can use plugins like [datasette-permissions-sql](https://github.com/simonw/datasette-permissions-sql) to hook into these more detailed permissions for finely grained control over what actions each authenticated actor can take. Plugins that implement the [permission_allowed()](https://datasette.readthedocs.io/en/stable/plugin_hooks.html#plugin-hook-permission-allowed) plugin hook can take full control over these permission decisions. ## CORS If you start Datasette with the `datasette --cors` option the following HTTP headers will be added to resources served by this plugin: Access-Control-Allow-Origin: * Access-Control-Allow-Headers: content-type,authorization Access-Control-Allow-Methods: POST ## Development To set up this plugin locally, first checkout the code. Then create a new virtual environment: cd datasette-insert python3 -m venv venv source venv/bin/activate Now install the dependencies and tests: pip install -e '.[test]' To run the tests: pytest ",Simon Willison,,text/markdown,https://datasette.io/plugins/datasette-insert,,"Apache License, Version 2.0",,,https://pypi.org/project/datasette-insert/,,https://pypi.org/project/datasette-insert/,"{""CI"": ""https://github.com/simonw/datasette-insert/actions"", ""Changelog"": ""https://github.com/simonw/datasette-insert/releases"", ""Homepage"": ""https://datasette.io/plugins/datasette-insert"", ""Issues"": ""https://github.com/simonw/datasette-insert/issues""}",https://pypi.org/project/datasette-insert/0.8/,"[""datasette (>=0.46)"", ""sqlite-utils"", ""pytest ; extra == 'test'"", ""pytest-asyncio ; extra == 'test'"", ""httpx ; extra == 'test'"", ""datasette-auth-tokens ; extra == 'test'""]",>=3.7,0.8,0, datasette-jellyfish,Datasette plugin adding SQL functions for fuzzy text matching powered by Jellyfish,[],"# datasette-jellyfish [](https://pypi.org/project/datasette-jellyfish/) [](https://github.com/simonw/datasette-jellyfish/releases) [](https://github.com/simonw/datasette-jellyfish/actions?query=workflow%3ATest) [](https://github.com/simonw/datasette-jellyfish/blob/main/LICENSE) Datasette plugin that adds custom SQL functions for fuzzy string matching, built on top of the [Jellyfish](https://github.com/jamesturk/jellyfish) Python library by James Turk and Michael Stephens. Interactive demos: * [soundex, metaphone, nysiis, match_rating_codex comparison](https://latest-with-plugins.datasette.io/fixtures?sql=SELECT%0D%0A++++soundex%28%3As%29%2C+%0D%0A++++metaphone%28%3As%29%2C+%0D%0A++++nysiis%28%3As%29%2C+%0D%0A++++match_rating_codex%28%3As%29&s=demo). * [distance functions comparison](https://latest-with-plugins.datasette.io/fixtures?sql=SELECT%0D%0A++++levenshtein_distance%28%3As1%2C+%3As2%29%2C%0D%0A++++damerau_levenshtein_distance%28%3As1%2C+%3As2%29%2C%0D%0A++++hamming_distance%28%3As1%2C+%3As2%29%2C%0D%0A++++jaro_similarity%28%3As1%2C+%3As2%29%2C%0D%0A++++jaro_winkler_similarity%28%3As1%2C+%3As2%29%2C%0D%0A++++match_rating_comparison%28%3As1%2C+%3As2%29%3B&s1=barrack+obama&s2=barrack+h+obama) Examples: SELECT soundex(""hello""); -- Outputs H400 SELECT metaphone(""hello""); -- Outputs HL SELECT nysiis(""hello""); -- Outputs HAL SELECT match_rating_codex(""hello""); -- Outputs HLL SELECT porter_stem(""running""); -- Outputs run SELECT levenshtein_distance(""hello"", ""hello world""); -- Outputs 6 SELECT damerau_levenshtein_distance(""hello"", ""hello world""); -- Outputs 6 SELECT hamming_distance(""hello"", ""hello world""); -- Outputs 6 SELECT jaro_similarity(""hello"", ""hello world""); -- Outputs 0.8181818181818182 SELECT jaro_winkler_similarity(""hello"", ""hello world""); -- Outputs 0.890909090909091 SELECT match_rating_comparison(""hello"", ""helloo""); -- Outputs 1 See [the Jellyfish documentation](https://jellyfish.readthedocs.io/en/latest/) for an explanation of each of these functions. ",Simon Willison,,text/markdown,https://datasette.io/plugins/datasette-jellyfish,,"Apache License, Version 2.0",,,https://pypi.org/project/datasette-jellyfish/,,https://pypi.org/project/datasette-jellyfish/,"{""CI"": ""https://github.com/simonw/datasette-jellyfish/actions"", ""Changelog"": ""https://github.com/simonw/datasette-jellyfish/releases"", ""Homepage"": ""https://datasette.io/plugins/datasette-jellyfish"", ""Issues"": ""https://github.com/simonw/datasette-jellyfish/issues""}",https://pypi.org/project/datasette-jellyfish/1.0.1/,"[""datasette"", ""jellyfish (>=0.8.2)"", ""pytest ; extra == 'test'""]",,1.0.1,0, datasette-jq,Datasette plugin that adds custom SQL functions for executing jq expressions against JSON values,[],"# datasette-jq [](https://pypi.org/project/datasette-jq/) [](https://circleci.com/gh/simonw/datasette-jq) [](https://github.com/simonw/datasette-jq/blob/master/LICENSE) Datasette plugin that adds custom SQL functions for executing [jq](https://stedolan.github.io/jq/) expressions against JSON values. Install this plugin in the same environment as Datasette to enable the `jq()` SQL function. Usage: select jq( column_with_json, ""{top_3: .classifiers[:3], v: .version}"" ) See [the jq manual](https://stedolan.github.io/jq/manual/#Basicfilters) for full details of supported expression syntax. ## Interactive demo You can try this plugin out at [datasette-jq-demo.datasette.io](https://datasette-jq-demo.datasette.io/) Sample query: select package, ""https://pypi.org/project/"" || package || ""/"" as url, jq(info, ""{summary: .info.summary, author: .info.author, versions: .releases|keys|reverse}"") from packages [Try this query out](https://datasette-jq-demo.datasette.io/demo?sql=select+package%2C+%22https%3A%2F%2Fpypi.org%2Fproject%2F%22+%7C%7C+package+%7C%7C+%22%2F%22+as+url%2C%0D%0Ajq%28info%2C+%22%7Bsummary%3A+.info.summary%2C+author%3A+.info.author%2C+versions%3A+.releases%7Ckeys%7Creverse%7D%22%29%0D%0Afrom+packages) in the interactive demo. ",Simon Willison,,text/markdown,https://github.com/simonw/datasette-jq,,"Apache License, Version 2.0",,,https://pypi.org/project/datasette-jq/,,https://pypi.org/project/datasette-jq/,"{""Homepage"": ""https://github.com/simonw/datasette-jq""}",https://pypi.org/project/datasette-jq/0.2.1/,"[""datasette"", ""pyjq"", ""six"", ""pytest ; extra == 'test'""]",,0.2.1,0, datasette-json-html,Datasette plugin for rendering HTML based on JSON values,[],"# datasette-json-html [](https://pypi.org/project/datasette-json-html/) [](https://github.com/simonw/datasette-json-html/releases) [](https://github.com/simonw/datasette-remote-metadata/actions?query=workflow%3ATest) [](https://github.com/simonw/datasette-json-html/blob/main/LICENSE) Datasette plugin for rendering HTML based on JSON values, using the [render_cell plugin hook](https://docs.datasette.io/en/stable/plugin_hooks.html#render-cell-value-column-table-database-datasette). This plugin looks for cell values that match a very specific JSON format and converts them into HTML when they are rendered by the Datasette interface. ## Links { ""href"": ""https://simonwillison.net/"", ""label"": ""Simon Willison"" } Will be rendered as an `` link: Simon Willison You can set a tooltip on the link using a `""title""` key: { ""href"": ""https://simonwillison.net/"", ""label"": ""Simon Willison"", ""title"": ""My blog"" } Produces: Simon Willison You can also include a description, which will be displayed below the link. If descriptions include newlines they will be converted to `` elements: select json_object( ""href"", ""https://simonwillison.net/"", ""label"", ""Simon Willison"", ""description"", ""This can contain"" || x'0a' || ""newlines"" ) Produces: Simon Willison
This can contain
newlines * [Literal JSON link demo](https://datasette-json-html.datasette.io/demo?sql=select+%27%7B%0D%0A++++%22href%22%3A+%22https%3A%2F%2Fsimonwillison.net%2F%22%2C%0D%0A++++%22label%22%3A+%22Simon+Willison%22%2C%0D%0A++++%22title%22%3A+%22My+blog%22%0D%0A%7D%27) ## List of links [ { ""href"": ""https://simonwillison.net/"", ""label"": ""Simon Willison"" }, { ""href"": ""https://github.com/simonw/datasette"", ""label"": ""Datasette"" } ] Will be rendered as a comma-separated list of `` links: Simon Willison, Datasette The `href` property must begin with `https://` or `http://` or `/`, to avoid potential XSS injection attacks (for example URLs that begin with `javascript:`). Lists of links cannot include `""description""` keys. * [Literal list of links demo](https://datasette-json-html.datasette.io/demo?sql=select+%27%5B%0D%0A++++%7B%0D%0A++++++++%22href%22%3A+%22https%3A%2F%2Fsimonwillison.net%2F%22%2C%0D%0A++++++++%22label%22%3A+%22Simon+Willison%22%0D%0A++++%7D%2C%0D%0A++++%7B%0D%0A++++++++%22href%22%3A+%22https%3A%2F%2Fgithub.com%2Fsimonw%2Fdatasette%22%2C%0D%0A++++++++%22label%22%3A+%22Datasette%22%0D%0A++++%7D%0D%0A%5D%27) ## Images The image tag is more complex. The most basic version looks like this: { ""img_src"": ""https://placekitten.com/200/300"" } This will render as:
` HTML tag:
{
""pre"": ""This\nhas\nnewlines""
}
Produces:
This
has
newlines
If the value attached to the `""pre""` key is itself a JSON object, that JSON will be pretty-printed:
{
""pre"": {
""this"": {
""object"": [""is"", ""nested""]
}
}
}
Produces:
{
"this": {
"object": [
"is",
"nested"
]
}
}
* [Preformatted text with JSON demo](https://datasette-json-html.datasette.io/demo?sql=select+%27%7B%0D%0A++++%22pre%22%3A+%7B%0D%0A++++++++%22this%22%3A+%7B%0D%0A++++++++++++%22object%22%3A+%5B%22is%22%2C+%22nested%22%5D%0D%0A++++++++%7D%0D%0A++++%7D%0D%0A%7D%27)
* [Preformatted text demo showing the Mandelbrot Set](https://datasette-json-html.datasette.io/demo?sql=WITH+RECURSIVE%0D%0A++xaxis%28x%29+AS+%28VALUES%28-2.0%29+UNION+ALL+SELECT+x%2B0.05+FROM+xaxis+WHERE+x%3C1.2%29%2C%0D%0A++yaxis%28y%29+AS+%28VALUES%28-1.0%29+UNION+ALL+SELECT+y%2B0.1+FROM+yaxis+WHERE+y%3C1.0%29%2C%0D%0A++m%28iter%2C+cx%2C+cy%2C+x%2C+y%29+AS+%28%0D%0A++++SELECT+0%2C+x%2C+y%2C+0.0%2C+0.0+FROM+xaxis%2C+yaxis%0D%0A++++UNION+ALL%0D%0A++++SELECT+iter%2B1%2C+cx%2C+cy%2C+x*x-y*y+%2B+cx%2C+2.0*x*y+%2B+cy+FROM+m+%0D%0A+++++WHERE+%28x*x+%2B+y*y%29+%3C+4.0+AND+iter%3C28%0D%0A++%29%2C%0D%0A++m2%28iter%2C+cx%2C+cy%29+AS+%28%0D%0A++++SELECT+max%28iter%29%2C+cx%2C+cy+FROM+m+GROUP+BY+cx%2C+cy%0D%0A++%29%2C%0D%0A++a%28t%29+AS+%28%0D%0A++++SELECT+group_concat%28+substr%28%27+.%2B*%23%27%2C+1%2Bmin%28iter%2F7%2C4%29%2C+1%29%2C+%27%27%29+%0D%0A++++FROM+m2+GROUP+BY+cy%0D%0A++%29%0D%0ASELECT+json_object%28%27pre%27%2C+group_concat%28rtrim%28t%29%2Cx%270a%27%29%29+FROM+a%3B) using [this example](https://www.sqlite.org/lang_with.html#outlandish_recursive_query_examples) from the SQLite documentation
## Using these with SQLite JSON functions
The most powerful way to make use of this plugin is in conjunction with SQLite's [JSON functions](https://www.sqlite.org/json1.html). For example:
select json_object(
""href"", ""https://simonwillison.net/"",
""label"", ""Simon Willison""
);
* [json_object() link demo](https://datasette-json-html.datasette.io/demo?sql=select+json_object%28%0D%0A++++%22href%22%2C+%22https%3A%2F%2Fsimonwillison.net%2F%22%2C%0D%0A++++%22label%22%2C+%22Simon+Willison%22%0D%0A%29%3B)
You can use these functions to construct JSON objects that work with the plugin from data in a table:
select id, json_object(
""href"", url, ""label"", text
) from mytable;
* [Demo that builds links against a table](https://datasette-json-html.datasette.io/demo?sql=select+json_object%28%22href%22%2C+url%2C+%22label%22%2C+package%2C+%22title%22%2C+package+%7C%7C+%22+%22+%7C%7C+url%29+as+package+from+packages)
The `json_group_array()` function is an aggregate function similar to `group_concat()` - it allows you to construct lists of JSON objects in conjunction with a `GROUP BY` clause.
This means you can use it to construct dynamic lists of links, for example:
select
substr(package, 0, 12) as prefix,
json_group_array(
json_object(
""href"", url,
""label"", package
)
) as package_links
from packages
group by prefix
* [Demo of json_group_array()](https://datasette-json-html.datasette.io/demo?sql=select%0D%0A++++substr%28package%2C+0%2C+12%29+as+prefix%2C%0D%0A++++json_group_array%28%0D%0A++++++++json_object%28%0D%0A++++++++++++%22href%22%2C+url%2C%0D%0A++++++++++++%22label%22%2C+package%0D%0A++++++++%29%0D%0A++++%29+as+package_links%0D%0Afrom+packages%0D%0Agroup+by+prefix)
## The `urllib_quote_plus()` SQL function
Since this plugin is designed to be used with SQL that constructs the underlying JSON structure, it is likely you will need to construct dynamic URLs from results returned by a SQL query.
This plugin registers a custom SQLite function called `urllib_quote_plus()` to help you do that. It lets you use Python's [urllib.parse.quote\_plus() function](https://docs.python.org/3/library/urllib.parse.html#urllib.parse.quote_plus) from within a SQL query.
Here's an example of how you might use it:
select id, json_object(
""href"",
""/mydatabase/other_table?_search="" || urllib_quote_plus(text),
""label"", text
) from mytable;
",Simon Willison,,text/markdown,https://datasette.io/plugins/datasette-json-html,,"Apache License, Version 2.0",,,https://pypi.org/project/datasette-json-html/,,https://pypi.org/project/datasette-json-html/,"{""CI"": ""https://github.com/simonw/datasette-json-html/actions"", ""Changelog"": ""https://github.com/simonw/datasette-json-html/releases"", ""Homepage"": ""https://datasette.io/plugins/datasette-json-html"", ""Issues"": ""https://github.com/simonw/datasette-json-html/issues""}",https://pypi.org/project/datasette-json-html/1.0.1/,"[""datasette"", ""pytest ; extra == 'test'"", ""pytest-asyncio ; extra == 'test'"", ""httpx ; extra == 'test'""]",,1.0.1,0,
datasette-jupyterlite,JupyterLite as a Datasette plugin,[],"# datasette-jupyterlite
[](https://pypi.org/project/datasette-jupyterlite/)
[](https://github.com/simonw/datasette-jupyterlite/releases)
[](https://github.com/simonw/datasette-jupyterlite/actions?query=workflow%3ATest)
[](https://github.com/simonw/datasette-jupyterlite/blob/main/LICENSE)
[JupyterLite](https://jupyterlite.readthedocs.io/en/latest/) as a Datasette plugin
## Installation
Install this plugin in the same environment as Datasette.
$ datasette install datasette-jupyterlite
## Demo
You can try out a demo of the plugin here: https://latest-with-plugins.datasette.io/jupyterlite/
Run this example code in a Pyolite notebook to pull all of the data from the [github/stars](https://latest-with-plugins.datasette.io/github/stars) table into a Pandas DataFrame:
```python
import pandas, pyodide
df = pandas.read_csv(pyodide.open_url(
""https://latest-with-plugins.datasette.io/github/stars.csv?_labels=on&_stream=on&_size=max"")
)
```
## Usage
Once installed, visit `/jupyterlite/` to access JupyterLite served from your Datasette instance.
## Development
To set up this plugin locally, first checkout the code. Then create a new virtual environment:
cd datasette-jupyterlite
python3 -mvenv venv
source venv/bin/activate
Or if you are using `pipenv`:
pipenv shell
Now install the dependencies and test dependencies:
pip install -e '.[test]'
To run the tests:
pytest
",Simon Willison,,text/markdown,https://github.com/simonw/datasette-jupyterlite,,"Apache License, Version 2.0",,,https://pypi.org/project/datasette-jupyterlite/,,https://pypi.org/project/datasette-jupyterlite/,"{""CI"": ""https://github.com/simonw/datasette-jupyterlite/actions"", ""Changelog"": ""https://github.com/simonw/datasette-jupyterlite/releases"", ""Homepage"": ""https://github.com/simonw/datasette-jupyterlite"", ""Issues"": ""https://github.com/simonw/datasette-jupyterlite/issues""}",https://pypi.org/project/datasette-jupyterlite/0.1a1/,"[""datasette"", ""jupyterlite"", ""importlib-resources"", ""pytest ; extra == 'test'"", ""pytest-asyncio ; extra == 'test'""]",>=3.7,0.1a1,0,
datasette-leaflet,A plugin that bundles Leaflet.js for Datasette,[],"# datasette-leaflet
[](https://pypi.org/project/datasette-leaflet/)
[](https://github.com/simonw/datasette-leaflet/releases)
[](https://github.com/simonw/datasette-leaflet/actions?query=workflow%3ATest)
[](https://github.com/simonw/datasette-leaflet/blob/main/LICENSE)
Datasette plugin adding the [Leaflet](https://leafletjs.com/) JavaScript library.
A growing number of Datasette plugins depend on the Leaflet JavaScript mapping library. They each have their own way of loading Leaflet, which could result in loading it multiple times (with multiple versions) if more than one plugin is installed.
This library is intended to solve this problem, by providing a single plugin they can all depend on that loads Leaflet in a reusable way.
Plugins that use this:
- [datasette-leaflet-freedraw](https://datasette.io/plugins/datasette-leaflet-freedraw)
- [datasette-leaflet-geojson](https://datasette.io/plugins/datasette-leaflet-geojson)
- [datasette-cluster-map](https://datasette.io/plugins/datasette-cluster-map)
## Installation
You can install this plugin like so:
datasette install datasette-leaflet
Usually this plugin will be a dependency of other plugins, so it should be installed automatically when you install them.
## Usage
The plugin makes `leaflet.js` and `leaflet.css` available as static files. It provides two custom template variables with the URLs of those two files.
- `{{ datasette_leaflet_url }}` is the URL to the JavaScript
- `{{ datasette_leaflet_css_url }}` is the URL to the CSS
These URLs are also made available as global JavaScript constants:
- `datasette.leaflet.JAVASCRIPT_URL`
- `datasette.leaflet.CSS_URL`
The JavaScript is packaed as a [JavaScript module](https://developer.mozilla.org/en-US/docs/Web/JavaScript/Guide/Modules). You can dynamically import the JavaScript from a custom template like this:
```html+jinja
```
You can load the CSS like this:
```html+jinja
```
Or dynamically like this:
```html+jinja
```
Here's a full example that loads the JavaScript and CSS and renders a map:
```html+jinja
```
",Simon Willison,,text/markdown,https://github.com/simonw/datasette-leaflet,,"Apache License, Version 2.0",,,https://pypi.org/project/datasette-leaflet/,,https://pypi.org/project/datasette-leaflet/,"{""CI"": ""https://github.com/simonw/datasette-leaflet/actions"", ""Changelog"": ""https://github.com/simonw/datasette-leaflet/releases"", ""Homepage"": ""https://github.com/simonw/datasette-leaflet"", ""Issues"": ""https://github.com/simonw/datasette-leaflet/issues""}",https://pypi.org/project/datasette-leaflet/0.2.2/,"[""datasette"", ""pytest ; extra == 'test'"", ""pytest-asyncio ; extra == 'test'""]",>=3.6,0.2.2,0,
datasette-leaflet-freedraw,Draw polygons on maps in Datasette,[],"# datasette-leaflet-freedraw
[](https://pypi.org/project/datasette-leaflet-freedraw/)
[](https://github.com/simonw/datasette-leaflet-freedraw/releases)
[](https://github.com/simonw/datasette-leaflet-freedraw/actions?query=workflow%3ATest)
[](https://github.com/simonw/datasette-leaflet-freedraw/blob/main/LICENSE)
Draw polygons on maps in Datasette
Project background: [Drawing shapes on a map to query a SpatiaLite database](https://simonwillison.net/2021/Jan/24/drawing-shapes-spatialite/).
## Installation
Install this plugin in the same environment as Datasette.
$ datasette install datasette-leaflet-freedraw
## Usage
If a table has a SpatiaLite `geometry` column, the plugin will add a map interface to the table page allowing users to draw a shape on the map to find rows with a geometry that intersects that shape.
The plugin can also work with arbitrary SQL queries. There it looks for input fields with a name of `freedraw` or that ends in `_freedraw` and replaces them with a map interface.
The map interface uses the [FreeDraw](https://freedraw.herokuapp.com/) Leaflet plugin.
## Demo
You can try out this plugin to run searches against the GreenInfo Network California Protected Areas Database. Here's [an example query](https://calands.datasettes.com/calands?sql=select%0D%0A++AsGeoJSON%28geometry%29%2C+*%0D%0Afrom%0D%0A++CPAD_2020a_SuperUnits%0D%0Awhere%0D%0A++PARK_NAME+like+%27%25mini%25%27+and%0D%0A++Intersects%28GeomFromGeoJSON%28%3Afreedraw%29%2C+geometry%29+%3D+1%0D%0A++and+CPAD_2020a_SuperUnits.rowid+in+%28%0D%0A++++select%0D%0A++++++rowid%0D%0A++++from%0D%0A++++++SpatialIndex%0D%0A++++where%0D%0A++++++f_table_name+%3D+%27CPAD_2020a_SuperUnits%27%0D%0A++++++and+search_frame+%3D+GeomFromGeoJSON%28%3Afreedraw%29%0D%0A++%29&freedraw=%7B%22type%22%3A%22MultiPolygon%22%2C%22coordinates%22%3A%5B%5B%5B%5B-122.42202758789064%2C37.82280243352759%5D%2C%5B-122.39868164062501%2C37.823887203271454%5D%2C%5B-122.38220214843751%2C37.81846319511331%5D%2C%5B-122.35061645507814%2C37.77071473849611%5D%2C%5B-122.34924316406251%2C37.74465712069939%5D%2C%5B-122.37258911132814%2C37.703380457832374%5D%2C%5B-122.39044189453125%2C37.690340943717715%5D%2C%5B-122.41241455078126%2C37.680559803205135%5D%2C%5B-122.44262695312501%2C37.67295135774715%5D%2C%5B-122.47283935546876%2C37.67295135774715%5D%2C%5B-122.52502441406251%2C37.68382032669382%5D%2C%5B-122.53463745117189%2C37.6892542140253%5D%2C%5B-122.54699707031251%2C37.690340943717715%5D%2C%5B-122.55798339843751%2C37.72945260537781%5D%2C%5B-122.54287719726564%2C37.77831314799672%5D%2C%5B-122.49893188476564%2C37.81303878836991%5D%2C%5B-122.46185302734376%2C37.82822612280363%5D%2C%5B-122.42889404296876%2C37.82822612280363%5D%2C%5B-122.42202758789064%2C37.82280243352759%5D%5D%5D%5D%7D) showing mini parks in San Francisco:
```sql
select
AsGeoJSON(geometry), *
from
CPAD_2020a_SuperUnits
where
PARK_NAME like '%mini%' and
Intersects(GeomFromGeoJSON(:freedraw), geometry) = 1
and CPAD_2020a_SuperUnits.rowid in (
select
rowid
from
SpatialIndex
where
f_table_name = 'CPAD_2020a_SuperUnits'
and search_frame = GeomFromGeoJSON(:freedraw)
)
```

## Development
To set up this plugin locally, first checkout the code. Then create a new virtual environment:
cd datasette-leaflet-freedraw
python3 -mvenv venv
source venv/bin/activate
Or if you are using `pipenv`:
pipenv shell
Now install the dependencies and tests:
pip install -e '.[test]'
To run the tests:
pytest
",Simon Willison,,text/markdown,https://github.com/simonw/datasette-leaflet-freedraw,,"Apache License, Version 2.0",,,https://pypi.org/project/datasette-leaflet-freedraw/,,https://pypi.org/project/datasette-leaflet-freedraw/,"{""CI"": ""https://github.com/simonw/datasette-leaflet-freedraw/actions"", ""Changelog"": ""https://github.com/simonw/datasette-leaflet-freedraw/releases"", ""Homepage"": ""https://github.com/simonw/datasette-leaflet-freedraw"", ""Issues"": ""https://github.com/simonw/datasette-leaflet-freedraw/issues""}",https://pypi.org/project/datasette-leaflet-freedraw/0.3.1/,"[""datasette (>=0.60)"", ""datasette-leaflet (>=0.2)"", ""pytest ; extra == 'test'"", ""pytest-asyncio ; extra == 'test'""]",>=3.6,0.3.1,0,
datasette-leaflet-geojson,A Datasette plugin that renders GeoJSON columns using Leaflet,[],"# datasette-leaflet-geojson
[](https://pypi.org/project/datasette-leaflet-geojson/)
[](https://github.com/simonw/datasette-leaflet-geojson/releases)
[](https://github.com/simonw/datasette-leaflet-geojson/actions?query=workflow%3ATest)
[](https://github.com/simonw/datasette-leaflet-geojson/blob/main/LICENSE)
Datasette plugin that replaces any GeoJSON column values with a Leaflet map
## Installation
Install this plugin in the same environment as Datasette.
$ datasette install datasette-leaflet-geojson
## Usage
Any columns containing valid GeoJSON strings will have their contents replaced with a Leaflet map when they are displayed in the Datasette interface.
## Demo
You can try this plugin out at https://calands.datasettes.com/calands/superunits_with_maps?MNG_AGENCY=Palo+Alto%2C+City+of
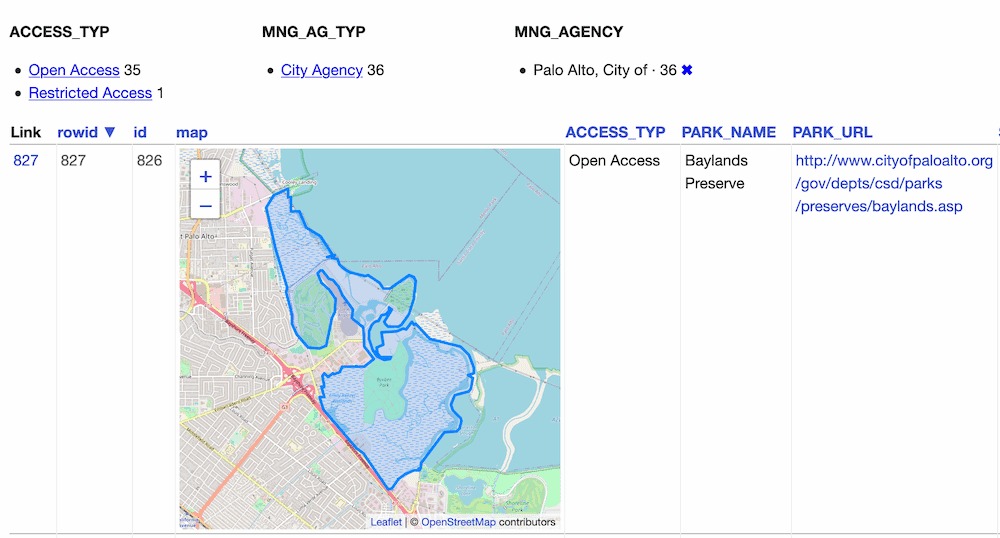
## Configuration
By default this plugin displays maps for the first ten rows, and shows a ""Click to load map"" prompt for rows past the first ten.
You can change this limit using the `default_maps_to_load` plugin configuration setting. Add this to your `metadata.json`:
```json
{
""plugins"": {
""datasette-leaflet-geojson"": {
""default_maps_to_load"": 20
}
}
}
```
Then run Datasette with `datasette mydb.db -m metadata.json`.
",Simon Willison,,text/markdown,https://github.com/simonw/datasette-leaflet-geojson,,"Apache License, Version 2.0",,,https://pypi.org/project/datasette-leaflet-geojson/,,https://pypi.org/project/datasette-leaflet-geojson/,"{""Homepage"": ""https://github.com/simonw/datasette-leaflet-geojson""}",https://pypi.org/project/datasette-leaflet-geojson/0.8/,"[""datasette (>=0.54)"", ""datasette-leaflet (>=0.2)"", ""pytest ; extra == 'test'"", ""pytest-asyncio ; extra == 'test'""]",,0.8,0,
datasette-mask-columns,Datasette plugin that masks specified database columns,[],"# datasette-mask-columns
[](https://pypi.org/project/datasette-mask-columns/)
[](https://github.com/simonw/datasette-mask-columns/releases)
[](https://github.com/simonw/datasette-mask-columns/actions?query=workflow%3ATest)
[](https://github.com/simonw/datasette-mask-columns/blob/main/LICENSE)
Datasette plugin that masks specified database columns
## Installation
pip install datasette-mask-columns
This depends on plugin hook changes in a not-yet released branch of Datasette. See [issue #678](https://github.com/simonw/datasette/issues/678) for details.
## Usage
In your `metadata.json` file add a section like this describing the database and table in which you wish to mask columns:
```json
{
""databases"": {
""my-database"": {
""plugins"": {
""datasette-mask-columns"": {
""users"": [""password""]
}
}
}
}
}
```
All SQL queries against the `users` table in `my-database.db` will now return `null` for the `password` column, no matter what value that column actually holds.
The table page for `users` will display the text `REDACTED` in the masked column. This visual hint will only be available on the table page; it will not display his text for arbitrary queries against the table.
",Simon Willison,,text/markdown,https://github.com/simonw/datasette-mask-columns,,"Apache License, Version 2.0",,,https://pypi.org/project/datasette-mask-columns/,,https://pypi.org/project/datasette-mask-columns/,"{""Homepage"": ""https://github.com/simonw/datasette-mask-columns""}",https://pypi.org/project/datasette-mask-columns/0.2.1/,"[""datasette"", ""pytest ; extra == 'test'"", ""pytest-asyncio ; extra == 'test'"", ""httpx ; extra == 'test'"", ""sqlite-utils ; extra == 'test'""]",,0.2.1,0,
datasette-media,Datasette plugin for serving media based on a SQL query,[],"# datasette-media
[](https://pypi.org/project/datasette-media/)
[](https://github.com/simonw/datasette-media/releases)
[](https://circleci.com/gh/simonw/datasette-media)
[](https://github.com/simonw/datasette-media/blob/master/LICENSE)
Datasette plugin for serving media based on a SQL query.
Use this when you have a database table containing references to files on disk - or binary content stored in BLOB columns - that you would like to be able to serve to your users.
## Installation
Install this plugin in the same environment as Datasette.
$ pip install datasette-media
### HEIC image support
Modern iPhones save their photos using the [HEIC image format](https://en.wikipedia.org/wiki/High_Efficiency_Image_File_Format). Processing these images requires an additional dependency, [pyheif](https://pypi.org/project/pyheif/). You can include this dependency by running:
$ pip install datasette-media[heif]
## Usage
You can use this plugin to configure Datasette to serve static media based on SQL queries to an underlying database table.
Media will be served from URLs that start with `/-/media/`. The full URL to each media asset will look like this:
/-/media/type-of-media/media-key
`type-of-media` will correspond to a configured SQL query, and might be something like `photo`. `media-key` will be an identifier that is used as part of the underlying SQL query to find which file should be served.
### Serving static files from disk
The following ``metadata.json`` configuration will cause this plugin to serve files from disk, based on queries to a database table called `apple_photos`.
```json
{
""plugins"": {
""datasette-media"": {
""photo"": {
""sql"": ""select filepath from apple_photos where uuid=:key""
}
}
}
}
```
A request to `/-/media/photo/CF972D33-5324-44F2-8DAE-22CB3182CD31` will execute the following SQL query:
```sql
select filepath from apple_photos where uuid=:key
```
The value from the URL - in this case `CF972D33-5324-44F2-8DAE-22CB3182CD31` - will be passed as the `:key` parameter to the query.
The query returns a `filepath` value that has been read from the table. The plugin will then read that file from disk and serve it in response to the request.
SQL queries default to running against the first connected database. You can specify a different database to execute the query against using `""database"": ""name_of_db""`. To execute against `photos.db`, use this:
```json
{
""plugins"": {
""datasette-media"": {
""photo"": {
""sql"": ""select filepath from apple_photos where uuid=:key"",
""database"": ""photos""
}
}
}
}
```
See [dogsheep-photos](https://github.com/dogsheep/dogsheep-photos) for an example of an application that can benefit from this plugin.
### Serving binary content from BLOB columns
If your SQL query returns a `content` column, this will be served directly to the user:
```json
{
""plugins"": {
""datasette-media"": {
""photo"": {
""sql"": ""select thumbnail as content from photos where uuid=:key"",
""database"": ""thumbs""
}
}
}
}
```
You can also return a `content_type` column which will be used as the `Content-Type` header served to the user:
```json
{
""plugins"": {
""datasette-media"": {
""photo"": {
""sql"": ""select body as content, 'text/html;charset=utf-8' as content_type from documents where id=:key"",
""database"": ""documents""
}
}
}
}
```
If you do not specify a `content_type` the default of `application/octet-stream` will be used.
### Serving content proxied from a URL
To serve content that is itself fetched from elsewhere, return a `content_url` column. This can be particularly useful when combined with the ability to resize images (described in the next section).
```json
{
""plugins"": {
""datasette-media"": {
""photos"": {
""sql"": ""select photo_url as content_url from photos where id=:key"",
""database"": ""photos"",
""enable_transform"": true
}
}
}
}
```
Now you can access resized versions of images from that URL like so:
/-/media/photos/13?w=200
### Setting a download file name
The `content_filename` column can be returned to force browsers to download the content using a specific file name.
```json
{
""plugins"": {
""datasette-media"": {
""hello"": {
""sql"": ""select 'Hello ' || :key as content, 'hello.txt' as content_filename""
}
}
}
}
```
Visiting `/-/media/hello/Groot` will cause your browser to download a file called `hello.txt` containing the text `Hello Groot`.
### Resizing or transforming images
Your SQL query can specify that an image should be resized and/or converted to another format by returning additional columns. All three are optional.
* `resize_width` - the width to resize the image to
* `resize_width` - the height to resize the image to
* `output_format` - the output format to use (e.g. `jpeg` or `png`) - any output format [supported by Pillow](https://pillow.readthedocs.io/en/stable/handbook/image-file-formats.html) is allowed here.
If you specify one but not the other of `resize_width` or `resize_height` the unspecified one will be calculated automatically to maintain the aspect ratio of the image.
Here's an example configuration that will resize all images to be JPEGs that are 200 pixels in height:
```json
{
""plugins"": {
""datasette-media"": {
""photo"": {
""sql"": ""select filepath, 200 as resize_height, 'jpeg' as output_format from apple_photos where uuid=:key"",
""database"": ""photos""
}
}
}
}
```
If you enable the `enable_transform` configuration option you can instead specify transform parameters at runtime using querystring parameters. For example:
- `/-/media/photo/CF972D33?w=200` to resize to a fixed width
- `/-/media/photo/CF972D33?h=200` to resize to a fixed height
- `/-/media/photo/CF972D33?format=jpeg` to convert to JPEG
That option is added like so:
```json
{
""plugins"": {
""datasette-media"": {
""photo"": {
""sql"": ""select filepath from apple_photos where uuid=:key"",
""database"": ""photos"",
""enable_transform"": true
}
}
}
}
```
The maximum allowed height or width is 4000 pixels. You can change this limit using the `""max_width_height""` option:
```json
{
""plugins"": {
""datasette-media"": {
""photo"": {
""sql"": ""select filepath from apple_photos where uuid=:key"",
""database"": ""photos"",
""enable_transform"": true,
""max_width_height"": 1000
}
}
}
}
```
## Configuration
In addition to the different named content types, the following special plugin configuration setting is available:
- `transform_threads` - number of threads to use for running transformations (e.g. resizing). Defaults to 4.
This can be used like this:
```json
{
""plugins"": {
""datasette-media"": {
""photo"": {
""sql"": ""select filepath from apple_photos where uuid=:key"",
""database"": ""photos""
},
""transform_threads"": 8
}
}
}
```
",Simon Willison,,text/markdown,https://github.com/simonw/datasette-media,,"Apache License, Version 2.0",,,https://pypi.org/project/datasette-media/,,https://pypi.org/project/datasette-media/,"{""CI"": ""https://app.circleci.com/pipelines/github/simonw/datasette-media"", ""Changelog"": ""https://github.com/simonw/datasette-media/releases"", ""Homepage"": ""https://github.com/simonw/datasette-media"", ""Issues"": ""https://gitlab.com/simonw/datasette-media/issues""}",https://pypi.org/project/datasette-media/0.5/,"[""datasette (>=0.44)"", ""Pillow (>=7.1.2)"", ""httpx (>=0.13.3)"", ""pyheif (>=0.4) ; extra == 'heif'"", ""asgiref ; extra == 'test'"", ""pytest ; extra == 'test'"", ""pytest-asyncio ; extra == 'test'"", ""sqlite-utils ; extra == 'test'"", ""pytest-httpx (>=0.4.0) ; extra == 'test'""]",,0.5,0,
datasette-mp3-audio,Turn .mp3 URLs into an audio player in the Datasette interface,"[""Framework :: Datasette"", ""License :: OSI Approved :: Apache Software License""]","# datasette-mp3-audio
[](https://pypi.org/project/datasette-mp3-audio/)
[](https://github.com/simonw/datasette-mp3-audio/releases)
[](https://github.com/simonw/datasette-mp3-audio/actions?query=workflow%3ATest)
[](https://github.com/simonw/datasette-mp3-audio/blob/main/LICENSE)
Turn .mp3 URLs into an audio player in the Datasette interface
## Installation
Install this plugin in the same environment as Datasette.
datasette install datasette-mp3-audio
## Demo
Try this plugin at [https://scotrail.datasette.io/scotrail/announcements](https://scotrail.datasette.io/scotrail/announcements)
The demo uses ScotRail train announcements from [matteason/scotrail-announcements-june-2022](https://github.com/matteason/scotrail-announcements-june-2022).
## Usage
Once installed, any cells with a value that ends in `.mp3` and starts with either `http://` or `/` or `https://` will be turned into an embedded HTML audio element like this:
```html
```
A ""Play X MP3s on this page"" button will be added to athe top of any table page listing more than one MP3.
## Development
To set up this plugin locally, first checkout the code. Then create a new virtual environment:
cd datasette-mp3-audio
python3 -m venv venv
source venv/bin/activate
Now install the dependencies and test dependencies:
pip install -e '.[test]'
To run the tests:
pytest
",Simon Willison,,text/markdown,https://github.com/simonw/datasette-mp3-audio,,"Apache License, Version 2.0",,,https://pypi.org/project/datasette-mp3-audio/,,https://pypi.org/project/datasette-mp3-audio/,"{""CI"": ""https://github.com/simonw/datasette-mp3-audio/actions"", ""Changelog"": ""https://github.com/simonw/datasette-mp3-audio/releases"", ""Homepage"": ""https://github.com/simonw/datasette-mp3-audio"", ""Issues"": ""https://github.com/simonw/datasette-mp3-audio/issues""}",https://pypi.org/project/datasette-mp3-audio/0.2/,"[""datasette"", ""pytest ; extra == 'test'"", ""pytest-asyncio ; extra == 'test'"", ""sqlite-utils ; extra == 'test'""]",>=3.7,0.2,0,
datasette-multiline-links,Make multiple newline separated URLs clickable in Datasette,"[""Framework :: Datasette"", ""License :: OSI Approved :: Apache Software License""]","# datasette-multiline-links
[](https://pypi.org/project/datasette-multiline-links/)
[](https://github.com/simonw/datasette-multiline-links/releases)
[](https://github.com/simonw/datasette-multiline-links/actions?query=workflow%3ATest)
[](https://github.com/simonw/datasette-multiline-links/blob/main/LICENSE)
Make multiple newline separated URLs clickable in Datasette
## Installation
Install this plugin in the same environment as Datasette.
datasette install datasette-multiline-links
## Usage
Once installed, if a cell has contents like this:
```
https://example.com
Not a link
https://google.com
```
It will be rendered as:
```html
https://example.com
Not a link
https://google.com
```
## Development
To set up this plugin locally, first checkout the code. Then create a new virtual environment:
cd datasette-multiline-links
python3 -m venv venv
source venv/bin/activate
Now install the dependencies and test dependencies:
pip install -e '.[test]'
To run the tests:
pytest
",Simon Willison,,text/markdown,https://github.com/simonw/datasette-multiline-links,,"Apache License, Version 2.0",,,https://pypi.org/project/datasette-multiline-links/,,https://pypi.org/project/datasette-multiline-links/,"{""CI"": ""https://github.com/simonw/datasette-multiline-links/actions"", ""Changelog"": ""https://github.com/simonw/datasette-multiline-links/releases"", ""Homepage"": ""https://github.com/simonw/datasette-multiline-links"", ""Issues"": ""https://github.com/simonw/datasette-multiline-links/issues""}",https://pypi.org/project/datasette-multiline-links/0.1/,"[""datasette"", ""pytest ; extra == 'test'"", ""pytest-asyncio ; extra == 'test'""]",>=3.7,0.1,0,
datasette-nteract-data-explorer,automatic visual data explorer for datasette,"[""Framework :: Datasette"", ""License :: OSI Approved :: Apache Software License""]","# datasette-nteract-data-explorer
[](https://pypi.org/project/datasette-nteract-data-explorer/)
[](https://github.com/hydrosquall/datasette-nteract-data-explorer/releases)
[](https://github.com/hydrosquall/datasette-nteract-data-explorer/actions?query=workflow%3ATest)
[](https://github.com/hydrosquall/datasette-nteract-data-explorer/blob/main/LICENSE)
An automatic data visualization plugin for the [Datasette](https://datasette.io/) ecosystem. See your dataset from multiple views with an easy-to-use, customizable menu-based interface.
## Demo
Try the [live demo](https://datasette-nteract-data-explorer.vercel.app/happy_planet_index/hpi_cleaned?_size=137)

_Running Datasette with the Happy Planet Index dataset_
## Installation
Install this plugin in the same Python environment as Datasette.
```bash
datasette install datasette-nteract-data-explorer
```
## Usage
- Click ""View in Data Explorer"" to expand the visualization panel
- Click the icons on the right side to change the visualization type.
- Use the menus underneath the graphing area to configure your graph (e.g. change which columns to graph, colors to use, etc)
- Use ""advanced settings"" mode to override the inferred column types. For example, you may want to treat a number as a ""string"" to be able to use it as a category.
- See a [live demo](https://data-explorer.nteract.io/) of the original Nteract data-explorer component used in isolation.
You can run a minimal demo after the installation step
```bash
datasette -i demo/happy_planet_index.db
```
If you're interested in improving the demo site, you can run a copy of the site the extra metadata/plugins used in the [published demo](https://datasette-nteract-data-explorer.vercel.app).
```bash
make run-demo
```
Thank you for reading this far! If you use the Data Explorer in your own site and would like others to find it, you can [mention it here](https://github.com/hydrosquall/datasette-nteract-data-explorer/discussions/10).
## Development
See [contributing docs](./docs/CONTRIBUTING.md).
## Acknowledgements
- The [Data Explorer](https://github.com/nteract/data-explorer) was designed by Elijah Meeks. I co-maintain this project as part of the [Nteract](https://nteract.io/) open-source team. You can read about the design behind this tool [here](https://blog.nteract.io/designing-the-nteract-data-explorer-f4476d53f897)
- The data model is based on the [Frictionless Data Spec](https://specs.frictionlessdata.io/).
- This plugin was bootstrapped by Simon Willison's [Datasette plugin template](https://simonwillison.net/2020/Jun/20/cookiecutter-plugins/)
- Demo dataset from the [Happy Planet Index](https://happyplanetindex.org/) was cleaned by Doris Lee. This dataset was chosen because of its global appeal, modest size, and variety in column datatypes (numbers, low cardinality and high cardinality strings, booleans).
- Hosting for the demo site is provided by Vercel.
[](https://vercel.com/?utm_source=datasette-visualization-plugin-demos&utm_campaign=oss)
",Cameron Yick,,text/markdown,https://github.com/hydrosquall/datasette-nteract-data-explorer,,"Apache License, Version 2.0",,,https://pypi.org/project/datasette-nteract-data-explorer/,,https://pypi.org/project/datasette-nteract-data-explorer/,"{""CI"": ""https://github.com/hydrosquall/datasette-nteract-data-explorer/actions"", ""Changelog"": ""https://github.com/hydrosquall/datasette-nteract-data-explorer/releases"", ""Homepage"": ""https://github.com/hydrosquall/datasette-nteract-data-explorer"", ""Issues"": ""https://github.com/hydrosquall/datasette-nteract-data-explorer/issues""}",https://pypi.org/project/datasette-nteract-data-explorer/0.5.1/,"[""datasette"", ""pytest ; extra == 'test'"", ""pytest-asyncio ; extra == 'test'""]",>=3.7,0.5.1,0,
datasette-packages,Show a list of currently installed Python packages,"[""Framework :: Datasette"", ""License :: OSI Approved :: Apache Software License""]","# datasette-packages
[](https://pypi.org/project/datasette-packages/)
[](https://github.com/simonw/datasette-packages/releases)
[](https://github.com/simonw/datasette-packages/actions?query=workflow%3ATest)
[](https://github.com/simonw/datasette-packages/blob/main/LICENSE)
Show a list of currently installed Python packages
## Installation
Install this plugin in the same environment as Datasette.
$ datasette install datasette-packages
## Usage
Visit `/-/packages` to see a list of installed Python packages.
Visit `/-/packages.json` to get that back as JSON.
## Demo
The output of this plugin can be seen here:
- https://latest-with-plugins.datasette.io/-/packages
- https://latest-with-plugins.datasette.io/-/packages.json
## With datasette-graphql
if you have version 2.1 or higher of the [datasette-graphql](https://datasette.io/plugins/datasette-graphql) plugin installed you can also query the list of packages using this GraphQL query:
```graphql
{
packages {
name
version
}
}
```
[Demo of this query](https://latest-with-plugins.datasette.io/graphql?query=%7B%0A%20%20%20%20packages%20%7B%0A%20%20%20%20%20%20%20%20name%0A%20%20%20%20%20%20%20%20version%0A%20%20%20%20%7D%0A%7D).
## Development
To set up this plugin locally, first checkout the code. Then create a new virtual environment:
cd datasette-packages
python3 -mvenv venv
source venv/bin/activate
Now install the dependencies and test dependencies:
pip install -e '.[test]'
To run the tests:
pytest
",Simon Willison,,text/markdown,https://github.com/simonw/datasette-packages,,"Apache License, Version 2.0",,,https://pypi.org/project/datasette-packages/,,https://pypi.org/project/datasette-packages/,"{""CI"": ""https://github.com/simonw/datasette-packages/actions"", ""Changelog"": ""https://github.com/simonw/datasette-packages/releases"", ""Homepage"": ""https://github.com/simonw/datasette-packages"", ""Issues"": ""https://github.com/simonw/datasette-packages/issues""}",https://pypi.org/project/datasette-packages/0.2/,"[""datasette"", ""pytest ; extra == 'test'"", ""pytest-asyncio ; extra == 'test'"", ""datasette-graphql (>=2.1) ; extra == 'test'""]",>=3.7,0.2,0,
datasette-permissions-sql,Datasette plugin for configuring permission checks using SQL queries,[],"# datasette-permissions-sql
[](https://pypi.org/project/datasette-permissions-sql/)
[](https://circleci.com/gh/simonw/datasette-permissions-sql)
[](https://github.com/simonw/datasette-permissions-sql/blob/master/LICENSE)
Datasette plugin for configuring permission checks using SQL queries
## Installation
Install this plugin in the same environment as Datasette.
$ pip install datasette-permissions-sql
## Usage
First, read up on how Datasette's [authentication and permissions system](https://datasette.readthedocs.io/en/latest/authentication.html) works.
This plugin lets you define rules containing SQL queries that are executed to see if the currently authenticated actor has permission to perform certain actions.
Consider a canned query which authenticated users should only be able to execute if a row in the `users` table says that they are a member of staff.
That `users` table in the `mydatabase.db` database could look like this:
| id | username | is_staff |
|--|--------|--------|
| 1 | cleopaws | 0 |
| 2 | simon | 1 |
Authenticated users have an `actor` that looks like this:
```json
{
""id"": 2,
""username"": ""simon""
}
```
To configure the canned query to only be executable by staff users, add the following to your `metadata.json`:
```json
{
""plugins"": {
""datasette-permissions-sql"": [
{
""action"": ""view-query"",
""resource"": [""mydatabase"", ""promote_to_staff""],
""sql"": ""SELECT * FROM users WHERE is_staff = 1 AND id = :actor_id""
}
]
},
""databases"": {
""mydatabase"": {
""queries"": {
""promote_to_staff"": {
""sql"": ""UPDATE users SET is is_staff=1 WHERE id=:id"",
""write"": true
}
}
}
}
}
```
The `""datasette-permissions-sql""` key is a list of rules. Each of those rules has the following shape:
```json
{
""action"": ""name-of-action"",
""resource"": [""resource identifier to run this on""],
""sql"": ""SQL query to execute"",
""database"": ""mydatabase""
}
```
Both `""action""` and `""resource""` are optional. If present, the SQL query will only be executed on permission checks that match the action and, if present, the resource indicators.
`""database""` is also optional: it specifies the named database that the query should be executed against. If it is not present the first connected database will be used.
The Datasette documentation includes a [list of built-in permissions](https://datasette.readthedocs.io/en/stable/authentication.html#built-in-permissions) that you might want to use here.
### The SQL query
If the SQL query returns any rows the action will be allowed. If it returns no rows, the plugin hook will return `False` and deny access to that action.
The SQL query is called with a number of named parameters. You can use any of these as part of the query.
The list of parameters is as follows:
* `action` - the action, e.g. `""view-database""`
* `resource_1` - the first component of the resource, if one was passed
* `resource_2` - the second component of the resource, if available
* `actor_*` - a parameter for every key on the actor. Usually `actor_id` is present.
If any rows are returned, the permission check passes. If no rows are returned the check fails.
Another example table, this time granting explicit access to individual tables. Consider a table called `table_access` that looks like this:
| user_id | database | table |
| - | - | - |
| 1 | mydb | dogs |
| 2 | mydb | dogs |
| 1 | mydb | cats |
The following SQL query would grant access to the `dogs` ttable in the `mydb.db` database to users 1 and 2 - but would forbid access for user 2 to the `cats` table:
```sql
SELECT
*
FROM
table_access
WHERE
user_id = :actor_id
AND ""database"" = :resource_1
AND ""table"" = :resource_2
```
In a `metadata.yaml` configuration file that would look like this:
```yaml
databases:
mydb:
allow_sql: {}
plugins:
datasette-permissions-sql:
- action: view-table
sql: |-
SELECT
*
FROM
table_access
WHERE
user_id = :actor_id
AND ""database"" = :resource_1
AND ""table"" = :resource_2
```
We're using `allow_sql: {}` here to disable arbitrary SQL queries. This prevents users from running `select * from cats` directly to work around the permissions limits.
### Fallback mode
The default behaviour of this plugin is to take full control of specified permissions. The SQL query will directly control if the user is allowed or denied access to the permission.
This means that the default policy for each permission (which in Datasette core is ""allow"" for `view-database` and friends) will be ignored. It also means that any other `permission_allowed` plugins will not get their turn once this plugin has executed.
You can change this on a per-rule basis using ``""fallback"": true``:
```json
{
""action"": ""view-table"",
""resource"": [""mydatabase"", ""mytable""],
""sql"": ""select * from admins where user_id = :actor_id"",
""fallback"": true
}
```
When running in fallback mode, a query result returning no rows will cause the plugin hook to return ``None`` - which means ""I have no opinion on this permission, fall back to other plugins or the default"".
In this mode you can still return `False` (for ""deny access"") by returning a single row with a single value of `-1`. For example:
```json
{
""action"": ""view-table"",
""resource"": [""mydatabase"", ""mytable""],
""sql"": ""select -1 from banned where user_id = :actor_id"",
""fallback"": true
}
```
",Simon Willison,,text/markdown,https://github.com/simonw/datasette-permissions-sql,,"Apache License, Version 2.0",,,https://pypi.org/project/datasette-permissions-sql/,,https://pypi.org/project/datasette-permissions-sql/,"{""Homepage"": ""https://github.com/simonw/datasette-permissions-sql""}",https://pypi.org/project/datasette-permissions-sql/0.3a0/,"[""datasette (>=0.44)"", ""pytest ; extra == 'test'"", ""pytest-asyncio ; extra == 'test'"", ""httpx ; extra == 'test'"", ""sqlite-utils (~=2.0) ; extra == 'test'""]",,0.3a0,0,
datasette-placekey,SQL functions for working with placekeys,[],"# datasette-placekey
[](https://pypi.org/project/datasette-placekey/)
[](https://github.com/simonw/datasette-placekey/releases)
[](https://github.com/simonw/datasette-placekey/actions?query=workflow%3ATest)
[](https://github.com/simonw/datasette-placekey/blob/main/LICENSE)
SQL functions for working with [placekeys](https://www.placekey.io/).
## Installation
Install this plugin in the same environment as Datasette.
$ datasette install datasette-placekey
## Usage
The following SQL functions are exposed - [documentation here](https://placekey.github.io/placekey-py/placekey.html#module-placekey.placekey).
```sql
select
geo_to_placekey(33.0896104,129.7900839),
placekey_to_geo('@6nh-nhh-kvf'),
placekey_to_geo_latitude('@6nh-nhh-kvf'),
placekey_to_geo_longitude('@6nh-nhh-kvf'),
placekey_to_h3('@6nh-nhh-kvf'),
h3_to_placekey('8a30d94e4c87fff'),
placekey_to_geojson('@6nh-nhh-kvf'),
placekey_to_wkt('@6nh-nhh-kvf'),
placekey_format_is_valid('@6nh-nhh-kvf');
```
## Development
To set up this plugin locally, first checkout the code. Then create a new virtual environment:
cd datasette-placekey
python3 -mvenv venv
source venv/bin/activate
Or if you are using `pipenv`:
pipenv shell
Now install the dependencies and tests:
pip install -e '.[test]'
To run the tests:
pytest
",Simon Willison,,text/markdown,https://github.com/simonw/datasette-placekey,,"Apache License, Version 2.0",,,https://pypi.org/project/datasette-placekey/,,https://pypi.org/project/datasette-placekey/,"{""CI"": ""https://github.com/simonw/datasette-placekey/actions"", ""Changelog"": ""https://github.com/simonw/datasette-placekey/releases"", ""Homepage"": ""https://github.com/simonw/datasette-placekey"", ""Issues"": ""https://github.com/simonw/datasette-placekey/issues""}",https://pypi.org/project/datasette-placekey/0.1/,"[""datasette"", ""placekey"", ""pytest ; extra == 'test'"", ""pytest-asyncio ; extra == 'test'""]",>=3.6,0.1,0,
datasette-pretty-json,Datasette plugin that pretty-prints any column values that are valid JSON objects or arrays,[],"# datasette-pretty-json
[](https://pypi.org/project/datasette-pretty-json/)
[](https://github.com/simonw/datasette-pretty-json/releases)
[](https://github.com/simonw/datasette-pretty-json/actions?query=workflow%3ATest)
[](https://github.com/simonw/datasette-pretty-json/blob/main/LICENSE)
[Datasette](https://github.com/simonw/datasette) plugin that pretty-prints any column values that are valid JSON objects or arrays.
You may also be interested in [datasette-json-html](https://github.com/simonw/datasette-json-html).
",Simon Willison,,text/markdown,https://github.com/simonw/datasette-pretty-json,,"Apache License, Version 2.0",,,https://pypi.org/project/datasette-pretty-json/,,https://pypi.org/project/datasette-pretty-json/,"{""Homepage"": ""https://github.com/simonw/datasette-pretty-json""}",https://pypi.org/project/datasette-pretty-json/0.2.2/,"[""datasette"", ""pytest ; extra == 'test'""]",,0.2.2,0,
datasette-pretty-traces,Prettier formatting for ?_trace=1 traces,"[""Framework :: Datasette"", ""License :: OSI Approved :: Apache Software License""]","# datasette-pretty-traces
[](https://pypi.org/project/datasette-pretty-traces/)
[](https://github.com/simonw/datasette-pretty-traces/releases)
[](https://github.com/simonw/datasette-pretty-traces/actions?query=workflow%3ATest)
[](https://github.com/simonw/datasette-pretty-traces/blob/main/LICENSE)
Prettier formatting for `?_trace=1` traces
## Installation
Install this plugin in the same environment as Datasette.
$ datasette install datasette-pretty-traces
## Usage
Once installed, run Datasette using `--setting trace_debug 1`:
datasette fixtures.db --setting trace_debug 1
Then navigate to any page and add `?_trace=` to the URL:
http://localhost:8001/?_trace=1
The plugin will scroll you down the page to the visualized trace information.
## Demo
You can try out the demo here:
- [/?_trace=1](https://latest-with-plugins.datasette.io/?_trace=1) tracing the homepage
- [/github/commits?_trace=1](https://latest-with-plugins.datasette.io/github/commits?_trace=1) tracing a table page
## Screenshot

## Development
To set up this plugin locally, first checkout the code. Then create a new virtual environment:
cd datasette-pretty-traces
python3 -mvenv venv
source venv/bin/activate
Or if you are using `pipenv`:
pipenv shell
Now install the dependencies and test dependencies:
pip install -e '.[test]'
To run the tests:
pytest
",Simon Willison,,text/markdown,https://github.com/simonw/datasette-pretty-traces,,"Apache License, Version 2.0",,,https://pypi.org/project/datasette-pretty-traces/,,https://pypi.org/project/datasette-pretty-traces/,"{""CI"": ""https://github.com/simonw/datasette-pretty-traces/actions"", ""Changelog"": ""https://github.com/simonw/datasette-pretty-traces/releases"", ""Homepage"": ""https://github.com/simonw/datasette-pretty-traces"", ""Issues"": ""https://github.com/simonw/datasette-pretty-traces/issues""}",https://pypi.org/project/datasette-pretty-traces/0.4/,"[""datasette"", ""pytest ; extra == 'test'"", ""pytest-asyncio ; extra == 'test'""]",>=3.6,0.4,0,
datasette-psutil,Datasette plugin adding a /-/psutil debugging endpoint,[],"# datasette-psutil
[](https://pypi.org/project/datasette-psutil/)
[](https://circleci.com/gh/simonw/datasette-psutil)
[](https://github.com/simonw/datasette-psutil/blob/master/LICENSE)
Datasette plugin adding a `/-/psutil` debugging endpoint
## Installation
Install this plugin in the same environment as Datasette.
$ pip install datasette-psutil
## Usage
Visit `/-/psutil` on your Datasette instance to see various information provided by [psutil](https://psutil.readthedocs.io/).
## Example
You can visit a live demo here: https://datasette-psutil-demo-j7hipcg4aq-uw.a.run.app/-/psutil
Sample output:
```
process.open_files()
popenfile(path='/tmp/fixtures.db', fd=6)
process.connections()
pconn(fd=5, family=, type=, laddr=addr(ip='169.254.8.130', port=8080), raddr=addr(ip='169.254.8.129', port=52621), status='ESTABLISHED')
pconn(fd=3, family=, type=, laddr=addr(ip='0.0.0.0', port=8080), raddr=(), status='LISTEN')
process.memory_info()
pmem(rss=56827904, vms=242540544, shared=0, text=0, lib=0, data=0, dirty=0)
process.cmdline()
'/usr/local/bin/python'
'/usr/local/bin/datasette'
'serve'
'--host'
'0.0.0.0'
'-i'
'fixtures.db'
'--cors'
'--inspect-file'
'inspect-data.json'
'--port'
'8080'
process.parents()
psutil.Process(pid=1, name='sh', started='23:19:29')
process.threads()
pthread(id=2, user_time=7.27, system_time=3.99)
pthread(id=4, user_time=0.01, system_time=0.0)
pthread(id=5, user_time=0.0, system_time=0.0)
pthread(id=6, user_time=0.0, system_time=0.0)
pthread(id=7, user_time=0.0, system_time=0.0)
pthread(id=8, user_time=0.0, system_time=0.0)
psutil.getloadavg()
(0.0, 0.0, 0.0)
psutil.cpu_times(True)
scputimes(user=0.0, nice=0.0, system=0.0, idle=0.0, iowait=0.0, irq=0.0, softirq=0.0, steal=0.0, guest=0.0, guest_nice=0.0)
scputimes(user=0.0, nice=0.0, system=0.0, idle=0.0, iowait=0.0, irq=0.0, softirq=0.0, steal=0.0, guest=0.0, guest_nice=0.0)
psutil.virtual_memory()
svmem(total=2147483648, available=2093080576, percent=2.5, used=31113216, free=2093080576, active=42860544, inactive=11513856, buffers=0, cached=23289856, shared=262144, slab=0)
list(psutil.process_iter())
psutil.Process(pid=1, name='sh', started='23:19:29')
psutil.Process(pid=2, name='datasette', started='23:19:29')
```
",Simon Willison,,text/markdown,https://github.com/simonw/datasette-psutil,,"Apache License, Version 2.0",,,https://pypi.org/project/datasette-psutil/,,https://pypi.org/project/datasette-psutil/,"{""Homepage"": ""https://github.com/simonw/datasette-psutil""}",https://pypi.org/project/datasette-psutil/0.2/,"[""datasette (>=0.44)"", ""psutil"", ""pytest ; extra == 'test'"", ""pytest-asyncio ; extra == 'test'"", ""httpx ; extra == 'test'""]",,0.2,0,
datasette-public,Make specific Datasette tables visible to the public,"[""Framework :: Datasette"", ""License :: OSI Approved :: Apache Software License""]","# datasette-public
[](https://pypi.org/project/datasette-public/)
[](https://github.com/simonw/datasette-public/releases)
[](https://github.com/simonw/datasette-public/actions?query=workflow%3ATest)
[](https://github.com/simonw/datasette-public/blob/main/LICENSE)
Make specific Datasette tables visible to the public
## Installation
Install this plugin in the same environment as Datasette.
datasette install datasette-public
## Usage
Any tables listed in the `_public_tables` table will be visible to the public, even if the rest of the Datasette instance does not allow anonymous access.
The root user (and any user with the new `public-tables` permission) will get a new option in the table action menu allowing them to toggle a table between public and private.
Installing this plugin also causes `allow-sql` permission checks to fall back to checking if the user has access to the entire database. This is to avoid users with access to a single public table being able to access data from other tables using the `?_where=` query string parameter.
## Configuration
This plugin creates a new table in one of your databases called `_public_tables`.
This table defaults to being created in the first database passed to Datasette.
To create it in a different named database, use this plugin configuration:
```json
{
""plugins"": {
""datasette-public"": {
""database"": ""database_to_create_table_in""
}
}
}
```
## Development
To set up this plugin locally, first checkout the code. Then create a new virtual environment:
cd datasette-public
python3 -m venv venv
source venv/bin/activate
Now install the dependencies and test dependencies:
pip install -e '.[test]'
To run the tests:
pytest
",Simon Willison,,text/markdown,https://github.com/simonw/datasette-public,,"Apache License, Version 2.0",,,https://pypi.org/project/datasette-public/,,https://pypi.org/project/datasette-public/,"{""CI"": ""https://github.com/simonw/datasette-public/actions"", ""Changelog"": ""https://github.com/simonw/datasette-public/releases"", ""Homepage"": ""https://github.com/simonw/datasette-public"", ""Issues"": ""https://github.com/simonw/datasette-public/issues""}",https://pypi.org/project/datasette-public/0.2/,"[""datasette"", ""pytest ; extra == 'test'"", ""pytest-asyncio ; extra == 'test'""]",>=3.7,0.2,0,
datasette-publish-fly,Datasette plugin for publishing data using Fly,[],"# datasette-publish-fly
[](https://pypi.org/project/datasette-publish-fly/)
[](https://github.com/simonw/datasette-publish-fly/releases)
[](https://github.com/simonw/datasette-publish-fly/actions?query=workflow%3ATest)
[](https://github.com/simonw/datasette-publish-fly/blob/main/LICENSE)
[Datasette](https://datasette.io/) plugin for deploying Datasette instances to [Fly.io](https://fly.io/).
Project background: [Using SQLite and Datasette with Fly Volumes](https://simonwillison.net/2022/Feb/15/fly-volumes/)
## Installation
Install this plugin in the same environment as Datasette.
$ datasette install datasette-publish-fly
## Deploying read-only data
First, install the `flyctl` command-line tool by [following their instructions](https://fly.io/docs/getting-started/installing-flyctl/).
Run `flyctl auth signup` to create an account there, or `flyctl auth login` if you already have one.
You can now use `datasette publish fly` to publish one or more SQLite database files:
datasette publish fly my-database.db --app=""my-data-app""
The argument you pass to `--app` will be used for the URL of your application: `my-data-app.fly.dev`.
To update an application, run the publish command passing the same application name to the `--app` option.
Fly have [a free tier](https://fly.io/docs/about/pricing/#free-allowances), beyond which they will charge you monthly for each application you have live. Details of their pricing can be [found on their site](https://fly.io/docs/pricing/).
Your application will be deployed at `https://your-app-name.fly.io/` - be aware that it may take several minutes to start working the first time you deploy it.
## Using Fly volumes for writable databases
Fly [Volumes](https://fly.io/docs/reference/volumes/) provide persistant disk storage for Fly applications. Volumes can be 1GB or more in size and the Fly free tier includes 3GB of volume space.
Datasette plugins such as [datasette-uploads-csvs](https://datasette.io/plugins/datasette-upload-csvs) and [datasette-tiddlywiki](https://datasette.io/plugins/datasette-tiddlywiki) can be deployed to Fly and store their mutable data in a volume.
> :warning: **You should only run a single instance of your application** if your database accepts writes. Fly has excellent support for running multiple instances in different geographical regions, but `datasette-publish-fly` with volumes is not yet compatible with that model. You should probably [use Fly PostgreSQL instead](https://fly.io/blog/globally-distributed-postgres/).
Here's how to deploy `datasette-tiddlywiki` with authentication provided by `datasette-auth-passwords`.
First, you'll need to create a root password hash to use to sign into the instance.
You can do that by installing the plugin and running the `datasette hash-password` command, or by using [this hosted tool](https://datasette-auth-passwords-demo.datasette.io/-/password-tool).
The hash should look like `pbkdf2_sha256$...` - you'll need this for the next step.
In this example we're also deploying a read-only database called `content.db`.
Pick a name for your new application, then run the following:
datasette publish fly \
content.db \
--app your-application-name \
--create-volume 1 \
--create-db tiddlywiki \
--install datasette-auth-passwords \
--install datasette-tiddlywiki \
--plugin-secret datasette-auth-passwords root_password_hash 'pbkdf2_sha256$...'
This will create the new application, deploy the `content.db` read-only database, create a 1GB volume for that application, create a new database in that volume called `tiddlywiki.db`, then install the two plugins and configure the password you specified.
### Updating applications that use a volume
Once you have deployed an application using a volume, you can update that application without needing the `--create-volume` or `--create-db` options. To add the [datasette-graphq](https://datasette.io/plugins/datasette-graphql) plugin to your deployed application you would run the following:
datasette publish fly \
content.db \
--app your-application-name \
--install datasette-auth-passwords \
--install datasette-tiddlywiki \
--install datasette-graphql \
--plugin-secret datasette-auth-passwords root_password_hash 'pbkdf2_sha256$...' \
Since the application name is the same you don't need the `--create-volume` or `--create-db` options - these are persisted automatically between deploys.
You do need to specify the full list of plugins that you want to have installed, and any plugin secrets.
You also need to include any read-only database files that are part of the instance - `content.db` in this example - otherwise the new deployment will not include them.
### Advanced volume usage
`datasette publish fly` will add a volume called `datasette` to your Fly application. You can customize the name using the `--volume name custom_name` option.
Fly can be used to scale applications to run multiple instances in multiple regions around the world. This works well with read-only Datasette but is not currently recommended using Datasette with volumes, since each Fly replica would need its own volume and data stored in one instance would not be visible in others.
If you want to use multiple instances with volumes you will need to switch to using the `flyctl` command directly. The `--generate-dir` option, described below, can help with this.
## Generating without deploying
Use the `--generate-dir` option to generate a directory that can be deployed to Fly rather than deploying directly:
datasette publish fly my-database.db \
--app=""my-generated-app"" \
--generate-dir /tmp/deploy-this
You can then manually deploy your generated application using the following:
cd /tmp/deploy-this
flyctl apps create my-generated-app
flyctl deploy
## datasette publish fly --help
```
Usage: datasette publish fly [OPTIONS] [FILES]...
Deploy an application to Fly that runs Datasette against the provided database
files.
Usage example:
datasette publish fly my-database.db --app=""my-data-app""
Full documentation: https://datasette.io/plugins/datasette-publish-fly
Options:
-m, --metadata FILENAME Path to JSON/YAML file containing metadata to
publish
--extra-options TEXT Extra options to pass to datasette serve
--branch TEXT Install datasette from a GitHub branch e.g.
main
--template-dir DIRECTORY Path to directory containing custom templates
--plugins-dir DIRECTORY Path to directory containing custom plugins
--static MOUNT:DIRECTORY Serve static files from this directory at
/MOUNT/...
--install TEXT Additional packages (e.g. plugins) to install
--plugin-secret ...
Secrets to pass to plugins, e.g. --plugin-
secret datasette-auth-github client_id xxx
--version-note TEXT Additional note to show on /-/versions
--secret TEXT Secret used for signing secure values, such as
signed cookies
--title TEXT Title for metadata
--license TEXT License label for metadata
--license_url TEXT License URL for metadata
--source TEXT Source label for metadata
--source_url TEXT Source URL for metadata
--about TEXT About label for metadata
--about_url TEXT About URL for metadata
--spatialite Enable SpatialLite extension
--region TEXT Fly region to deploy to, e.g sjc - see
https://fly.io/docs/reference/regions/
--create-volume INTEGER RANGE Create and attach volume of this size in GB
[x>=1]
--create-db TEXT Names of read-write database files to create
--volume-name TEXT Volume name to use
-a, --app TEXT Name of Fly app to deploy [required]
-o, --org TEXT Name of Fly org to deploy to
--generate-dir DIRECTORY Output generated application files and stop
without deploying
--show-files Output the generated Dockerfile, metadata.json
and fly.toml
--help Show this message and exit.
```
## Development
To contribute to this tool, first checkout the code. Then create a new virtual environment:
cd datasette-publish-fly
python -m venv venv
source venv/bin/activate
Or if you are using `pipenv`:
pipenv shell
Now install the dependencies and test dependencies:
pip install -e '.[test]'
To run the tests:
pytest
### Integration tests
The tests in `tests/test_integration.py` make actual calls to Fly to deploy a test application.
These tests are skipped by default. If you have `flyctl` installed and configured, you can run the integration tests like this:
pytest --integration -s
The `-s` option here ensures that output from the deploys will be visible to you - otherwise it can look like the tests have hung.
The tests will create applications on Fly that start with the prefix `publish-fly-temp-` and then delete them at the end of the run.
",Simon Willison,,text/markdown,https://github.com/simonw/datasette-publish-fly,,"Apache License, Version 2.0",,,https://pypi.org/project/datasette-publish-fly/,,https://pypi.org/project/datasette-publish-fly/,"{""CI"": ""https://github.com/simonw/datasette-publish-fly/actions"", ""Changelog"": ""https://github.com/simonw/datasette-publish-fly/releases"", ""Homepage"": ""https://github.com/simonw/datasette-publish-fly"", ""Issues"": ""https://github.com/simonw/datasette-publish-fly/issues""}",https://pypi.org/project/datasette-publish-fly/1.2/,"[""datasette (>=0.60.2)"", ""pytest ; extra == 'test'"", ""pytest-mock ; extra == 'test'"", ""cogapp ; extra == 'test'""]",,1.2,0,
datasette-publish-vercel,Datasette plugin for publishing data using Vercel,[],"# datasette-publish-vercel
[](https://pypi.org/project/datasette-publish-vercel/)
[](https://github.com/simonw/datasette-publish-vercel/releases)
[](https://github.com/simonw/datasette-publish-vercel/actions?query=workflow%3ATest)
[](https://github.com/simonw/datasette-publish-vercel/blob/main/LICENSE)
Datasette plugin for publishing data using [Vercel](https://vercel.com/).
## Installation
Install this plugin in the same environment as Datasette.
$ datasette install datasette-publish-vercel
## Usage
First, install the Vercel CLI tool by [following their instructions](https://vercel.com/download).
Run `vercel login` to login to (or create) an account.
Now you can use `datasette publish vercel` to publish your data:
datasette publish vercel my-database.db --project=my-database
The `--project` argument is required - it specifies the project name that should be used for your deployment. This will be used as part of the deployment's URL.
### Other options
* `--no-prod` deploys to the project without updating the ""production"" URL alias to point to that new deployment. Without that option all deploys go directly to production.
* `--debug` enables the Vercel CLI debug output.
* `--token` allows you to pass a Now authentication token, rather than needing to first run `now login` to configure the tool. Tokens can be created in the Vercel web dashboard under Account Settings -> Tokens.
* `--public` runs `vercel --public` to publish the application source code at `/_src` e.g. https://datasette-public.now.sh/_src and make recent logs visible at `/_logs` e.g. https://datasette-public.now.sh/_logs
* `--generate-dir` - by default this tool generates a new Vercel app in a temporary directory, deploys it and then deletes the directory. Use `--generate-dir=my-app` to output the generated application files to a new directory of your choice instead. You can then deploy it by running `vercel` in that directory.
* `--setting default_page_size 10` - use this to set Datasette settings, as described in [the documentation](https://docs.datasette.io/en/stable/settings.html). This is a replacement for the unsupported `--extra-options` option.
### Full help
**Warning:** Some of these options are not yet implemented by this plugin. In particular, the following do not yet work:
* `--extra-options` - use `--setting` described above instead.
* `--plugin-secret`
* `--version-note`
```
$ datasette publish vercel --help
Usage: datasette publish vercel [OPTIONS] [FILES]...
Publish to https://vercel.com/
Options:
-m, --metadata FILENAME Path to JSON/YAML file containing metadata to publish
--extra-options TEXT Extra options to pass to datasette serve
--branch TEXT Install datasette from a GitHub branch e.g. main
--template-dir DIRECTORY Path to directory containing custom templates
--plugins-dir DIRECTORY Path to directory containing custom plugins
--static MOUNT:DIRECTORY Serve static files from this directory at /MOUNT/...
--install TEXT Additional packages (e.g. plugins) to install
--plugin-secret ...
Secrets to pass to plugins, e.g. --plugin-secret
datasette-auth-github client_id xxx
--version-note TEXT Additional note to show on /-/versions
--secret TEXT Secret used for signing secure values, such as signed
cookies
--title TEXT Title for metadata
--license TEXT License label for metadata
--license_url TEXT License URL for metadata
--source TEXT Source label for metadata
--source_url TEXT Source URL for metadata
--about TEXT About label for metadata
--about_url TEXT About URL for metadata
--token TEXT Auth token to use for deploy
--project PROJECT Vercel project name to use [required]
--scope TEXT Optional Vercel scope (e.g. a team name)
--no-prod Don't deploy directly to production
--debug Enable Vercel CLI debug output
--public Publish source with Vercel CLI --public
--generate-dir DIRECTORY Output generated application files and stop without
deploying
--generate-vercel-json Output generated vercel.json file and stop without
deploying
--vercel-json FILENAME Custom vercel.json file to use instead of generating
one
--setting SETTING... Setting, see docs.datasette.io/en/stable/settings.html
--crossdb Enable cross-database SQL queries
--help Show this message and exit.
```
## Using a custom `vercel.json` file
If you want to add additional redirects or similar to your Vercel configuration you may want to provide a custom `vercel.json` file.
To do this, first generate a configuration file (without running a deploy) using the `--generate-vercel-json` option:
datasette publish vercel my-database.db \
--project=my-database \
--generate-vercel-json > vercel.json
You can now edit the `vercel.json` file that this creates to add your custom options.
Then run the deploy using:
datasette publish vercel my-database.db \
--project=my-database \
--vercel-json=vercel.json
## Setting a `DATASETTE_SECRET`
Datasette uses [a secret string](https://docs.datasette.io/en/stable/settings.html#configuring-the-secret) for purposes such as signing authentication cookies. This secret is reset when the server restarts, which will sign out any users who are authenticated using a signed cookie.
You can avoid this by generating a `DATASETTE_SECRET` secret string and setting that as a [Vercel environment variable](https://vercel.com/docs/concepts/projects/environment-variables). If you do this the secret will stay consistent and your users will not be signed out.
## Using this with GitHub Actions
This plugin can be used together with [GitHub Actions](https://github.com/features/actions) to deploy Datasette instances automatically on new pushes to a repo, or on a schedule.
The GitHub Actions runners already have the Vercel deployment tool installed. You'll need to create an API token for your account at [vercel.com/account/tokens](https://vercel.com/account/tokens), and store that as a secret in your GitHub repository called `VERCEL_TOKEN`.
Make sure your workflow has installed `datasette` and `datasette-publish-vercel` using `pip`, then add the following step to your GitHub Actions workflow:
```
- name: Deploy Datasette using Vercel
env:
VERCEL_TOKEN: ${{ secrets.VERCEL_TOKEN }}
run: |-
datasette publish vercel mydb.db \
--token $VERCEL_TOKEN \
--project my-vercel-project
```
You can see a full example of a workflow that uses Vercel in this way [in the simonw/til repository](https://github.com/simonw/til/blob/12b3f0d3679320cbeafa5df164bbc08ba703625d/.github/workflows/build.yml).
",Simon Willison,,text/markdown,https://github.com/simonw/datasette-publish-vercel,,"Apache License, Version 2.0",,,https://pypi.org/project/datasette-publish-vercel/,,https://pypi.org/project/datasette-publish-vercel/,"{""CI"": ""https://github.com/simonw/datasette-publish-vercel/actions"", ""Changelog"": ""https://github.com/simonw/datasette-publish-vercel/releases"", ""Homepage"": ""https://github.com/simonw/datasette-publish-vercel"", ""Issues"": ""https://github.com/simonw/datasette-publish-vercel/issues""}",https://pypi.org/project/datasette-publish-vercel/0.14.2/,"[""datasette (>=0.59)"", ""pytest ; extra == 'test'""]",,0.14.2,0,
datasette-pyinstrument,Use pyinstrument to analyze Datasette page performance,[],"# datasette-pyinstrument
[](https://pypi.org/project/datasette-pyinstrument/)
[](https://github.com/simonw/datasette-pyinstrument/releases)
[](https://github.com/simonw/datasette-pyinstrument/actions?query=workflow%3ATest)
[](https://github.com/simonw/datasette-pyinstrument/blob/main/LICENSE)
Use pyinstrument to analyze Datasette page performance
## Installation
Install this plugin in the same environment as Datasette.
$ datasette install datasette-pyinstrument
## Usage
Once installed, adding `?_pyinstrument=1` to any URL within Datasette will replace the output of that page with the pyinstrument profiler results for it.
## Development
To set up this plugin locally, first checkout the code. Then create a new virtual environment:
cd datasette-pyinstrument
python3 -mvenv venv
source venv/bin/activate
Or if you are using `pipenv`:
pipenv shell
Now install the dependencies and test dependencies:
pip install -e '.[test]'
To run the tests:
pytest
",Simon Willison,,text/markdown,https://github.com/simonw/datasette-pyinstrument,,"Apache License, Version 2.0",,,https://pypi.org/project/datasette-pyinstrument/,,https://pypi.org/project/datasette-pyinstrument/,"{""CI"": ""https://github.com/simonw/datasette-pyinstrument/actions"", ""Changelog"": ""https://github.com/simonw/datasette-pyinstrument/releases"", ""Homepage"": ""https://github.com/simonw/datasette-pyinstrument"", ""Issues"": ""https://github.com/simonw/datasette-pyinstrument/issues""}",https://pypi.org/project/datasette-pyinstrument/0.1/,"[""datasette"", ""pyinstrument"", ""pytest ; extra == 'test'"", ""pytest-asyncio ; extra == 'test'""]",>=3.7,0.1,0,
datasette-query-files,Write Datasette canned queries as plain SQL files,"[""Framework :: Datasette"", ""License :: OSI Approved :: Apache Software License""]","# datasette-query-files
[](https://pypi.org/project/datasette-query-files/)
[](https://github.com/eyeseast/datasette-query-files/releases)
[](https://github.com/eyeseast/datasette-query-files/actions?query=workflow%3ATest)
[](https://github.com/eyeseast/datasette-query-files/blob/main/LICENSE)
Write Datasette canned queries as plain SQL files.
## Installation
Install this plugin in the same environment as Datasette.
datasette install datasette-query-files
Or using `pip` or `pipenv`:
pip install datasette-query-files
pipenv install datasette-query-files
## Usage
This plugin will look for [canned queries](https://docs.datasette.io/en/stable/sql_queries.html#canned-queries) in the filesystem, in addition any defined in metadata.
Let's say you're working in a directory called `project-directory`, with a database file called `my-project.db`. Start by creating a `queries` directory with a `my-project` directory inside it. Any SQL file inside that `my-project` folder will become a canned query that can be run on the `my-project` database. If you have a `query-name.sql` file and a `query-name.json` (or `query-name.yml`) file in the same directory, the JSON file will be used as query metadata.
```
project-directory/
my-project.db
queries/
my-project/
query-name.sql # a query
query-name.yml # query metadata
```
## Development
To set up this plugin locally, first checkout the code. Then create a new virtual environment:
cd datasette-query-files
python3 -m venv venv
source venv/bin/activate
Now install the dependencies and test dependencies:
pip install -e '.[test]'
To run the tests:
pytest
",Chris Amico,,text/markdown,https://github.com/eyeseast/datasette-query-files,,"Apache License, Version 2.0",,,https://pypi.org/project/datasette-query-files/,,https://pypi.org/project/datasette-query-files/,"{""CI"": ""https://github.com/eyeseast/datasette-query-files/actions"", ""Changelog"": ""https://github.com/eyeseast/datasette-query-files/releases"", ""Homepage"": ""https://github.com/eyeseast/datasette-query-files"", ""Issues"": ""https://github.com/eyeseast/datasette-query-files/issues""}",https://pypi.org/project/datasette-query-files/0.1.1/,"[""datasette"", ""pytest ; extra == 'test'"", ""pytest-asyncio ; extra == 'test'""]",>=3.7,0.1.1,0,
datasette-query-history,Datasette plugin that keeps a list of the queries you've run and lets you rerun them.,[],"# datasette-query-history
[](https://pypi.org/project/datasette-query-history/)
[](https://github.com/bretwalker/datasette-query-history/releases)
[](https://github.com/bretwalker/datasette-query-history/actions?query=workflow%3ATest)
[](https://github.com/bretwalker/datasette-query-history/blob/main/LICENSE)
Datasette plugin that keeps a list of the queries you've run and lets you rerun them.
## Installation
Install this plugin in the same environment as Datasette.
$ datasette install datasette-query-history
## Usage
Click the `Query History` button on the SQL editor page to see previous queries.
Click the ⬆︎ button to replace the current query with a previous query.
Click the `Clear Query History` button to clear the list previous queries.
![]() ## Development
To set up this plugin locally, first checkout the code. Then create a new virtual environment:
cd datasette-query-history
python3 -mvenv venv
source venv/bin/activate
Or if you are using `pipenv`:
pipenv shell
Now install the dependencies and tests:
pip install -e '.[test]'
To run the tests:
pytest
",Bret Walker,,text/markdown,https://github.com/bretwalker/datasette-query-history,,"Apache License, Version 2.0",,,https://pypi.org/project/datasette-query-history/,,https://pypi.org/project/datasette-query-history/,"{""CI"": ""https://github.com/bretwalker/datasette-query-history/actions"", ""Changelog"": ""https://github.com/bretwalker/datasette-query-history/releases"", ""Homepage"": ""https://github.com/bretwalker/datasette-query-history"", ""Issues"": ""https://github.com/bretwalker/datasette-query-history/issues""}",https://pypi.org/project/datasette-query-history/0.2.3/,"[""datasette"", ""pytest ; extra == 'test'"", ""pytest-asyncio ; extra == 'test'""]",>=3.6,0.2.3,0,
datasette-query-links,Turn SELECT queries returned by a query into links to execute them,[],"# datasette-query-links
[](https://pypi.org/project/datasette-query-links/)
[](https://github.com/simonw/datasette-query-links/releases)
[](https://github.com/simonw/datasette-query-links/actions?query=workflow%3ATest)
[](https://github.com/simonw/datasette-query-links/blob/main/LICENSE)
Turn SELECT queries returned by a query into links to execute them
## Installation
Install this plugin in the same environment as Datasette.
$ datasette install datasette-query-links
## Usage
This is an experimental plugin, requiring Datasette 0.59a1 or higher.
Any SQL query that returns a value that itself looks like a valid SQL query will be converted into a link to execute that SQL query when it is displayed in the Datasette interface.
These links will only show for valid SQL query - if a SQL query would return an error it will not be turned into a link.
## Demo
* [Here's an example query](https://latest-with-plugins.datasette.io/fixtures?sql=select%0D%0A++%27select+*+from+%5Bfacetable%5D%27+as+query%0D%0Aunion%0D%0Aselect%0D%0A++%27select+sqlite_version()%27%0D%0Aunion%0D%0Aselect%0D%0A++%27select+this+is+invalid+SQL+so+will+not+be+linked%27) showing the plugin in action.
## Development
To set up this plugin locally, first checkout the code. Then create a new virtual environment:
cd datasette-query-links
python3 -mvenv venv
source venv/bin/activate
Or if you are using `pipenv`:
pipenv shell
Now install the dependencies and test dependencies:
pip install -e '.[test]'
To run the tests:
pytest
",Simon Willison,,text/markdown,https://github.com/simonw/datasette-query-links,,"Apache License, Version 2.0",,,https://pypi.org/project/datasette-query-links/,,https://pypi.org/project/datasette-query-links/,"{""CI"": ""https://github.com/simonw/datasette-query-links/actions"", ""Changelog"": ""https://github.com/simonw/datasette-query-links/releases"", ""Homepage"": ""https://github.com/simonw/datasette-query-links"", ""Issues"": ""https://github.com/simonw/datasette-query-links/issues""}",https://pypi.org/project/datasette-query-links/0.1.2/,"[""datasette (>=0.59a1)"", ""pytest ; extra == 'test'"", ""pytest-asyncio ; extra == 'test'"", ""beautifulsoup4 ; extra == 'test'""]",>=3.6,0.1.2,0,
datasette-redirect-forbidden,Redirect forbidden requests to a login page,"[""Framework :: Datasette"", ""License :: OSI Approved :: Apache Software License""]","# datasette-redirect-forbidden
[](https://pypi.org/project/datasette-redirect-forbidden/)
[](https://github.com/simonw/datasette-redirect-forbidden/releases)
[](https://github.com/simonw/datasette-redirect-forbidden/actions?query=workflow%3ATest)
[](https://github.com/simonw/datasette-redirect-forbidden/blob/main/LICENSE)
Redirect forbidden requests to a login page
## Installation
Install this plugin in the same environment as Datasette.
$ datasette install datasette-redirect-forbidden
## Usage
Add the following to your `metadata.yml` (or `metadata.json`) file to configure the plugin:
```yaml
plugins:
datasette-redirect-forbidden:
redirect_to: /-/login
```
Any 403 forbidden pages will redirect to the specified page.
## Development
To set up this plugin locally, first checkout the code. Then create a new virtual environment:
cd datasette-redirect-forbidden
python3 -mvenv venv
source venv/bin/activate
Or if you are using `pipenv`:
pipenv shell
Now install the dependencies and test dependencies:
pip install -e '.[test]'
To run the tests:
pytest
",Simon Willison,,text/markdown,https://github.com/simonw/datasette-redirect-forbidden,,"Apache License, Version 2.0",,,https://pypi.org/project/datasette-redirect-forbidden/,,https://pypi.org/project/datasette-redirect-forbidden/,"{""CI"": ""https://github.com/simonw/datasette-redirect-forbidden/actions"", ""Changelog"": ""https://github.com/simonw/datasette-redirect-forbidden/releases"", ""Homepage"": ""https://github.com/simonw/datasette-redirect-forbidden"", ""Issues"": ""https://github.com/simonw/datasette-redirect-forbidden/issues""}",https://pypi.org/project/datasette-redirect-forbidden/0.1/,"[""datasette"", ""pytest ; extra == 'test'"", ""pytest-asyncio ; extra == 'test'""]",>=3.6,0.1,0,
datasette-redirect-to-https,Datasette plugin that redirects all non-https requests to https,[],"# datasette-redirect-to-https
[](https://pypi.org/project/datasette-redirect-to-https/)
[](https://github.com/simonw/datasette-redirect-to-https/releases)
[](https://github.com/simonw/datasette-redirect-to-https/actions?query=workflow%3ATest)
[](https://github.com/simonw/datasette-redirect-to-https/blob/main/LICENSE)
Datasette plugin that redirects all non-https requests to https
## Installation
Install this plugin in the same environment as Datasette.
$ datasette install datasette-redirect-to-https
## Usage
Once installed, incoming GET requests to the `http://` protocol will be 301 redirected to the `https://` equivalent page.
HTTP verbs other than GET will get a 405 Method Not Allowed HTTP error.
## Configuration
Some hosting providers handle HTTPS for you, passing requests back to your application server over HTTP.
For this plugin to work correctly, you need to detect that they the original incoming request came in over HTTP.
Hosting providers like this often set an additional HTTP header such as `x-forwarded-proto: http` to let you know the original protocol.
You can configure `datasette-redirect-to-https` to respect this header using the following plugin configuration in `metadata.json`:
```json
{
""plugins"": {
""datasette-redirect-to-https"": {
""if_headers"": {
""x-forwarded-proto"": ""http""
}
}
}
}
```
The above example will redirect to `https://` if the incoming request has a `x-forwarded-proto: http` request header.
If multiple `if_headers` are listed, the redirect will occur if any of them match.
## Development
To set up this plugin locally, first checkout the code. Then create a new virtual environment:
cd datasette-redirect-to-https
python3 -m venv venv
source venv/bin/activate
Now install the dependencies and test dependencies:
pip install -e '.[test]'
To run the tests:
pytest
",Simon Willison,,text/markdown,https://github.com/simonw/datasette-redirect-to-https,,"Apache License, Version 2.0",,,https://pypi.org/project/datasette-redirect-to-https/,,https://pypi.org/project/datasette-redirect-to-https/,"{""CI"": ""https://github.com/simonw/datasette-redirect-to-https/actions"", ""Changelog"": ""https://github.com/simonw/datasette-redirect-to-https/releases"", ""Homepage"": ""https://github.com/simonw/datasette-redirect-to-https"", ""Issues"": ""https://github.com/simonw/datasette-redirect-to-https/issues""}",https://pypi.org/project/datasette-redirect-to-https/0.2/,"[""datasette"", ""pytest ; extra == 'test'"", ""pytest-asyncio ; extra == 'test'"", ""asgi-lifespan ; extra == 'test'""]",>=3.6,0.2,0,
datasette-remote-metadata,Periodically refresh Datasette metadata from a remote URL,[],"# datasette-remote-metadata
[](https://pypi.org/project/datasette-remote-metadata/)
[](https://github.com/simonw/datasette-remote-metadata/releases)
[](https://github.com/simonw/datasette-remote-metadata/actions?query=workflow%3ATest)
[](https://github.com/simonw/datasette-remote-metadata/blob/main/LICENSE)
Periodically refresh Datasette metadata from a remote URL
## Installation
Install this plugin in the same environment as Datasette.
$ datasette install datasette-remote-metadata
## Usage
Add the following to your `metadata.json`:
```json
{
""plugins"": {
""datasette-remote-metadata"": {
""url"": ""https://example.com/remote-metadata.yml""
}
}
}
```
The plugin will fetch the specified metadata from that URL at startup and combine it with any existing metadata. You can use a URL to either a JSON file or a YAML file.
It will periodically refresh that metadata - by default every 30 seconds, unless you specify an alternative `""ttl""` value in the plugin configuration.
## Configuration
Available configuration options are as follows:
- `""url""` - the URL to retrieve remote metadata from. Can link to a JSON or a YAML file.
- `""ttl""` - integer value in secords: how frequently should the script check for fresh metadata. Defaults to 30 seconds.
- `""headers""` - a dictionary of additional request headers to send.
- `""cachebust""` - if true, a random `?0.29508` value will be added to the query string of the remote metadata to bust any intermediary caches.
This example `metadata.json` configuration refreshes every 10 seconds, uses cache busting and sends an `Authorization: Bearer xyz` header with the request:
```json
{
""plugins"": {
""datasette-remote-metadata"": {
""url"": ""https://example.com/remote-metadata.yml"",
""ttl"": 10,
""cachebust"": true,
""headers"": {
""Authorization"": ""Bearer xyz""
}
}
}
}
```
This example if you are using `metadata.yaml` for configuration:
```yaml
plugins:
datasette-remote-metadata:
url: https://example.com/remote-metadata.yml
ttl: 10
cachebust: true
headers:
Authorization: Bearer xyz
```
## Development
To set up this plugin locally, first checkout the code. Then create a new virtual environment:
cd datasette-remote-metadata
python3 -mvenv venv
source venv/bin/activate
Or if you are using `pipenv`:
pipenv shell
Now install the dependencies and test dependencies:
pip install -e '.[test]'
To run the tests:
pytest
",Simon Willison,,text/markdown,https://github.com/simonw/datasette-remote-metadata,,"Apache License, Version 2.0",,,https://pypi.org/project/datasette-remote-metadata/,,https://pypi.org/project/datasette-remote-metadata/,"{""CI"": ""https://github.com/simonw/datasette-remote-metadata/actions"", ""Changelog"": ""https://github.com/simonw/datasette-remote-metadata/releases"", ""Homepage"": ""https://github.com/simonw/datasette-remote-metadata"", ""Issues"": ""https://github.com/simonw/datasette-remote-metadata/issues""}",https://pypi.org/project/datasette-remote-metadata/0.1/,"[""datasette"", ""pytest ; extra == 'test'"", ""pytest-asyncio ; extra == 'test'"", ""pytest-httpx ; extra == 'test'""]",>=3.6,0.1,0,
datasette-render-binary,Datasette plugin for rendering binary data,[],"# datasette-render-binary
[](https://pypi.org/project/datasette-render-binary/)
[](https://circleci.com/gh/simonw/datasette-render-binary)
[](https://github.com/simonw/datasette-render-binary/blob/master/LICENSE)
Datasette plugin for rendering binary data.
Install this plugin in the same environment as Datasette to enable this new functionality:
pip install datasette-render-binary
Binary data in cells will now be rendered as a mixture of characters and octets.
",Simon Willison,,text/markdown,https://github.com/simonw/datasette-render-binary,,"Apache License, Version 2.0",,,https://pypi.org/project/datasette-render-binary/,,https://pypi.org/project/datasette-render-binary/,"{""Homepage"": ""https://github.com/simonw/datasette-render-binary""}",https://pypi.org/project/datasette-render-binary/0.3/,"[""datasette"", ""filetype"", ""pytest ; extra == 'test'""]",,0.3,0,
datasette-render-html,Datasette plugin that renders specified cells as HTML,[],"# datasette-render-html
[](https://pypi.org/project/datasette-render-html/)
[](https://circleci.com/gh/simonw/datasette-render-html)
[](https://github.com/simonw/datasette-render-html/blob/master/LICENSE)
This Datasette plugin lets you configure Datasette to render specific columns as HTML in the table and row interfaces.
This means you can store HTML in those columns and have it rendered as such on those pages.
If you have a database called `docs.db` containing a `glossary` table and you want the `definition` column in that table to be rendered as HTML, you would use a `metadata.json` file that looks like this:
{
""databases"": {
""docs"": {
""tables"": {
""glossary"": {
""plugins"": {
""datasette-render-html"": {
""columns"": [""definition""]
}
}
}
}
}
}
}
## Security
This plugin allows HTML to be rendered exactly as it is stored in the database. As such, you should be sure only to use this against columns with content that you trust - otherwise you could open yourself up to an [XSS attack](https://owasp.org/www-community/attacks/xss/).
It's possible to configure this plugin to apply to columns with specific names across whole databases or the full Datasette instance, but doing so is not safe. It could open you up to XSS vulnerabilities where an attacker composes a SQL query that results in a column containing unsafe HTML.
As such, you should only use this plugin against specific columns in specific tables, as shown in the example above.
",Simon Willison,,text/markdown,https://github.com/simonw/datasette-render-html,,"Apache License, Version 2.0",,,https://pypi.org/project/datasette-render-html/,,https://pypi.org/project/datasette-render-html/,"{""Homepage"": ""https://github.com/simonw/datasette-render-html""}",https://pypi.org/project/datasette-render-html/0.1.2/,"[""datasette"", ""pytest ; extra == 'test'""]",,0.1.2,0,
datasette-render-image-tags,Turn any URLs ending in .jpg/.png/.gif into img tags with width 200,"[""Framework :: Datasette"", ""License :: OSI Approved :: Apache Software License""]","# datasette-render-image-tags
[](https://pypi.org/project/datasette-render-image-tags/)
[](https://github.com/simonw/datasette-render-image-tags/releases)
[](https://github.com/simonw/datasette-render-image-tags/actions?query=workflow%3ATest)
[](https://github.com/simonw/datasette-render-image-tags/blob/main/LICENSE)
Turn any URLs ending in .jpg/.png/.gif into img tags with width 200
## Installation
Install this plugin in the same environment as Datasette.
datasette install datasette-render-image-tags
## Usage
Once installed, any cells contaning a URL that ends with `.png` or `.jpg` or `.jpeg` or `.gif` will be rendered using an image tag, with a width of 200px.
## Development
To set up this plugin locally, first checkout the code. Then create a new virtual environment:
cd datasette-render-image-tags
python3 -m venv venv
source venv/bin/activate
Now install the dependencies and test dependencies:
pip install -e '.[test]'
To run the tests:
pytest
",Simon Willison,,text/markdown,https://github.com/simonw/datasette-render-image-tags,,"Apache License, Version 2.0",,,https://pypi.org/project/datasette-render-image-tags/,,https://pypi.org/project/datasette-render-image-tags/,"{""CI"": ""https://github.com/simonw/datasette-render-image-tags/actions"", ""Changelog"": ""https://github.com/simonw/datasette-render-image-tags/releases"", ""Homepage"": ""https://github.com/simonw/datasette-render-image-tags"", ""Issues"": ""https://github.com/simonw/datasette-render-image-tags/issues""}",https://pypi.org/project/datasette-render-image-tags/0.1/,"[""datasette"", ""pytest ; extra == 'test'"", ""pytest-asyncio ; extra == 'test'""]",>=3.7,0.1,0,
datasette-render-images,Datasette plugin that renders binary blob images using data-uris,[],"# datasette-render-images
[](https://pypi.org/project/datasette-render-images/)
[](https://github.com/simonw/datasette-render-images/releases)
[](https://github.com/simonw/datasette-render-images/actions?query=workflow%3ATest)
[](https://github.com/simonw/datasette-render-images/blob/main/LICENSE)
A Datasette plugin that renders binary blob images with data-uris, using the [render_cell() plugin hook](https://datasette.readthedocs.io/en/stable/plugins.html#render-cell-value-column-table-database-datasette).
## Installation
Install this plugin in the same environment as Datasette.
$ pip install datasette-render-images
## Usage
If a database row contains binary image data (PNG, GIF or JPEG), this plugin will detect that it is an image (using the [imghdr module](https://docs.python.org/3/library/imghdr.html) and render that cell using an `
## Development
To set up this plugin locally, first checkout the code. Then create a new virtual environment:
cd datasette-query-history
python3 -mvenv venv
source venv/bin/activate
Or if you are using `pipenv`:
pipenv shell
Now install the dependencies and tests:
pip install -e '.[test]'
To run the tests:
pytest
",Bret Walker,,text/markdown,https://github.com/bretwalker/datasette-query-history,,"Apache License, Version 2.0",,,https://pypi.org/project/datasette-query-history/,,https://pypi.org/project/datasette-query-history/,"{""CI"": ""https://github.com/bretwalker/datasette-query-history/actions"", ""Changelog"": ""https://github.com/bretwalker/datasette-query-history/releases"", ""Homepage"": ""https://github.com/bretwalker/datasette-query-history"", ""Issues"": ""https://github.com/bretwalker/datasette-query-history/issues""}",https://pypi.org/project/datasette-query-history/0.2.3/,"[""datasette"", ""pytest ; extra == 'test'"", ""pytest-asyncio ; extra == 'test'""]",>=3.6,0.2.3,0,
datasette-query-links,Turn SELECT queries returned by a query into links to execute them,[],"# datasette-query-links
[](https://pypi.org/project/datasette-query-links/)
[](https://github.com/simonw/datasette-query-links/releases)
[](https://github.com/simonw/datasette-query-links/actions?query=workflow%3ATest)
[](https://github.com/simonw/datasette-query-links/blob/main/LICENSE)
Turn SELECT queries returned by a query into links to execute them
## Installation
Install this plugin in the same environment as Datasette.
$ datasette install datasette-query-links
## Usage
This is an experimental plugin, requiring Datasette 0.59a1 or higher.
Any SQL query that returns a value that itself looks like a valid SQL query will be converted into a link to execute that SQL query when it is displayed in the Datasette interface.
These links will only show for valid SQL query - if a SQL query would return an error it will not be turned into a link.
## Demo
* [Here's an example query](https://latest-with-plugins.datasette.io/fixtures?sql=select%0D%0A++%27select+*+from+%5Bfacetable%5D%27+as+query%0D%0Aunion%0D%0Aselect%0D%0A++%27select+sqlite_version()%27%0D%0Aunion%0D%0Aselect%0D%0A++%27select+this+is+invalid+SQL+so+will+not+be+linked%27) showing the plugin in action.
## Development
To set up this plugin locally, first checkout the code. Then create a new virtual environment:
cd datasette-query-links
python3 -mvenv venv
source venv/bin/activate
Or if you are using `pipenv`:
pipenv shell
Now install the dependencies and test dependencies:
pip install -e '.[test]'
To run the tests:
pytest
",Simon Willison,,text/markdown,https://github.com/simonw/datasette-query-links,,"Apache License, Version 2.0",,,https://pypi.org/project/datasette-query-links/,,https://pypi.org/project/datasette-query-links/,"{""CI"": ""https://github.com/simonw/datasette-query-links/actions"", ""Changelog"": ""https://github.com/simonw/datasette-query-links/releases"", ""Homepage"": ""https://github.com/simonw/datasette-query-links"", ""Issues"": ""https://github.com/simonw/datasette-query-links/issues""}",https://pypi.org/project/datasette-query-links/0.1.2/,"[""datasette (>=0.59a1)"", ""pytest ; extra == 'test'"", ""pytest-asyncio ; extra == 'test'"", ""beautifulsoup4 ; extra == 'test'""]",>=3.6,0.1.2,0,
datasette-redirect-forbidden,Redirect forbidden requests to a login page,"[""Framework :: Datasette"", ""License :: OSI Approved :: Apache Software License""]","# datasette-redirect-forbidden
[](https://pypi.org/project/datasette-redirect-forbidden/)
[](https://github.com/simonw/datasette-redirect-forbidden/releases)
[](https://github.com/simonw/datasette-redirect-forbidden/actions?query=workflow%3ATest)
[](https://github.com/simonw/datasette-redirect-forbidden/blob/main/LICENSE)
Redirect forbidden requests to a login page
## Installation
Install this plugin in the same environment as Datasette.
$ datasette install datasette-redirect-forbidden
## Usage
Add the following to your `metadata.yml` (or `metadata.json`) file to configure the plugin:
```yaml
plugins:
datasette-redirect-forbidden:
redirect_to: /-/login
```
Any 403 forbidden pages will redirect to the specified page.
## Development
To set up this plugin locally, first checkout the code. Then create a new virtual environment:
cd datasette-redirect-forbidden
python3 -mvenv venv
source venv/bin/activate
Or if you are using `pipenv`:
pipenv shell
Now install the dependencies and test dependencies:
pip install -e '.[test]'
To run the tests:
pytest
",Simon Willison,,text/markdown,https://github.com/simonw/datasette-redirect-forbidden,,"Apache License, Version 2.0",,,https://pypi.org/project/datasette-redirect-forbidden/,,https://pypi.org/project/datasette-redirect-forbidden/,"{""CI"": ""https://github.com/simonw/datasette-redirect-forbidden/actions"", ""Changelog"": ""https://github.com/simonw/datasette-redirect-forbidden/releases"", ""Homepage"": ""https://github.com/simonw/datasette-redirect-forbidden"", ""Issues"": ""https://github.com/simonw/datasette-redirect-forbidden/issues""}",https://pypi.org/project/datasette-redirect-forbidden/0.1/,"[""datasette"", ""pytest ; extra == 'test'"", ""pytest-asyncio ; extra == 'test'""]",>=3.6,0.1,0,
datasette-redirect-to-https,Datasette plugin that redirects all non-https requests to https,[],"# datasette-redirect-to-https
[](https://pypi.org/project/datasette-redirect-to-https/)
[](https://github.com/simonw/datasette-redirect-to-https/releases)
[](https://github.com/simonw/datasette-redirect-to-https/actions?query=workflow%3ATest)
[](https://github.com/simonw/datasette-redirect-to-https/blob/main/LICENSE)
Datasette plugin that redirects all non-https requests to https
## Installation
Install this plugin in the same environment as Datasette.
$ datasette install datasette-redirect-to-https
## Usage
Once installed, incoming GET requests to the `http://` protocol will be 301 redirected to the `https://` equivalent page.
HTTP verbs other than GET will get a 405 Method Not Allowed HTTP error.
## Configuration
Some hosting providers handle HTTPS for you, passing requests back to your application server over HTTP.
For this plugin to work correctly, you need to detect that they the original incoming request came in over HTTP.
Hosting providers like this often set an additional HTTP header such as `x-forwarded-proto: http` to let you know the original protocol.
You can configure `datasette-redirect-to-https` to respect this header using the following plugin configuration in `metadata.json`:
```json
{
""plugins"": {
""datasette-redirect-to-https"": {
""if_headers"": {
""x-forwarded-proto"": ""http""
}
}
}
}
```
The above example will redirect to `https://` if the incoming request has a `x-forwarded-proto: http` request header.
If multiple `if_headers` are listed, the redirect will occur if any of them match.
## Development
To set up this plugin locally, first checkout the code. Then create a new virtual environment:
cd datasette-redirect-to-https
python3 -m venv venv
source venv/bin/activate
Now install the dependencies and test dependencies:
pip install -e '.[test]'
To run the tests:
pytest
",Simon Willison,,text/markdown,https://github.com/simonw/datasette-redirect-to-https,,"Apache License, Version 2.0",,,https://pypi.org/project/datasette-redirect-to-https/,,https://pypi.org/project/datasette-redirect-to-https/,"{""CI"": ""https://github.com/simonw/datasette-redirect-to-https/actions"", ""Changelog"": ""https://github.com/simonw/datasette-redirect-to-https/releases"", ""Homepage"": ""https://github.com/simonw/datasette-redirect-to-https"", ""Issues"": ""https://github.com/simonw/datasette-redirect-to-https/issues""}",https://pypi.org/project/datasette-redirect-to-https/0.2/,"[""datasette"", ""pytest ; extra == 'test'"", ""pytest-asyncio ; extra == 'test'"", ""asgi-lifespan ; extra == 'test'""]",>=3.6,0.2,0,
datasette-remote-metadata,Periodically refresh Datasette metadata from a remote URL,[],"# datasette-remote-metadata
[](https://pypi.org/project/datasette-remote-metadata/)
[](https://github.com/simonw/datasette-remote-metadata/releases)
[](https://github.com/simonw/datasette-remote-metadata/actions?query=workflow%3ATest)
[](https://github.com/simonw/datasette-remote-metadata/blob/main/LICENSE)
Periodically refresh Datasette metadata from a remote URL
## Installation
Install this plugin in the same environment as Datasette.
$ datasette install datasette-remote-metadata
## Usage
Add the following to your `metadata.json`:
```json
{
""plugins"": {
""datasette-remote-metadata"": {
""url"": ""https://example.com/remote-metadata.yml""
}
}
}
```
The plugin will fetch the specified metadata from that URL at startup and combine it with any existing metadata. You can use a URL to either a JSON file or a YAML file.
It will periodically refresh that metadata - by default every 30 seconds, unless you specify an alternative `""ttl""` value in the plugin configuration.
## Configuration
Available configuration options are as follows:
- `""url""` - the URL to retrieve remote metadata from. Can link to a JSON or a YAML file.
- `""ttl""` - integer value in secords: how frequently should the script check for fresh metadata. Defaults to 30 seconds.
- `""headers""` - a dictionary of additional request headers to send.
- `""cachebust""` - if true, a random `?0.29508` value will be added to the query string of the remote metadata to bust any intermediary caches.
This example `metadata.json` configuration refreshes every 10 seconds, uses cache busting and sends an `Authorization: Bearer xyz` header with the request:
```json
{
""plugins"": {
""datasette-remote-metadata"": {
""url"": ""https://example.com/remote-metadata.yml"",
""ttl"": 10,
""cachebust"": true,
""headers"": {
""Authorization"": ""Bearer xyz""
}
}
}
}
```
This example if you are using `metadata.yaml` for configuration:
```yaml
plugins:
datasette-remote-metadata:
url: https://example.com/remote-metadata.yml
ttl: 10
cachebust: true
headers:
Authorization: Bearer xyz
```
## Development
To set up this plugin locally, first checkout the code. Then create a new virtual environment:
cd datasette-remote-metadata
python3 -mvenv venv
source venv/bin/activate
Or if you are using `pipenv`:
pipenv shell
Now install the dependencies and test dependencies:
pip install -e '.[test]'
To run the tests:
pytest
",Simon Willison,,text/markdown,https://github.com/simonw/datasette-remote-metadata,,"Apache License, Version 2.0",,,https://pypi.org/project/datasette-remote-metadata/,,https://pypi.org/project/datasette-remote-metadata/,"{""CI"": ""https://github.com/simonw/datasette-remote-metadata/actions"", ""Changelog"": ""https://github.com/simonw/datasette-remote-metadata/releases"", ""Homepage"": ""https://github.com/simonw/datasette-remote-metadata"", ""Issues"": ""https://github.com/simonw/datasette-remote-metadata/issues""}",https://pypi.org/project/datasette-remote-metadata/0.1/,"[""datasette"", ""pytest ; extra == 'test'"", ""pytest-asyncio ; extra == 'test'"", ""pytest-httpx ; extra == 'test'""]",>=3.6,0.1,0,
datasette-render-binary,Datasette plugin for rendering binary data,[],"# datasette-render-binary
[](https://pypi.org/project/datasette-render-binary/)
[](https://circleci.com/gh/simonw/datasette-render-binary)
[](https://github.com/simonw/datasette-render-binary/blob/master/LICENSE)
Datasette plugin for rendering binary data.
Install this plugin in the same environment as Datasette to enable this new functionality:
pip install datasette-render-binary
Binary data in cells will now be rendered as a mixture of characters and octets.

",Simon Willison,,text/markdown,https://github.com/simonw/datasette-render-binary,,"Apache License, Version 2.0",,,https://pypi.org/project/datasette-render-binary/,,https://pypi.org/project/datasette-render-binary/,"{""Homepage"": ""https://github.com/simonw/datasette-render-binary""}",https://pypi.org/project/datasette-render-binary/0.3/,"[""datasette"", ""filetype"", ""pytest ; extra == 'test'""]",,0.3,0,
datasette-render-html,Datasette plugin that renders specified cells as HTML,[],"# datasette-render-html
[](https://pypi.org/project/datasette-render-html/)
[](https://circleci.com/gh/simonw/datasette-render-html)
[](https://github.com/simonw/datasette-render-html/blob/master/LICENSE)
This Datasette plugin lets you configure Datasette to render specific columns as HTML in the table and row interfaces.
This means you can store HTML in those columns and have it rendered as such on those pages.
If you have a database called `docs.db` containing a `glossary` table and you want the `definition` column in that table to be rendered as HTML, you would use a `metadata.json` file that looks like this:
{
""databases"": {
""docs"": {
""tables"": {
""glossary"": {
""plugins"": {
""datasette-render-html"": {
""columns"": [""definition""]
}
}
}
}
}
}
}
## Security
This plugin allows HTML to be rendered exactly as it is stored in the database. As such, you should be sure only to use this against columns with content that you trust - otherwise you could open yourself up to an [XSS attack](https://owasp.org/www-community/attacks/xss/).
It's possible to configure this plugin to apply to columns with specific names across whole databases or the full Datasette instance, but doing so is not safe. It could open you up to XSS vulnerabilities where an attacker composes a SQL query that results in a column containing unsafe HTML.
As such, you should only use this plugin against specific columns in specific tables, as shown in the example above.
",Simon Willison,,text/markdown,https://github.com/simonw/datasette-render-html,,"Apache License, Version 2.0",,,https://pypi.org/project/datasette-render-html/,,https://pypi.org/project/datasette-render-html/,"{""Homepage"": ""https://github.com/simonw/datasette-render-html""}",https://pypi.org/project/datasette-render-html/0.1.2/,"[""datasette"", ""pytest ; extra == 'test'""]",,0.1.2,0,
datasette-render-image-tags,Turn any URLs ending in .jpg/.png/.gif into img tags with width 200,"[""Framework :: Datasette"", ""License :: OSI Approved :: Apache Software License""]","# datasette-render-image-tags
[](https://pypi.org/project/datasette-render-image-tags/)
[](https://github.com/simonw/datasette-render-image-tags/releases)
[](https://github.com/simonw/datasette-render-image-tags/actions?query=workflow%3ATest)
[](https://github.com/simonw/datasette-render-image-tags/blob/main/LICENSE)
Turn any URLs ending in .jpg/.png/.gif into img tags with width 200
## Installation
Install this plugin in the same environment as Datasette.
datasette install datasette-render-image-tags
## Usage
Once installed, any cells contaning a URL that ends with `.png` or `.jpg` or `.jpeg` or `.gif` will be rendered using an image tag, with a width of 200px.
## Development
To set up this plugin locally, first checkout the code. Then create a new virtual environment:
cd datasette-render-image-tags
python3 -m venv venv
source venv/bin/activate
Now install the dependencies and test dependencies:
pip install -e '.[test]'
To run the tests:
pytest
",Simon Willison,,text/markdown,https://github.com/simonw/datasette-render-image-tags,,"Apache License, Version 2.0",,,https://pypi.org/project/datasette-render-image-tags/,,https://pypi.org/project/datasette-render-image-tags/,"{""CI"": ""https://github.com/simonw/datasette-render-image-tags/actions"", ""Changelog"": ""https://github.com/simonw/datasette-render-image-tags/releases"", ""Homepage"": ""https://github.com/simonw/datasette-render-image-tags"", ""Issues"": ""https://github.com/simonw/datasette-render-image-tags/issues""}",https://pypi.org/project/datasette-render-image-tags/0.1/,"[""datasette"", ""pytest ; extra == 'test'"", ""pytest-asyncio ; extra == 'test'""]",>=3.7,0.1,0,
datasette-render-images,Datasette plugin that renders binary blob images using data-uris,[],"# datasette-render-images
[](https://pypi.org/project/datasette-render-images/)
[](https://github.com/simonw/datasette-render-images/releases)
[](https://github.com/simonw/datasette-render-images/actions?query=workflow%3ATest)
[](https://github.com/simonw/datasette-render-images/blob/main/LICENSE)
A Datasette plugin that renders binary blob images with data-uris, using the [render_cell() plugin hook](https://datasette.readthedocs.io/en/stable/plugins.html#render-cell-value-column-table-database-datasette).
## Installation
Install this plugin in the same environment as Datasette.
$ pip install datasette-render-images
## Usage
If a database row contains binary image data (PNG, GIF or JPEG), this plugin will detect that it is an image (using the [imghdr module](https://docs.python.org/3/library/imghdr.html) and render that cell using an `![]() ` element.
Here's a [demo of the plugin in action](https://datasette-render-images-demo.datasette.io/favicons/favicons).
## Creating a compatible database table
You can use the [sqlite-utils insert-files](https://sqlite-utils.readthedocs.io/en/stable/cli.html#inserting-binary-data-from-files) command to insert image files into a database table:
$ pip install sqlite-utils
$ sqlite-utils insert-files gifs.db images *.gif
See [Fun with binary data and SQLite](https://simonwillison.net/2020/Jul/30/fun-binary-data-and-sqlite/) for more on this tool.
## Configuration
By default the plugin will only render images that are smaller than 100KB. You can adjust this limit using the `size_limit` plugin configuration option - for example, to increase the limit to 1MB (1000000 bytes) use the following in `metadata.json`:
```json
{
""plugins"": {
""datasette-render-images"": {
""size_limit"": 1000000
}
}
}
```
",Simon Willison,,text/markdown,https://github.com/simonw/datasette-render-images,,"Apache License, Version 2.0",,,https://pypi.org/project/datasette-render-images/,,https://pypi.org/project/datasette-render-images/,"{""Homepage"": ""https://github.com/simonw/datasette-render-images""}",https://pypi.org/project/datasette-render-images/0.3.2/,"[""datasette"", ""pytest ; extra == 'test'""]",,0.3.2,0,
datasette-render-markdown,Datasette plugin for rendering Markdown,[],"# datasette-render-markdown
[](https://pypi.org/project/datasette-render-markdown/)
[](https://github.com/simonw/datasette-render-markdown/releases)
[](https://github.com/simonw/datasette-render-markdown/actions?query=workflow%3ATest)
[](https://github.com/simonw/datasette-render-markdown/blob/main/LICENSE)
Datasette plugin for rendering Markdown.
## Installation
Install this plugin in the same environment as Datasette to enable this new functionality:
$ pip install datasette-render-markdown
## Usage
You can explicitly list the columns you would like to treat as Markdown using [plugin configuration](https://datasette.readthedocs.io/en/stable/plugins.html#plugin-configuration) in a `metadata.json` file.
Add a `""datasette-render-markdown""` configuration block and use a `""columns""` key to list the columns you would like to treat as Markdown values:
```json
{
""plugins"": {
""datasette-render-markdown"": {
""columns"": [""body""]
}
}
}
```
This will cause any `body` column in any table to be treated as markdown and safely rendered using [Python-Markdown](https://python-markdown.github.io/). The resulting HTML is then run through [Bleach](https://bleach.readthedocs.io/) to avoid the risk of XSS security problems.
Save this to `metadata.json` and run Datasette with the `--metadata` flag to load this configuration:
$ datasette serve mydata.db --metadata metadata.json
The configuration block can be used at the top level, or it can be applied just to specific databases or tables. Here's how to apply it to just the `entries` table in the `news.db` database:
```json
{
""databases"": {
""news"": {
""tables"": {
""entries"": {
""plugins"": {
""datasette-render-markdown"": {
""columns"": [""body""]
}
}
}
}
}
}
}
```
And here's how to apply it to every `body` column in every table in the `news.db` database:
```json
{
""databases"": {
""news"": {
""plugins"": {
""datasette-render-markdown"": {
""columns"": [""body""]
}
}
}
}
}
```
## Columns that match a naming convention
This plugin can also render markdown in any columns that match a specific naming convention.
By default, columns that have a name ending in `_markdown` will be rendered.
You can try this out using the following query:
```sql
select '# Hello there
* This is a list
* of items
[And a link](https://github.com/simonw/datasette-render-markdown).'
as demo_markdown
```
You can configure a different list of wildcard patterns using the `""patterns""` configuration key. Here's how to render columns that end in either `_markdown` or `_md`:
```json
{
""plugins"": {
""datasette-render-markdown"": {
""patterns"": [""*_markdown"", ""*_md""]
}
}
}
```
To disable wildcard column matching entirely, set `""patterns"": []` in your plugin metadata configuration.
## Markdown extensions
The [Python-Markdown library](https://python-markdown.github.io/) that powers this plugin supports extensions, both [bundled](https://python-markdown.github.io/extensions/) and [third-party](https://github.com/Python-Markdown/markdown/wiki/Third-Party-Extensions). These can be used to enable additional Markdown features such as [table support](https://python-markdown.github.io/extensions/tables/).
You can configure support for extensions using the `""extensions""` key in your plugin metadata configuration.
Since extensions may introduce new HTML tags, you will also need to add those tags to the list of tags that are allowed by the [Bleach](https://bleach.readthedocs.io/) sanitizer. You can do that using the `""extra_tags""` key, and you can whitelist additional HTML attributes using `""extra_attrs""`. See [the Bleach documentation](https://bleach.readthedocs.io/en/latest/clean.html#allowed-tags-tags) for more information on this.
Here's how to enable support for [Markdown tables](https://python-markdown.github.io/extensions/tables/):
```json
{
""plugins"": {
""datasette-render-markdown"": {
""extensions"": [""tables""],
""extra_tags"": [""table"", ""thead"", ""tr"", ""th"", ""td"", ""tbody""]
}
}
}
```
### GitHub-Flavored Markdown
Enabling [GitHub-Flavored Markdown](https://help.github.com/en/github/writing-on-github) (useful for if you are working with data imported from GitHub using [github-to-sqlite](https://github.com/dogsheep/github-to-sqlite)) is a little more complicated.
First, you will need to install the [py-gfm](https://py-gfm.readthedocs.io) package:
$ pip install py-gfm
Note that `py-gfm` has [a bug](https://github.com/Zopieux/py-gfm/issues/13) that causes it to pin to `Markdown<3.0` - so if you are using it you should install it _before_ installing `datasette-render-markdown` to ensure you get a compatibly version of that dependency.
Now you can configure it like this. Note that the extension name is `mdx_gfm:GithubFlavoredMarkdownExtension` and you need to whitelist several extra HTML tags and attributes:
```json
{
""plugins"": {
""datasette-render-markdown"": {
""extra_tags"": [
""hr"",
""br"",
""details"",
""summary"",
""input""
],
""extra_attrs"": {
""input"": [
""type"",
""disabled"",
""checked""
],
},
""extensions"": [
""mdx_gfm:GithubFlavoredMarkdownExtension""
]
}
}
}
```
The `` attributes are needed to support rendering checkboxes in issue descriptions.
## Markdown in templates
The plugin also adds a new template function: `render_markdown(value)`. You can use this in your templates like so:
```html+jinja
{{ render_markdown(""""""
# This is markdown
* One
* Two
* Three
"""""") }}
```
You can load additional extensions and whitelist tags by passing extra arguments to the function like this:
```html+jinja
{{ render_markdown(""""""
## Markdown table
First Header | Second Header
------------- | -------------
Content Cell | Content Cell
Content Cell | Content Cell
"""""", extensions=[""tables""],
extra_tags=[""table"", ""thead"", ""tr"", ""th"", ""td"", ""tbody""])) }}
```
",Simon Willison,,text/markdown,https://github.com/simonw/datasette-render-markdown,,"Apache License, Version 2.0",,,https://pypi.org/project/datasette-render-markdown/,,https://pypi.org/project/datasette-render-markdown/,"{""Homepage"": ""https://github.com/simonw/datasette-render-markdown""}",https://pypi.org/project/datasette-render-markdown/2.1/,"[""datasette"", ""markdown"", ""bleach"", ""pytest ; extra == 'test'"", ""pytest-asyncio ; extra == 'test'""]",,2.1,0,
datasette-render-timestamps,Datasette plugin for rendering timestamps,[],"# datasette-render-timestamps
[](https://pypi.org/project/datasette-render-timestamps/)
[](https://circleci.com/gh/simonw/datasette-render-timestamps)
[](https://github.com/simonw/datasette-render-timestamps/blob/master/LICENSE)
Datasette plugin for rendering timestamps.
## Installation
Install this plugin in the same environment as Datasette to enable this new functionality:
pip install datasette-render-timestamps
The plugin will then look out for integer numbers that are likely to be timestamps - anything that would be a number of seconds from 5 years ago to 5 years in the future.
These will then be rendered in a more readable format.
## Configuration
You can disable automatic column detection in favour of explicitly listing the columns that you would like to render using [plugin configuration](https://datasette.readthedocs.io/en/stable/plugins.html#plugin-configuration) in a `metadata.json` file.
Add a `""datasette-render-timestamps""` configuration block and use a `""columns""` key to list the columns you would like to treat as timestamp values:
```json
{
""plugins"": {
""datasette-render-timestamps"": {
""columns"": [""created"", ""updated""]
}
}
}
```
This will cause any `created` or `updated` columns in any table to be treated as timestamps and rendered.
Save this to `metadata.json` and run datasette with the `--metadata` flag to load this configuration:
datasette serve mydata.db --metadata metadata.json
To disable automatic timestamp detection entirely, you can use `""columnns"": []`.
This configuration block can be used at the top level, or it can be applied just to specific databases or tables. Here's how to apply it to just the `entries` table in the `news.db` database:
```json
{
""databases"": {
""news"": {
""tables"": {
""entries"": {
""plugins"": {
""datasette-render-timestamps"": {
""columns"": [""created"", ""updated""]
}
}
}
}
}
}
}
```
### Customizing the date format
The default format is `%B %d, %Y - %H:%M:%S UTC` which renders for example: `October 10, 2019 - 07:18:29 UTC`. If you want another format, the date format can be customized using plugin configuration. Any format string supported by [strftime](http://strftime.org/) may be used. For example:
```json
{
""plugins"": {
""datasette-render-timestamps"": {
""format"": ""%Y-%m-%d-%H:%M:%S""
}
}
}
```
",Simon Willison,,text/markdown,https://github.com/simonw/datasette-render-timestamps,,"Apache License, Version 2.0",,,https://pypi.org/project/datasette-render-timestamps/,,https://pypi.org/project/datasette-render-timestamps/,"{""Homepage"": ""https://github.com/simonw/datasette-render-timestamps""}",https://pypi.org/project/datasette-render-timestamps/1.0.1/,"[""datasette"", ""pytest ; extra == 'test'""]",,1.0.1,0,
datasette-ripgrep,"Web interface for searching your code using ripgrep, built as a Datasette plugin",[],"# datasette-ripgrep
[](https://pypi.org/project/datasette-ripgrep/)
[](https://github.com/simonw/datasette-ripgrep/releases)
[](https://github.com/simonw/datasette-ripgrep/actions?query=workflow%3ATest)
[](https://github.com/simonw/datasette-ripgrep/blob/main/LICENSE)
Web interface for searching your code using [ripgrep](https://github.com/BurntSushi/ripgrep), built as a [Datasette](https://datasette.io/) plugin
## Demo
Try this plugin out at https://ripgrep.datasette.io/-/ripgrep - where you can run regular expression searches across the source code of Datasette and all of the `datasette-*` plugins belonging to the [simonw GitHub user](https://github.com/simonw).
Some example searches:
- [with.\*AsyncClient](https://ripgrep.datasette.io/-/ripgrep?pattern=with.*AsyncClient) - regular expression search for `with.*AsyncClient`
- [.plugin_config, literal=on](https://ripgrep.datasette.io/-/ripgrep?pattern=.plugin_config\(&literal=on) - a non-regular expression search for `.plugin_config(`
- [with.\*AsyncClient glob=datasette/\*\*](https://ripgrep.datasette.io/-/ripgrep?pattern=with.*AsyncClient&glob=datasette%2F%2A%2A) - search for that pattern only within the `datasette/` top folder
- [""sqlite-utils\["">\] glob=setup.py](https://ripgrep.datasette.io/-/ripgrep?pattern=%22sqlite-utils%5B%22%3E%5D&glob=setup.py) - a regular expression search for packages that depend on either `sqlite-utils` or `sqlite-utils>=some-version`
- [test glob=!\*.html](https://ripgrep.datasette.io/-/ripgrep?pattern=test&glob=%21*.html) - search for the string `test` but exclude results in HTML files
## Installation
Install this plugin in the same environment as Datasette.
$ datasette install datasette-ripgrep
The `rg` executable needs to be [installed](https://github.com/BurntSushi/ripgrep/blob/master/README.md#installation) such that it can be run by this tool.
## Usage
This plugin requires configuration: it needs to a `path` setting so that it knows where to run searches.
Create a `metadata.json` file that looks like this:
```json
{
""plugins"": {
""datasette-ripgrep"": {
""path"": ""/path/to/your/files""
}
}
}
```
Now run Datasette using `datasette -m metadata.json`. The plugin will add an interface at `/-/ripgrep` for running searches.
## Plugin configuration
The `""path""` configuration is required. Optional extra configuration options are:
- `time_limit` - floating point number. The `rg` process will be terminated if it takes longer than this limit. The default is one second, `1.0`.
- `max_lines` - integer. The `rg` process will be terminated if it returns more than this number of lines. The default is `2000`.
## Development
To set up this plugin locally, first checkout the code. Then create a new virtual environment:
cd datasette-ripgrep
python3 -mvenv venv
source venv/bin/activate
Or if you are using `pipenv`:
pipenv shell
Now install the dependencies and tests:
pip install -e '.[test]'
To run the tests:
pytest
",Simon Willison,,text/markdown,https://github.com/simonw/datasette-ripgrep,,"Apache License, Version 2.0",,,https://pypi.org/project/datasette-ripgrep/,,https://pypi.org/project/datasette-ripgrep/,"{""CI"": ""https://github.com/simonw/datasette-ripgrep/actions"", ""Changelog"": ""https://github.com/simonw/datasette-ripgrep/releases"", ""Homepage"": ""https://github.com/simonw/datasette-ripgrep"", ""Issues"": ""https://github.com/simonw/datasette-ripgrep/issues""}",https://pypi.org/project/datasette-ripgrep/0.7/,"[""datasette"", ""pytest ; extra == 'test'"", ""pytest-asyncio ; extra == 'test'"", ""httpx ; extra == 'test'""]",>=3.6,0.7,0,
datasette-rure,Datasette plugin that adds a custom SQL function for executing matches using the Rust regular expression engine,[],"# datasette-rure
[](https://pypi.org/project/datasette-rure/)
[](https://circleci.com/gh/simonw/datasette-rure)
[](https://github.com/simonw/datasette-rure/blob/master/LICENSE)
Datasette plugin that adds a custom SQL function for executing matches using the Rust regular expression engine
Install this plugin in the same environment as Datasette to enable the `regexp()` SQL function.
$ pip install datasette-rure
The plugin is built on top of the [rure-python](https://github.com/davidblewett/rure-python) library by David Blewett.
## regexp() to test regular expressions
You can test if a value matches a regular expression like this:
select regexp('hi.*there', 'hi there')
-- returns 1
select regexp('not.*there', 'hi there')
-- returns 0
You can also use SQLite's custom syntax to run matches:
select 'hi there' REGEXP 'hi.*there'
-- returns 1
This means you can select rows based on regular expression matches - for example, to select every article where the title begins with an E or an F:
select * from articles where title REGEXP '^[EF]'
Try this out: [REGEXP interactive demo](https://datasette-rure-demo.datasette.io/24ways?sql=select+*+from+articles+where+title+REGEXP+%27%5E%5BEF%5D%27)
## regexp_match() to extract groups
You can extract captured subsets of a pattern using `regexp_match()`.
select regexp_match('.*( and .*)', title) as n from articles where n is not null
-- Returns the ' and X' component of any matching titles, e.g.
-- and Recognition
-- and Transitions Their Place
-- etc
This will return the first parenthesis match when called with two arguments. You can call it with three arguments to indicate which match you would like to extract:
select regexp_match('.*(and)(.*)', title, 2) as n from articles where n is not null
The function will return `null` for invalid inputs e.g. a pattern without capture groups.
Try this out: [regexp_match() interactive demo](https://datasette-rure-demo.datasette.io/24ways?sql=select+%27WHY+%27+%7C%7C+regexp_match%28%27Why+%28.*%29%27%2C+title%29+as+t+from+articles+where+t+is+not+null)
## regexp_matches() to extract multiple matches at once
The `regexp_matches()` function can be used to extract multiple patterns from a single string. The result is returned as a JSON array, which can then be further processed using SQLite's [JSON functions](https://www.sqlite.org/json1.html).
The first argument is a regular expression with named capture groups. The second argument is the string to be matched.
select regexp_matches(
'hello (?P
` element.
Here's a [demo of the plugin in action](https://datasette-render-images-demo.datasette.io/favicons/favicons).
## Creating a compatible database table
You can use the [sqlite-utils insert-files](https://sqlite-utils.readthedocs.io/en/stable/cli.html#inserting-binary-data-from-files) command to insert image files into a database table:
$ pip install sqlite-utils
$ sqlite-utils insert-files gifs.db images *.gif
See [Fun with binary data and SQLite](https://simonwillison.net/2020/Jul/30/fun-binary-data-and-sqlite/) for more on this tool.
## Configuration
By default the plugin will only render images that are smaller than 100KB. You can adjust this limit using the `size_limit` plugin configuration option - for example, to increase the limit to 1MB (1000000 bytes) use the following in `metadata.json`:
```json
{
""plugins"": {
""datasette-render-images"": {
""size_limit"": 1000000
}
}
}
```
",Simon Willison,,text/markdown,https://github.com/simonw/datasette-render-images,,"Apache License, Version 2.0",,,https://pypi.org/project/datasette-render-images/,,https://pypi.org/project/datasette-render-images/,"{""Homepage"": ""https://github.com/simonw/datasette-render-images""}",https://pypi.org/project/datasette-render-images/0.3.2/,"[""datasette"", ""pytest ; extra == 'test'""]",,0.3.2,0,
datasette-render-markdown,Datasette plugin for rendering Markdown,[],"# datasette-render-markdown
[](https://pypi.org/project/datasette-render-markdown/)
[](https://github.com/simonw/datasette-render-markdown/releases)
[](https://github.com/simonw/datasette-render-markdown/actions?query=workflow%3ATest)
[](https://github.com/simonw/datasette-render-markdown/blob/main/LICENSE)
Datasette plugin for rendering Markdown.
## Installation
Install this plugin in the same environment as Datasette to enable this new functionality:
$ pip install datasette-render-markdown
## Usage
You can explicitly list the columns you would like to treat as Markdown using [plugin configuration](https://datasette.readthedocs.io/en/stable/plugins.html#plugin-configuration) in a `metadata.json` file.
Add a `""datasette-render-markdown""` configuration block and use a `""columns""` key to list the columns you would like to treat as Markdown values:
```json
{
""plugins"": {
""datasette-render-markdown"": {
""columns"": [""body""]
}
}
}
```
This will cause any `body` column in any table to be treated as markdown and safely rendered using [Python-Markdown](https://python-markdown.github.io/). The resulting HTML is then run through [Bleach](https://bleach.readthedocs.io/) to avoid the risk of XSS security problems.
Save this to `metadata.json` and run Datasette with the `--metadata` flag to load this configuration:
$ datasette serve mydata.db --metadata metadata.json
The configuration block can be used at the top level, or it can be applied just to specific databases or tables. Here's how to apply it to just the `entries` table in the `news.db` database:
```json
{
""databases"": {
""news"": {
""tables"": {
""entries"": {
""plugins"": {
""datasette-render-markdown"": {
""columns"": [""body""]
}
}
}
}
}
}
}
```
And here's how to apply it to every `body` column in every table in the `news.db` database:
```json
{
""databases"": {
""news"": {
""plugins"": {
""datasette-render-markdown"": {
""columns"": [""body""]
}
}
}
}
}
```
## Columns that match a naming convention
This plugin can also render markdown in any columns that match a specific naming convention.
By default, columns that have a name ending in `_markdown` will be rendered.
You can try this out using the following query:
```sql
select '# Hello there
* This is a list
* of items
[And a link](https://github.com/simonw/datasette-render-markdown).'
as demo_markdown
```
You can configure a different list of wildcard patterns using the `""patterns""` configuration key. Here's how to render columns that end in either `_markdown` or `_md`:
```json
{
""plugins"": {
""datasette-render-markdown"": {
""patterns"": [""*_markdown"", ""*_md""]
}
}
}
```
To disable wildcard column matching entirely, set `""patterns"": []` in your plugin metadata configuration.
## Markdown extensions
The [Python-Markdown library](https://python-markdown.github.io/) that powers this plugin supports extensions, both [bundled](https://python-markdown.github.io/extensions/) and [third-party](https://github.com/Python-Markdown/markdown/wiki/Third-Party-Extensions). These can be used to enable additional Markdown features such as [table support](https://python-markdown.github.io/extensions/tables/).
You can configure support for extensions using the `""extensions""` key in your plugin metadata configuration.
Since extensions may introduce new HTML tags, you will also need to add those tags to the list of tags that are allowed by the [Bleach](https://bleach.readthedocs.io/) sanitizer. You can do that using the `""extra_tags""` key, and you can whitelist additional HTML attributes using `""extra_attrs""`. See [the Bleach documentation](https://bleach.readthedocs.io/en/latest/clean.html#allowed-tags-tags) for more information on this.
Here's how to enable support for [Markdown tables](https://python-markdown.github.io/extensions/tables/):
```json
{
""plugins"": {
""datasette-render-markdown"": {
""extensions"": [""tables""],
""extra_tags"": [""table"", ""thead"", ""tr"", ""th"", ""td"", ""tbody""]
}
}
}
```
### GitHub-Flavored Markdown
Enabling [GitHub-Flavored Markdown](https://help.github.com/en/github/writing-on-github) (useful for if you are working with data imported from GitHub using [github-to-sqlite](https://github.com/dogsheep/github-to-sqlite)) is a little more complicated.
First, you will need to install the [py-gfm](https://py-gfm.readthedocs.io) package:
$ pip install py-gfm
Note that `py-gfm` has [a bug](https://github.com/Zopieux/py-gfm/issues/13) that causes it to pin to `Markdown<3.0` - so if you are using it you should install it _before_ installing `datasette-render-markdown` to ensure you get a compatibly version of that dependency.
Now you can configure it like this. Note that the extension name is `mdx_gfm:GithubFlavoredMarkdownExtension` and you need to whitelist several extra HTML tags and attributes:
```json
{
""plugins"": {
""datasette-render-markdown"": {
""extra_tags"": [
""hr"",
""br"",
""details"",
""summary"",
""input""
],
""extra_attrs"": {
""input"": [
""type"",
""disabled"",
""checked""
],
},
""extensions"": [
""mdx_gfm:GithubFlavoredMarkdownExtension""
]
}
}
}
```
The `` attributes are needed to support rendering checkboxes in issue descriptions.
## Markdown in templates
The plugin also adds a new template function: `render_markdown(value)`. You can use this in your templates like so:
```html+jinja
{{ render_markdown(""""""
# This is markdown
* One
* Two
* Three
"""""") }}
```
You can load additional extensions and whitelist tags by passing extra arguments to the function like this:
```html+jinja
{{ render_markdown(""""""
## Markdown table
First Header | Second Header
------------- | -------------
Content Cell | Content Cell
Content Cell | Content Cell
"""""", extensions=[""tables""],
extra_tags=[""table"", ""thead"", ""tr"", ""th"", ""td"", ""tbody""])) }}
```
",Simon Willison,,text/markdown,https://github.com/simonw/datasette-render-markdown,,"Apache License, Version 2.0",,,https://pypi.org/project/datasette-render-markdown/,,https://pypi.org/project/datasette-render-markdown/,"{""Homepage"": ""https://github.com/simonw/datasette-render-markdown""}",https://pypi.org/project/datasette-render-markdown/2.1/,"[""datasette"", ""markdown"", ""bleach"", ""pytest ; extra == 'test'"", ""pytest-asyncio ; extra == 'test'""]",,2.1,0,
datasette-render-timestamps,Datasette plugin for rendering timestamps,[],"# datasette-render-timestamps
[](https://pypi.org/project/datasette-render-timestamps/)
[](https://circleci.com/gh/simonw/datasette-render-timestamps)
[](https://github.com/simonw/datasette-render-timestamps/blob/master/LICENSE)
Datasette plugin for rendering timestamps.
## Installation
Install this plugin in the same environment as Datasette to enable this new functionality:
pip install datasette-render-timestamps
The plugin will then look out for integer numbers that are likely to be timestamps - anything that would be a number of seconds from 5 years ago to 5 years in the future.
These will then be rendered in a more readable format.
## Configuration
You can disable automatic column detection in favour of explicitly listing the columns that you would like to render using [plugin configuration](https://datasette.readthedocs.io/en/stable/plugins.html#plugin-configuration) in a `metadata.json` file.
Add a `""datasette-render-timestamps""` configuration block and use a `""columns""` key to list the columns you would like to treat as timestamp values:
```json
{
""plugins"": {
""datasette-render-timestamps"": {
""columns"": [""created"", ""updated""]
}
}
}
```
This will cause any `created` or `updated` columns in any table to be treated as timestamps and rendered.
Save this to `metadata.json` and run datasette with the `--metadata` flag to load this configuration:
datasette serve mydata.db --metadata metadata.json
To disable automatic timestamp detection entirely, you can use `""columnns"": []`.
This configuration block can be used at the top level, or it can be applied just to specific databases or tables. Here's how to apply it to just the `entries` table in the `news.db` database:
```json
{
""databases"": {
""news"": {
""tables"": {
""entries"": {
""plugins"": {
""datasette-render-timestamps"": {
""columns"": [""created"", ""updated""]
}
}
}
}
}
}
}
```
### Customizing the date format
The default format is `%B %d, %Y - %H:%M:%S UTC` which renders for example: `October 10, 2019 - 07:18:29 UTC`. If you want another format, the date format can be customized using plugin configuration. Any format string supported by [strftime](http://strftime.org/) may be used. For example:
```json
{
""plugins"": {
""datasette-render-timestamps"": {
""format"": ""%Y-%m-%d-%H:%M:%S""
}
}
}
```
",Simon Willison,,text/markdown,https://github.com/simonw/datasette-render-timestamps,,"Apache License, Version 2.0",,,https://pypi.org/project/datasette-render-timestamps/,,https://pypi.org/project/datasette-render-timestamps/,"{""Homepage"": ""https://github.com/simonw/datasette-render-timestamps""}",https://pypi.org/project/datasette-render-timestamps/1.0.1/,"[""datasette"", ""pytest ; extra == 'test'""]",,1.0.1,0,
datasette-ripgrep,"Web interface for searching your code using ripgrep, built as a Datasette plugin",[],"# datasette-ripgrep
[](https://pypi.org/project/datasette-ripgrep/)
[](https://github.com/simonw/datasette-ripgrep/releases)
[](https://github.com/simonw/datasette-ripgrep/actions?query=workflow%3ATest)
[](https://github.com/simonw/datasette-ripgrep/blob/main/LICENSE)
Web interface for searching your code using [ripgrep](https://github.com/BurntSushi/ripgrep), built as a [Datasette](https://datasette.io/) plugin
## Demo
Try this plugin out at https://ripgrep.datasette.io/-/ripgrep - where you can run regular expression searches across the source code of Datasette and all of the `datasette-*` plugins belonging to the [simonw GitHub user](https://github.com/simonw).
Some example searches:
- [with.\*AsyncClient](https://ripgrep.datasette.io/-/ripgrep?pattern=with.*AsyncClient) - regular expression search for `with.*AsyncClient`
- [.plugin_config, literal=on](https://ripgrep.datasette.io/-/ripgrep?pattern=.plugin_config\(&literal=on) - a non-regular expression search for `.plugin_config(`
- [with.\*AsyncClient glob=datasette/\*\*](https://ripgrep.datasette.io/-/ripgrep?pattern=with.*AsyncClient&glob=datasette%2F%2A%2A) - search for that pattern only within the `datasette/` top folder
- [""sqlite-utils\["">\] glob=setup.py](https://ripgrep.datasette.io/-/ripgrep?pattern=%22sqlite-utils%5B%22%3E%5D&glob=setup.py) - a regular expression search for packages that depend on either `sqlite-utils` or `sqlite-utils>=some-version`
- [test glob=!\*.html](https://ripgrep.datasette.io/-/ripgrep?pattern=test&glob=%21*.html) - search for the string `test` but exclude results in HTML files
## Installation
Install this plugin in the same environment as Datasette.
$ datasette install datasette-ripgrep
The `rg` executable needs to be [installed](https://github.com/BurntSushi/ripgrep/blob/master/README.md#installation) such that it can be run by this tool.
## Usage
This plugin requires configuration: it needs to a `path` setting so that it knows where to run searches.
Create a `metadata.json` file that looks like this:
```json
{
""plugins"": {
""datasette-ripgrep"": {
""path"": ""/path/to/your/files""
}
}
}
```
Now run Datasette using `datasette -m metadata.json`. The plugin will add an interface at `/-/ripgrep` for running searches.
## Plugin configuration
The `""path""` configuration is required. Optional extra configuration options are:
- `time_limit` - floating point number. The `rg` process will be terminated if it takes longer than this limit. The default is one second, `1.0`.
- `max_lines` - integer. The `rg` process will be terminated if it returns more than this number of lines. The default is `2000`.
## Development
To set up this plugin locally, first checkout the code. Then create a new virtual environment:
cd datasette-ripgrep
python3 -mvenv venv
source venv/bin/activate
Or if you are using `pipenv`:
pipenv shell
Now install the dependencies and tests:
pip install -e '.[test]'
To run the tests:
pytest
",Simon Willison,,text/markdown,https://github.com/simonw/datasette-ripgrep,,"Apache License, Version 2.0",,,https://pypi.org/project/datasette-ripgrep/,,https://pypi.org/project/datasette-ripgrep/,"{""CI"": ""https://github.com/simonw/datasette-ripgrep/actions"", ""Changelog"": ""https://github.com/simonw/datasette-ripgrep/releases"", ""Homepage"": ""https://github.com/simonw/datasette-ripgrep"", ""Issues"": ""https://github.com/simonw/datasette-ripgrep/issues""}",https://pypi.org/project/datasette-ripgrep/0.7/,"[""datasette"", ""pytest ; extra == 'test'"", ""pytest-asyncio ; extra == 'test'"", ""httpx ; extra == 'test'""]",>=3.6,0.7,0,
datasette-rure,Datasette plugin that adds a custom SQL function for executing matches using the Rust regular expression engine,[],"# datasette-rure
[](https://pypi.org/project/datasette-rure/)
[](https://circleci.com/gh/simonw/datasette-rure)
[](https://github.com/simonw/datasette-rure/blob/master/LICENSE)
Datasette plugin that adds a custom SQL function for executing matches using the Rust regular expression engine
Install this plugin in the same environment as Datasette to enable the `regexp()` SQL function.
$ pip install datasette-rure
The plugin is built on top of the [rure-python](https://github.com/davidblewett/rure-python) library by David Blewett.
## regexp() to test regular expressions
You can test if a value matches a regular expression like this:
select regexp('hi.*there', 'hi there')
-- returns 1
select regexp('not.*there', 'hi there')
-- returns 0
You can also use SQLite's custom syntax to run matches:
select 'hi there' REGEXP 'hi.*there'
-- returns 1
This means you can select rows based on regular expression matches - for example, to select every article where the title begins with an E or an F:
select * from articles where title REGEXP '^[EF]'
Try this out: [REGEXP interactive demo](https://datasette-rure-demo.datasette.io/24ways?sql=select+*+from+articles+where+title+REGEXP+%27%5E%5BEF%5D%27)
## regexp_match() to extract groups
You can extract captured subsets of a pattern using `regexp_match()`.
select regexp_match('.*( and .*)', title) as n from articles where n is not null
-- Returns the ' and X' component of any matching titles, e.g.
-- and Recognition
-- and Transitions Their Place
-- etc
This will return the first parenthesis match when called with two arguments. You can call it with three arguments to indicate which match you would like to extract:
select regexp_match('.*(and)(.*)', title, 2) as n from articles where n is not null
The function will return `null` for invalid inputs e.g. a pattern without capture groups.
Try this out: [regexp_match() interactive demo](https://datasette-rure-demo.datasette.io/24ways?sql=select+%27WHY+%27+%7C%7C+regexp_match%28%27Why+%28.*%29%27%2C+title%29+as+t+from+articles+where+t+is+not+null)
## regexp_matches() to extract multiple matches at once
The `regexp_matches()` function can be used to extract multiple patterns from a single string. The result is returned as a JSON array, which can then be further processed using SQLite's [JSON functions](https://www.sqlite.org/json1.html).
The first argument is a regular expression with named capture groups. The second argument is the string to be matched.
select regexp_matches(
'hello (?P\w+) the (?P\w+)',
'hello bob the dog, hello maggie the cat, hello tarquin the otter'
)
This will return a list of JSON objects, each one representing the named captures from the original regular expression:
[
{""name"": ""bob"", ""species"": ""dog""},
{""name"": ""maggie"", ""species"": ""cat""},
{""name"": ""tarquin"", ""species"": ""otter""}
]
Try this out: [regexp_matches() interactive demo](https://datasette-rure-demo.datasette.io/24ways?sql=select+regexp_matches%28%0D%0A++++%27hello+%28%3FP%3Cname%3E%5Cw%2B%29+the+%28%3FP%3Cspecies%3E%5Cw%2B%29%27%2C%0D%0A++++%27hello+bob+the+dog%2C+hello+maggie+the+cat%2C+hello+tarquin+the+otter%27%0D%0A%29)
",Simon Willison,,text/markdown,https://github.com/simonw/datasette-rure,,"Apache License, Version 2.0",,,https://pypi.org/project/datasette-rure/,,https://pypi.org/project/datasette-rure/,"{""Homepage"": ""https://github.com/simonw/datasette-rure""}",https://pypi.org/project/datasette-rure/0.3/,"[""datasette"", ""rure"", ""pytest ; extra == 'test'""]",,0.3,0,
datasette-sandstorm-support,Authentication and permissions for Datasette on Sandstorm,"[""Framework :: Datasette"", ""License :: OSI Approved :: Apache Software License""]","# datasette-sandstorm-support
[](https://pypi.org/project/datasette-sandstorm-support/)
[](https://github.com/simonw/datasette-sandstorm-support/releases)
[](https://github.com/simonw/datasette-sandstorm-support/actions?query=workflow%3ATest)
[](https://github.com/simonw/datasette-sandstorm-support/blob/main/LICENSE)
Authentication and permissions for Datasette on Sandstorm
## Installation
Install this plugin in the same environment as Datasette.
datasette install datasette-sandstorm-support
## Usage
This plugin is part of [datasette-sandstorm](https://github.com/ocdtrekkie/datasette-sandstorm).
## Development
To set up this plugin locally, first checkout the code. Then create a new virtual environment:
cd datasette-sandstorm-support
python3 -m venv venv
source venv/bin/activate
Now install the dependencies and test dependencies:
pip install -e '.[test]'
To run the tests:
pytest
",Simon Willison,,text/markdown,https://github.com/simonw/datasette-sandstorm-support,,"Apache License, Version 2.0",,,https://pypi.org/project/datasette-sandstorm-support/,,https://pypi.org/project/datasette-sandstorm-support/,"{""CI"": ""https://github.com/simonw/datasette-sandstorm-support/actions"", ""Changelog"": ""https://github.com/simonw/datasette-sandstorm-support/releases"", ""Homepage"": ""https://github.com/simonw/datasette-sandstorm-support"", ""Issues"": ""https://github.com/simonw/datasette-sandstorm-support/issues""}",https://pypi.org/project/datasette-sandstorm-support/0.2/,"[""datasette"", ""pytest ; extra == 'test'"", ""pytest-asyncio ; extra == 'test'""]",>=3.7,0.2,0,
datasette-saved-queries,Datasette plugin that lets users save and execute queries,[],"# datasette-saved-queries
[](https://pypi.org/project/datasette-saved-queries/)
[](https://github.com/simonw/datasette-saved-queries/releases)
[](https://github.com/simonw/datasette-saved-queries/blob/master/LICENSE)
Datasette plugin that lets users save and execute queries
## Installation
Install this plugin in the same environment as Datasette.
$ pip install datasette-saved-queries
## Usage
When the plugin is installed Datasette will automatically create a `saved_queries` table in the first connected database when it starts up.
It also creates a `save_query` writable canned query which you can use to save new queries.
Queries that you save will be added to the query list on the database page.
## Development
To set up this plugin locally, first checkout the code. Then create a new virtual environment:
cd datasette-saved-queries
python -mvenv venv
source venv/bin/activate
Or if you are using `pipenv`:
pipenv shell
Now install the dependencies and tests:
pip install -e '.[test]'
To run the tests:
pytest
",Simon Willison,,text/markdown,https://github.com/simonw/datasette-saved-queries,,"Apache License, Version 2.0",,,https://pypi.org/project/datasette-saved-queries/,,https://pypi.org/project/datasette-saved-queries/,"{""CI"": ""https://github.com/simonw/datasette-saved-queries/actions"", ""Changelog"": ""https://github.com/simonw/datasette-saved-queries/releases"", ""Homepage"": ""https://github.com/simonw/datasette-saved-queries"", ""Issues"": ""https://github.com/simonw/datasette-saved-queries/issues""}",https://pypi.org/project/datasette-saved-queries/0.2.1/,"[""datasette (>=0.45)"", ""sqlite-utils"", ""pytest ; extra == 'test'"", ""pytest-asyncio ; extra == 'test'"", ""httpx ; extra == 'test'""]",,0.2.1,0,
datasette-scale-to-zero,Quit Datasette if it has not received traffic for a specified time period,"[""Framework :: Datasette"", ""License :: OSI Approved :: Apache Software License""]","# datasette-scale-to-zero
[](https://pypi.org/project/datasette-scale-to-zero/)
[](https://github.com/simonw/datasette-scale-to-zero/releases)
[](https://github.com/simonw/datasette-scale-to-zero/actions?query=workflow%3ATest)
[](https://github.com/simonw/datasette-scale-to-zero/blob/main/LICENSE)
Quit Datasette if it has not received traffic for a specified time period
Some hosting providers such as [Fly](https://fly.io/) offer a scale to zero mechanism, where servers can shut down and will be automatically started when new traffic arrives.
This plugin can be used to configure Datasette to quit X minutes (or seconds, or hours) after the last request it received. It can also cause the Datasette server to exit after a configured maximum time whether or not it is receiving traffic.
## Installation
Install this plugin in the same environment as Datasette.
datasette install datasette-scale-to-zero
## Configuration
This plugin will only take effect if it has been configured.
Add the following to your ``metadata.json`` or ``metadata.yml`` configuration file:
```json
{
""plugins"": {
""datasette-scale-to-zero"": {
""duration"": ""10m""
}
}
}
```
This will cause Datasette to quit if it has not received any HTTP traffic for 10 minutes.
You can set this value using a suffix of `m` for minutes, `h` for hours or `s` for seconds.
To cause Datasette to exit if the server has been running for longer than a specific time, use `""max-age""`:
```json
{
""plugins"": {
""datasette-scale-to-zero"": {
""max-age"": ""10h""
}
}
}
```
This example will exit the Datasette server if it has been running for more than ten hours.
You can use `""duration""` and `""max-age""` together in the same configuration file:
```json
{
""plugins"": {
""datasette-scale-to-zero"": {
""max-age"": ""10h"",
""duration"": ""5m""
}
}
}
```
This example will quit if no traffic has been received in five minutes, or if the server has been running for ten hours.
## Development
To set up this plugin locally, first checkout the code. Then create a new virtual environment:
cd datasette-scale-to-zero
python3 -m venv venv
source venv/bin/activate
Now install the dependencies and test dependencies:
pip install -e '.[test]'
To run the tests:
pytest
",Simon Willison,,text/markdown,https://github.com/simonw/datasette-scale-to-zero,,"Apache License, Version 2.0",,,https://pypi.org/project/datasette-scale-to-zero/,,https://pypi.org/project/datasette-scale-to-zero/,"{""CI"": ""https://github.com/simonw/datasette-scale-to-zero/actions"", ""Changelog"": ""https://github.com/simonw/datasette-scale-to-zero/releases"", ""Homepage"": ""https://github.com/simonw/datasette-scale-to-zero"", ""Issues"": ""https://github.com/simonw/datasette-scale-to-zero/issues""}",https://pypi.org/project/datasette-scale-to-zero/0.2/,"[""datasette"", ""pytest ; extra == 'test'"", ""pytest-asyncio ; extra == 'test'""]",>=3.7,0.2,0,
datasette-schema-versions,Datasette plugin that shows the schema version of every attached database,[],"# datasette-schema-versions
[](https://pypi.org/project/datasette-schema-versions/)
[](https://github.com/simonw/datasette-schema-versions/releases)
[](https://github.com/simonw/datasette-schema-versions/actions?query=workflow%3ATest)
[](https://github.com/simonw/datasette-schema-versions/blob/main/LICENSE)
Datasette plugin that shows the schema version of every attached database
## Installation
Install this plugin in the same environment as Datasette.
$ datasette install datasette-schema-versions
## Usage
Visit `/-/schema-versions` on your Datasette instance to see a numeric version for the schema for each of your databases.
Any changes you make to the schema will increase this version number.
",Simon Willison,,text/markdown,https://github.com/simonw/datasette-schema-versions,,"Apache License, Version 2.0",,,https://pypi.org/project/datasette-schema-versions/,,https://pypi.org/project/datasette-schema-versions/,"{""CI"": ""https://github.com/simonw/datasette-schema-versions/actions"", ""Changelog"": ""https://github.com/simonw/datasette-schema-versions/releases"", ""Homepage"": ""https://github.com/simonw/datasette-schema-versions"", ""Issues"": ""https://github.com/simonw/datasette-schema-versions/issues""}",https://pypi.org/project/datasette-schema-versions/0.2/,"[""datasette"", ""pytest ; extra == 'test'"", ""pytest-asyncio ; extra == 'test'"", ""httpx ; extra == 'test'"", ""sqlite-utils ; extra == 'test'""]",,0.2,0,
datasette-seaborn,Statistical visualizations for Datasette using Seaborn,[],"# datasette-seaborn
[](https://pypi.org/project/datasette-seaborn/)
[](https://github.com/simonw/datasette-seaborn/releases)
[](https://github.com/simonw/datasette-seaborn/actions?query=workflow%3ATest)
[](https://github.com/simonw/datasette-seaborn/blob/main/LICENSE)
Statistical visualizations for Datasette using Seaborn
## Installation
Install this plugin in the same environment as Datasette.
$ datasette install datasette-seaborn
## Usage
Navigate to the new `.seaborn` extension for any Datasette table.
The `_seaborn` argument specifies a method on `sns` to execute, e.g. `?_seaborn=relplot`.
Extra arguments to those methods can be specified using e.g. `&_seaborn_x=column_name`.
## Configuration
The plugin implements a default rendering time limit of five seconds. You can customize this limit using the `render_time_limit` setting, which accepts a floating point number of seconds. Add this to your `metadata.json`:
```json
{
""plugins"": {
""datasette-seaborn"": {
""render_time_limit"": 1.0
}
}
}
```
## Development
To set up this plugin locally, first checkout the code. Then create a new virtual environment:
cd datasette-seaborn
python3 -mvenv venv
source venv/bin/activate
Or if you are using `pipenv`:
pipenv shell
Now install the dependencies and tests:
pip install -e '.[test]'
To run the tests:
pytest
",Simon Willison,,text/markdown,https://github.com/simonw/datasette-seaborn,,"Apache License, Version 2.0",,,https://pypi.org/project/datasette-seaborn/,,https://pypi.org/project/datasette-seaborn/,"{""CI"": ""https://github.com/simonw/datasette-seaborn/actions"", ""Changelog"": ""https://github.com/simonw/datasette-seaborn/releases"", ""Homepage"": ""https://github.com/simonw/datasette-seaborn"", ""Issues"": ""https://github.com/simonw/datasette-seaborn/issues""}",https://pypi.org/project/datasette-seaborn/0.2a0/,"[""datasette (>=0.50)"", ""seaborn (>=0.11.0)"", ""pytest ; extra == 'test'"", ""pytest-asyncio ; extra == 'test'""]",,0.2a0,0,
datasette-search-all,Datasette plugin for searching all searchable tables at once,[],"# datasette-search-all
[](https://pypi.org/project/datasette-search-all/)
[](https://github.com/simonw/datasette-search-all/releases)
[](https://github.com/simonw/datasette-search-all/actions?query=workflow%3ATest)
[](https://github.com/simonw/datasette-search-all/blob/main/LICENSE)
Datasette plugin for searching all searchable tables at once.
## Installation
Install the plugin in the same Python environment as Datasette:
pip install datasette-search-all
## Background
See [datasette-search-all: a new plugin for searching multiple Datasette tables at once](https://simonwillison.net/2020/Mar/9/datasette-search-all/) for background on this project. You can try the plugin out at https://fara.datasettes.com/
## Usage
This plugin only works if at least one of the tables connected to your Datasette instance has been configured for SQLite's full-text search.
The [Datasette search documentation](https://docs.datasette.io/en/stable/full_text_search.html) includes details on how to enable full-text search for a table.
You can also use the following tools:
* [sqlite-utils](https://sqlite-utils.datasette.io/en/stable/cli.html#configuring-full-text-search) includes a command-line tool for enabling full-text search.
* [datasette-enable-fts](https://github.com/simonw/datasette-enable-fts) is a Datasette plugin that adds a web interface for enabling search for specific columns.
If the plugin detects at least one searchable table it will add a search form to the homepage.
You can also navigate to `/-/search` on your Datasette instance to use the search interface directly.
## Screenshot
",Simon Willison,,text/markdown,https://github.com/simonw/datasette-search-all,,"Apache License, Version 2.0",,,https://pypi.org/project/datasette-search-all/,,https://pypi.org/project/datasette-search-all/,"{""CI"": ""https://github.com/simonw/datasette-search-all/actions"", ""Changelog"": ""https://github.com/simonw/datasette-search-all/releases"", ""Homepage"": ""https://github.com/simonw/datasette-search-all"", ""Issues"": ""https://github.com/simonw/datasette-search-all/issues""}",https://pypi.org/project/datasette-search-all/1.1/,"[""datasette (>=0.61)"", ""pytest ; extra == 'test'"", ""pytest-asyncio ; extra == 'test'"", ""sqlite-utils ; extra == 'test'""]",>=3.7,1.1,0,
datasette-sentry,Datasette plugin for configuring Sentry,"[""License :: OSI Approved :: Apache Software License"", ""Programming Language :: Python :: 3.7"", ""Programming Language :: Python :: 3.8""]","# datasette-sentry
[](https://pypi.org/project/datasette-sentry/)
[](https://github.com/simonw/datasette-sentry/releases)
[](https://github.com/simonw/datasette-sentry/actions?query=workflow%3ATest)
[](https://github.com/simonw/datasette-sentry/blob/main/LICENSE)
Datasette plugin for configuring Sentry for error reporting
## Installation
pip install datasette-sentry
## Usage
This plugin only takes effect if your `metadata.json` file contains relevant top-level plugin configuration in a `""datasette-sentry""` configuration key.
You will need a Sentry DSN - see their [Getting Started instructions](https://docs.sentry.io/error-reporting/quickstart/?platform=python).
Add it to `metadata.json` like this:
```json
{
""plugins"": {
""datasette-sentry"": {
""dsn"": ""https://KEY@sentry.io/PROJECTID""
}
}
}
```
Settings in `metadata.json` are visible to anyone who visits the `/-/metadata` URL so this is a good place to take advantage of Datasette's [secret configuration values](https://datasette.readthedocs.io/en/stable/plugins.html#secret-configuration-values), in which case your configuration will look more like this:
```json
{
""plugins"": {
""datasette-sentry"": {
""dsn"": {
""$env"": ""SENTRY_DSN""
}
}
}
}
```
Then make a `SENTRY_DSN` environment variable available to Datasette.
## Configuration
In addition to the `dsn` setting, you can also configure the Sentry [sample rate](https://docs.sentry.io/platforms/python/configuration/sampling/) by setting `sample_rate` to a floating point number between 0 and 1.
For example, to capture 25% of errors you would do this:
```json
{
""plugins"": {
""datasette-sentry"": {
""dsn"": {
""$env"": ""SENTRY_DSN""
},
""sample_rate"": 0.25
}
}
}
```
",Simon Willison,,text/markdown,https://github.com/simonw/datasette-sentry,,"Apache License, Version 2.0",,,https://pypi.org/project/datasette-sentry/,,https://pypi.org/project/datasette-sentry/,"{""Homepage"": ""https://github.com/simonw/datasette-sentry""}",https://pypi.org/project/datasette-sentry/0.3/,"[""sentry-sdk"", ""datasette (>=0.62)"", ""pytest ; extra == 'test'"", ""pytest-asyncio ; extra == 'test'""]",,0.3,0,
datasette-show-errors,Datasette plugin for displaying error tracebacks,[],"# datasette-show-errors
[](https://pypi.org/project/datasette-show-errors/)
[](https://circleci.com/gh/simonw/datasette-show-errors)
[](https://github.com/simonw/datasette-show-errors/blob/master/LICENSE)
Datasette plugin for displaying error tracebacks.
## Installation
pip install datasette-show-errors
## Usage
Installing the plugin will cause any internal error to be displayed with a full traceback, rather than just a generic 500 page.
Be careful not to use this in a context that might expose sensitive information.
",Simon Willison,,text/markdown,https://github.com/simonw/datasette-show-errors,,"Apache License, Version 2.0",,,https://pypi.org/project/datasette-show-errors/,,https://pypi.org/project/datasette-show-errors/,"{""Homepage"": ""https://github.com/simonw/datasette-show-errors""}",https://pypi.org/project/datasette-show-errors/0.2/,"[""starlette"", ""datasette"", ""pytest ; extra == 'test'""]",,0.2,0,
datasette-sitemap,Generate sitemap.xml for Datasette sites,"[""Framework :: Datasette"", ""License :: OSI Approved :: Apache Software License""]","# datasette-sitemap
[](https://pypi.org/project/datasette-sitemap/)
[](https://github.com/simonw/datasette-sitemap/releases)
[](https://github.com/simonw/datasette-sitemap/actions?query=workflow%3ATest)
[](https://github.com/simonw/datasette-sitemap/blob/main/LICENSE)
Generate sitemap.xml for Datasette sites
## Installation
Install this plugin in the same environment as Datasette.
datasette install datasette-sitemap
## Demo
This plugin is used for the sitemap on [til.simonwillison.net](https://til.simonwillison.net/):
- https://til.simonwillison.net/sitemap.xml
Here's [the configuration](https://github.com/simonw/til/blob/d4f67743a90a67100b46145986b2dec6f8d96583/metadata.yaml#L14-L16) used for that sitemap.
## Usage
Once configured, this plugin adds a sitemap at `/sitemap.xml` with a list of URLs.
This list is defined using a SQL query in `metadata.json` (or `.yml`) that looks like this:
```json
{
""plugins"": {
""datasette-sitemap"": {
""query"": ""select '/' || id as path from my_table""
}
}
}
```
Using `metadata.yml` allows for multi-line SQL queries which can be easier to maintain:
```yaml
plugins:
datasette-sitemap:
query: |
select
'/' || id as path
from
my_table
```
The SQL query must return a column called `path`. The values in this column must begin with a `/`. They will be used to generate a sitemap that looks like this:
```xml
https://example.com/1 https://example.com/2
```
You can use ``UNION`` in your SQL query to combine results from multiple tables, or include literal paths that you want to include in the index:
```sql
select
'/data/table1/' || id as path
from table1
union
select
'/data/table2/' || id as path
from table2
union
select
'/about' as path
```
If your Datasette instance has multiple databases you can configure the database to query using the `database` configuration property.
By default the domain name for the genearted URLs in the sitemap will be detected from the incoming request.
You can set `base_url` instead to override this. This should not include a trailing slash.
This example shows both of those settings, running the query against the `content` database and setting a custom base URL:
```yaml
plugins:
datasette-sitemap:
query: |
select '/plugins/' || name as path from plugins
union
select '/tools/' || name as path from tools
union
select '/news' as path
database: content
base_url: https://datasette.io
```
[Try that query](https://datasette.io/content?sql=select+%27%2Fplugins%2F%27+||+name+as+path+from+plugins%0D%0Aunion%0D%0Aselect+%27%2Ftools%2F%27+||+name+as+path+from+tools%0D%0Aunion%0D%0Aselect+%27%2Fnews%27+as+path%0D%0A).
## robots.txt
This plugin adds a `robots.txt` file pointing to the sitemap:
```
Sitemap: http://example.com/sitemap.xml
```
You can take full control of the sitemap by installing and configuring the [datasette-block-robots](https://datasette.io/plugins/datasette-block-robots) plugin.
This plugin will add the `Sitemap:` line even if you are using `datasette-block-robots` for the rest of your `robots.txt` file.
## Adding paths to the sitemap from other plugins
This plugin adds a new [plugin hook](https://docs.datasette.io/en/stable/plugin_hooks.html) to Datasete called `sitemap_extra_paths()` which can be used by other plugins to add their own additional lines to the `sitemap.xml` file.
The hook accepts these optional parameters:
- `datasette`: The current [Datasette instance](https://docs.datasette.io/en/stable/internals.html#datasette-class). You can use this to execute SQL queries or read plugin configuration settings.
- `request`: The [Request object](https://docs.datasette.io/en/stable/internals.html#request-object) representing the incoming request to `/sitemap.xml`.
The hook should return a list of strings, each representing a path to be added to the sitemap. Each path must begin with a `/`.
It can also return an `async def` function, which will be awaited and used to generate a list of lines. Use this option if you need to make `await` calls inside you hook implementation.
This example uses the hook to add two extra paths, one of which came from a SQL query:
```python
from datasette import hookimpl
@hookimpl
def sitemap_extra_paths(datasette):
async def inner():
db = datasette.get_database()
path_from_db = (await db.execute(""select '/example'"")).single_value()
return [""/about"", path_from_db]
return inner
```
## Development
To set up this plugin locally, first checkout the code. Then create a new virtual environment:
cd datasette-sitemap
python3 -m venv venv
source venv/bin/activate
Now install the dependencies and test dependencies:
pip install -e '.[test]'
To run the tests:
pytest
",Simon Willison,,text/markdown,https://github.com/simonw/datasette-sitemap,,"Apache License, Version 2.0",,,https://pypi.org/project/datasette-sitemap/,,https://pypi.org/project/datasette-sitemap/,"{""CI"": ""https://github.com/simonw/datasette-sitemap/actions"", ""Changelog"": ""https://github.com/simonw/datasette-sitemap/releases"", ""Homepage"": ""https://github.com/simonw/datasette-sitemap"", ""Issues"": ""https://github.com/simonw/datasette-sitemap/issues""}",https://pypi.org/project/datasette-sitemap/1.0/,"[""datasette"", ""pytest ; extra == 'test'"", ""pytest-asyncio ; extra == 'test'"", ""datasette-block-robots ; extra == 'test'""]",>=3.7,1.0,0,
datasette-socrata,Import data from Socrata into Datasette,"[""Framework :: Datasette"", ""License :: OSI Approved :: Apache Software License""]","# datasette-socrata
[](https://pypi.org/project/datasette-socrata/)
[](https://github.com/simonw/datasette-socrata/releases)
[](https://github.com/simonw/datasette-socrata/actions?query=workflow%3ATest)
[](https://github.com/simonw/datasette-socrata/blob/main/LICENSE)
Import data from Socrata into Datasette
## Installation
Install this plugin in the same environment as Datasette.
datasette install datasette-socrata
## Usage
Make sure you have [enabled WAL mode](https://til.simonwillison.net/sqlite/enabling-wal-mode) on your database files before using this plugin.
Once installed, an interface for importing data from Socrata will become available at this URL:
/-/import-socrata
Users will be able to paste in a URL to a dataset on Socrata in order to initialize an import.
You can also pre-fill the form by passing a `?url=` parameter, for example:
/-/import-socrata?url=https://data.sfgov.org/City-Infrastructure/Street-Tree-List/tkzw-k3nq
Any database that is attached to Datasette, is NOT loaded as immutable (with the `-i` option) and that has WAL mode enabled will be available for users to import data into.
The `import-socrata` permission governs access. By default the `root` actor (accessible using `datasette --root` to start Datasette) is granted that permission.
You can use permission plugins such as [datasette-permissions-sql](https://github.com/simonw/datasette-permissions-sql) to grant additional access to other users.
## Configuration
If you only want Socrata imports to be allowed to a specific database, you can configure that using plugin configration in `metadata.yml`:
```yaml
plugins:
datasette-socrata:
database: socrata
```
## Development
To set up this plugin locally, first checkout the code. Then create a new virtual environment:
cd datasette-socrata
python3 -m venv venv
source venv/bin/activate
Now install the dependencies and test dependencies:
pip install -e '.[test]'
To run the tests:
pytest
",Simon Willison,,text/markdown,https://github.com/simonw/datasette-socrata,,"Apache License, Version 2.0",,,https://pypi.org/project/datasette-socrata/,,https://pypi.org/project/datasette-socrata/,"{""CI"": ""https://github.com/simonw/datasette-socrata/actions"", ""Changelog"": ""https://github.com/simonw/datasette-socrata/releases"", ""Homepage"": ""https://github.com/simonw/datasette-socrata"", ""Issues"": ""https://github.com/simonw/datasette-socrata/issues""}",https://pypi.org/project/datasette-socrata/0.3/,"[""datasette"", ""sqlite-utils (>=3.27)"", ""datasette-low-disk-space-hook"", ""pytest ; extra == 'test'"", ""pytest-asyncio ; extra == 'test'"", ""pytest-httpx ; extra == 'test'""]",>=3.7,0.3,0,
datasette-sqlite-fts4,Datasette plugin exposing SQL functions from sqlite-fts4,"[""Framework :: Datasette"", ""License :: OSI Approved :: Apache Software License""]","# datasette-sqlite-fts4
[](https://pypi.org/project/datasette-sqlite-fts4/)
[](https://github.com/simonw/datasette-sqlite-fts4/releases)
[](https://github.com/simonw/datasette-sqlite-fts4/actions?query=workflow%3ATest)
[](https://github.com/simonw/datasette-sqlite-fts4/blob/main/LICENSE)
Datasette plugin that exposes the custom SQL functions from [sqlite-fts4](https://github.com/simonw/sqlite-fts4).
[Interactive demo](https://datasette-sqlite-fts4.datasette.io/24ways-fts4?sql=select%0D%0A++++json_object%28%0D%0A++++++++""label""%2C+articles.title%2C+""href""%2C+articles.url%0D%0A++++%29+as+article%2C%0D%0A++++articles.author%2C%0D%0A++++rank_score%28matchinfo%28articles_fts%2C+""pcx""%29%29+as+score%2C%0D%0A++++rank_bm25%28matchinfo%28articles_fts%2C+""pcnalx""%29%29+as+bm25%2C%0D%0A++++json_object%28%0D%0A++++++++""pre""%2C+annotate_matchinfo%28matchinfo%28articles_fts%2C+""pcxnalyb""%29%2C+""pcxnalyb""%29%0D%0A++++%29+as+annotated_matchinfo%2C%0D%0A++++matchinfo%28articles_fts%2C+""pcxnalyb""%29+as+matchinfo%2C%0D%0A++++decode_matchinfo%28matchinfo%28articles_fts%2C+""pcxnalyb""%29%29+as+decoded_matchinfo%0D%0Afrom%0D%0A++++articles_fts+join+articles+on+articles.rowid+%3D+articles_fts.rowid%0D%0Awhere%0D%0A++++articles_fts+match+%3Asearch%0D%0Aorder+by+bm25&search=jquery+maps). Read [Exploring search relevance algorithms with SQLite](https://simonwillison.net/2019/Jan/7/exploring-search-relevance-algorithms-sqlite/) for further details on this project.
## Installation
pip install datasette-sqlite-fts4
If you are deploying a database using `datasette publish` you can include this plugin using the `--install` option:
datasette publish now mydb.db --install=datasette-sqlite-fts4
",Simon Willison,,text/markdown,https://github.com/simonw/datasette-sqlite-fts4,,"Apache License, Version 2.0",,,https://pypi.org/project/datasette-sqlite-fts4/,,https://pypi.org/project/datasette-sqlite-fts4/,"{""CI"": ""https://github.com/simonw/datasette-sqlite-fts4/actions"", ""Changelog"": ""https://github.com/simonw/datasette-sqlite-fts4/releases"", ""Homepage"": ""https://github.com/simonw/datasette-sqlite-fts4"", ""Issues"": ""https://github.com/simonw/datasette-sqlite-fts4/issues""}",https://pypi.org/project/datasette-sqlite-fts4/0.3.2/,"[""datasette"", ""sqlite-fts4 (>=1.0.3)"", ""pytest ; extra == 'test'"", ""pytest-asyncio ; extra == 'test'""]",>=3.7,0.3.2,0,
datasette-template-request,Expose the Datasette request object to custom templates,[],"# datasette-template-request
[](https://pypi.org/project/datasette-template-request/)
[](https://github.com/simonw/datasette-template-request/releases)
[](https://github.com/simonw/datasette-template-request/actions?query=workflow%3ATest)
[](https://github.com/simonw/datasette-template-request/blob/main/LICENSE)
Expose the Datasette request object to custom templates
## Installation
Install this plugin in the same environment as Datasette.
$ datasette install datasette-template-request
## Usage
Once this plugin is installed, Datasette [custom templates](https://docs.datasette.io/en/stable/custom_templates.html) can use `{{ request }}` to access the current [request object](https://docs.datasette.io/en/stable/internals.html#request-object). For example, to access `?name=Cleo` in the query string a template could use this:
Name: {{ request.args.name }}
## Development
To set up this plugin locally, first checkout the code. Then create a new virtual environment:
cd datasette-template-request
python3 -mvenv venv
source venv/bin/activate
Or if you are using `pipenv`:
pipenv shell
Now install the dependencies and test dependencies:
pip install -e '.[test]'
To run the tests:
pytest
",Simon Willison,,text/markdown,https://github.com/simonw/datasette-template-request,,"Apache License, Version 2.0",,,https://pypi.org/project/datasette-template-request/,,https://pypi.org/project/datasette-template-request/,"{""CI"": ""https://github.com/simonw/datasette-template-request/actions"", ""Changelog"": ""https://github.com/simonw/datasette-template-request/releases"", ""Homepage"": ""https://github.com/simonw/datasette-template-request"", ""Issues"": ""https://github.com/simonw/datasette-template-request/issues""}",https://pypi.org/project/datasette-template-request/0.1/,"[""datasette"", ""pytest ; extra == 'test'"", ""pytest-asyncio ; extra == 'test'""]",>=3.6,0.1,0,
datasette-template-sql,Datasette plugin for executing SQL queries from templates,[],"# datasette-template-sql
[](https://pypi.org/project/datasette-template-sql/)
[](https://github.com/simonw/datasette-template-sql/releases)
[](https://github.com/simonw/datasette-template-sql/actions?query=workflow%3ATest)
[](https://github.com/simonw/datasette-template-sql/blob/main/LICENSE)
Datasette plugin for executing SQL queries from templates.
## Examples
[www.niche-museums.com](https://www.niche-museums.com/) uses this plugin to run a custom themed website on top of Datasette. The full source code for the site [is here](https://github.com/simonw/museums) - see also [niche-museums.com, powered by Datasette](https://simonwillison.net/2019/Nov/25/niche-museums/).
[simonw/til](https://github.com/simonw/til) is another simple example, described in [Using a self-rewriting README powered by GitHub Actions to track TILs](https://simonwillison.net/2020/Apr/20/self-rewriting-readme/).
## Installation
Run this command to install the plugin in the same environment as Datasette:
$ pip install datasette-template-sql
## Usage
This plugin makes a new function, `sql(sql_query)`, available to your Datasette templates.
You can use it like this:
```html+jinja
{% for row in sql(""select 1 + 1 as two, 2 * 4 as eight"") %}
{% for key in row.keys() %}
{{ key }}: {{ row[key] }}
{% endfor %}
{% endfor %}
```
The plugin will execute SQL against the current database for the page in `database.html`, `table.html` and `row.html` templates. If a template does not have a current database (`index.html` for example) the query will execute against the first attached database.
### Queries with arguments
You can construct a SQL query using `?` or `:name` parameter syntax by passing a list or dictionary as a second argument:
```html+jinja
{% for row in sql(""select distinct topic from til order by topic"") %}
{{ row.topic }}
{% for til in sql(""select * from til where topic = ?"", [row.topic]) %}
- {{ til.title }} - {{ til.created[:10] }}
{% endfor %}
{% endfor %}
```
Here's the same example using the `:topic` style of parameters:
```html+jinja
{% for row in sql(""select distinct topic from til order by topic"") %}
{{ row.topic }}
{% for til in sql(""select * from til where topic = :topic"", {""topic"": row.topic}) %}
- {{ til.title }} - {{ til.created[:10] }}
{% endfor %}
{% endfor %}
```
### Querying a different database
You can pass an optional `database=` argument to specify a named database to use for the query. For example, if you have attached a `news.db` database you could use this:
```html+jinja
{% for article in sql(
""select headline, date, summary from articles order by date desc limit 5"",
database=""news""
) %}
{{ article.headline }}
{{ article.date }}
{{ article.summary }}
{% endfor %}
```
",Simon Willison,,text/markdown,https://github.com/simonw/datasette-template-sql,,"Apache License, Version 2.0",,,https://pypi.org/project/datasette-template-sql/,,https://pypi.org/project/datasette-template-sql/,"{""CI"": ""https://github.com/simonw/datasette-template-sql/actions"", ""Changelog"": ""https://github.com/simonw/datasette-template-sql/releases"", ""Homepage"": ""https://github.com/simonw/datasette-template-sql"", ""Issues"": ""https://github.com/simonw/datasette-template-sql/issues""}",https://pypi.org/project/datasette-template-sql/1.0.2/,"[""datasette (>=0.54)"", ""pytest ; extra == 'test'"", ""pytest-asyncio ; extra == 'test'"", ""sqlite-utils ; extra == 'test'""]",>=3.6,1.0.2,0,
datasette-tiddlywiki,Run TiddlyWiki in Datasette and save Tiddlers to a SQLite database,"[""Framework :: Datasette"", ""License :: OSI Approved :: Apache Software License""]","# datasette-tiddlywiki
[](https://pypi.org/project/datasette-tiddlywiki/)
[](https://github.com/simonw/datasette-tiddlywiki/releases)
[](https://github.com/simonw/datasette-tiddlywiki/actions?query=workflow%3ATest)
[](https://github.com/simonw/datasette-tiddlywiki/blob/main/LICENSE)
Run [TiddlyWiki](https://tiddlywiki.com/) in Datasette and save Tiddlers to a SQLite database
## Installation
Install this plugin in the same environment as Datasette.
$ datasette install datasette-tiddlywiki
## Usage
Start Datasette with a `tiddlywiki.db` database. You can create it if it does not yet exist using `--create`.
You need to be signed in as the `root` user to write to the wiki, so use the `--root` option and click on the link it provides:
% datasette tiddlywiki.db --create --root
http://127.0.0.1:8001/-/auth-token?token=456670f1e8d01a8a33b71e17653130de17387336e29afcdfb4ab3d18261e6630
# ...
Navigate to `/-/tiddlywiki` on your instance to interact with TiddlyWiki.
## Authentication and permissions
By default, the wiki can be read by anyone who has permission to read the `tiddlywiki.db` database. Only the signed in `root` user can write to it.
You can sign in using the `--root` option described above, or you can set a password for that user using the [datasette-auth-passwords](https://datasette.io/plugins/datasette-auth-passwords) plugin and sign in using the `/-/login` page.
You can use the `edit-tiddlywiki` permission to grant edit permisions to other users, using another plugin such as [datasette-permissions-sql](https://datasette.io/plugins/datasette-permissions-sql).
You can use the `view-database` permission against the `tiddlywiki` database to control who can view the wiki.
Datasette's permissions mechanism is described in full in [the Datasette documentation](https://docs.datasette.io/en/stable/authentication.html).
## Development
To set up this plugin locally, first checkout the code. Then create a new virtual environment:
cd datasette-tiddlywiki
python3 -mvenv venv
source venv/bin/activate
Or if you are using `pipenv`:
pipenv shell
Now install the dependencies and test dependencies:
pip install -e '.[test]'
To run the tests:
pytest
",Simon Willison,,text/markdown,https://github.com/simonw/datasette-tiddlywiki,,"Apache License, Version 2.0",,,https://pypi.org/project/datasette-tiddlywiki/,,https://pypi.org/project/datasette-tiddlywiki/,"{""CI"": ""https://github.com/simonw/datasette-tiddlywiki/actions"", ""Changelog"": ""https://github.com/simonw/datasette-tiddlywiki/releases"", ""Homepage"": ""https://github.com/simonw/datasette-tiddlywiki"", ""Issues"": ""https://github.com/simonw/datasette-tiddlywiki/issues""}",https://pypi.org/project/datasette-tiddlywiki/0.2/,"[""datasette"", ""pytest ; extra == 'test'"", ""pytest-asyncio ; extra == 'test'""]",>=3.6,0.2,0,
datasette-tiles,"Mapping tile server for Datasette, serving tiles from MBTiles packages",[],"# datasette-tiles
[](https://pypi.org/project/datasette-tiles/)
[](https://github.com/simonw/datasette-tiles/releases)
[](https://github.com/simonw/datasette-tiles/actions?query=workflow%3ATest)
[](https://github.com/simonw/datasette-tiles/blob/main/LICENSE)
Datasette plugin for serving MBTiles map tiles
## Installation
Install this plugin in the same environment as Datasette.
$ datasette install datasette-tiles
## Demo
You can try this plugin out at https://datasette-tiles-demo.datasette.io/-/tiles
## Usage
This plugin scans all database files connected to Datasette to see if any of them are valid MBTiles databases.
It can then serve tiles from those databases at the following URL:
/-/tiles/db-name/zoom/x/y.png
An example map for each database demonstrating the configured minimum and maximum zoom for that database can be found at `/-/tiles/db-name` - this can also be accessed via the table and database action menus for that database.
Visit `/-/tiles` for an index page of attached valid databases.
You can install the [datasette-basemap](https://datasette.io/plugins/datasette-basemap) plugin to get a `basemap` default set of tiles, handling zoom levels 0 to 6 using OpenStreetMap.
### Tile coordinate systems
There are two tile coordinate systems in common use for online maps. The first is used by OpenStreetMap and Google Maps, the second is from a specification called [Tile Map Service](https://en.wikipedia.org/wiki/Tile_Map_Service), or TMS.
Both systems use three components: `z/x/y` - where `z` is the zoom level, `x` is the column and `y` is the row.
The difference is in the way the `y` value is counted. OpenStreetMap has y=0 at the top. TMS has y=0 at the bottom.
An illustrative example: at zoom level 2 the map is divided into 16 total tiles. The OpenStreetMap scheme numbers them like so:
0/0 1/0 2/0 3/0
0/1 1/1 2/1 3/1
0/2 1/2 2/2 3/2
0/3 1/3 2/3 3/3
The TMS scheme looks like this:
0/3 1/3 2/3 3/3
0/2 1/2 2/2 3/2
0/1 1/1 2/1 3/1
0/0 1/0 2/0 3/0
`datasette-tiles` can serve tiles using either of these standards. For the OpenStreetMap / Google Maps 0-at-the-top system, use the following URL:
/-/tiles/database-name/{z}/{x}/{y}.png
For the TMS 0-at-the-bottom system, use this:
/-/tiles-tms/database-name/{z}/{x}/{y}.png
### Configuring a Leaflet tile layer
The following JavaScript will configure a [Leaflet TileLayer](https://leafletjs.com/reference-1.7.1.html#tilelayer) for use with this plugin:
```javascript
var tiles = leaflet.tileLayer(""/-/tiles/basemap/{z}/{x}/{y}.png"", {
minZoom: 0,
maxZoom: 6,
attribution: ""\u00a9 OpenStreetMap contributors""
});
```
### Tile stacks
`datasette-tiles` can be configured to serve tiles from multiple attached MBTiles files, searching each database in order for a tile and falling back to the next in line if that tile is not found.
For a demo of this in action, visit https://datasette-tiles-demo.datasette.io/-/tiles-stack and zoom in on Japan. It should start showing [Stamen's Toner map](maps.stamen.com) of Japan once you get to zoom level 6 and 7.
The `/-/tiles-stack/{z}/{x}/{y}.png` endpoint provides this feature.
If you start Datasette like this:
datasette world.mbtiles country.mbtiles city1.mbtiles city2.mbtiles
Any requests for a tile from the `/-/tiles-stack` path will first check the `city2` database, than `city1`, then `country`, then `world`.
If you have the [datasette-basemap](https://datasette.io/plugins/datasette-basemap) plugin installed it will be given special treatment: the `basemap` database will always be the last database checked for a tile.
Rather than rely on the order in which databases were attached, you can instead configure an explicit order using the `tiles-stack-order` plugin setting. Add the following to your `metadata.json` file:
```json
{
""plugins"": {
""datasette-tiles"": {
""tiles-stack-order"": [""world"", ""country""]
}
}
}
```
You can then run Datasette like this:
datasette -m metadata.json country.mbtiles world.mbtiles
This endpoint serves tiles using the OpenStreetMap / Google Maps coordinate system. To load tiles using the TMS coordinate system use this endpoint instead:
/-/tiles-stack-tms/{z}/{x}/{y}.png
## Development
To set up this plugin locally, first checkout the code. Then create a new virtual environment:
cd datasette-tiles
python3 -mvenv venv
source venv/bin/activate
Or if you are using `pipenv`:
pipenv shell
Now install the dependencies and tests:
pip install -e '.[test]'
To run the tests:
pytest
",Simon Willison,,text/markdown,https://github.com/simonw/datasette-tiles,,"Apache License, Version 2.0",,,https://pypi.org/project/datasette-tiles/,,https://pypi.org/project/datasette-tiles/,"{""CI"": ""https://github.com/simonw/datasette-tiles/actions"", ""Changelpog"": ""https://github.com/simonw/datasette-tiles/releases"", ""Homepage"": ""https://github.com/simonw/datasette-tiles"", ""Issues"": ""https://github.com/simonw/datasette-tiles/issues""}",https://pypi.org/project/datasette-tiles/0.6.1/,"[""datasette"", ""datasette-leaflet (>=0.2.2)"", ""pytest ; extra == 'test'"", ""pytest-asyncio ; extra == 'test'"", ""datasette-basemap (>=0.2) ; extra == 'test'""]",>=3.6,0.6.1,0,
datasette-total-page-time,Add a note to the Datasette footer measuring the total page load time,"[""Framework :: Datasette"", ""License :: OSI Approved :: Apache Software License""]","# datasette-total-page-time
[](https://pypi.org/project/datasette-total-page-time/)
[](https://github.com/simonw/datasette-total-page-time/releases)
[](https://github.com/simonw/datasette-total-page-time/actions?query=workflow%3ATest)
[](https://github.com/simonw/datasette-total-page-time/blob/main/LICENSE)
Add a note to the Datasette footer measuring the total page load time
## Installation
Install this plugin in the same environment as Datasette.
datasette install datasette-total-page-time
## Usage
Once this plugin is installed, a note will appear in the footer of every page showing how long the page took to generate.
> Queries took 326.74ms · Page took 386.310ms
## How it works
Measuring how long a page takes to load and then injecting that note into the page is tricky, because you need to finish generating the page before you know how long it took to load it!
This plugin uses the [asgi_wrapper](https://docs.datasette.io/en/stable/plugin_hooks.html#asgi-wrapper-datasette) plugin hook to measure the time taken by Datasette and then inject the following JavaScript at the bottom of the response, after the closing `